Wednesday, March 5, 2014

Modeling the Prince: Part 2

Here are some photographs of the interior that is completely modeled, with the gauges, the throttle and the brakes.


This usually takes the most time to model for these large scale engines, but it is worth it! I used card-stock for all the parts, rolled up and glued into cylinders and decorated and detailed each for each part.


Pictured here are two scratch-built shovels! The handles are each toothpicks! The pail itself is paper.

Now Prince is finished. Posted soon will be photographs showing him in profile!

Sunday, February 23, 2014

Modeling the Prince: Part 1

In progress, the icon of the Ffestiniog Railway, The Prince! All of the body work is completed. I am going to try and describe his construction as I did with Rheneas, this blog's signature series of posts, all made possible by the grace and kindness of Greg Tiernan and Nitrogen Studios. 


Prince will be the main engine or character that will be taking the slate train from the quarry inclines to the harbor. As I have loved the Mid Sodor Railway, This line that belonged to Duck, Stuart and Falcon had inspired me to make a animation short of something real, showing the workings of a quarry, the railway and its engines that work there. Prince is famous and a well recognized engine as one of the oldest surviving roster of engines of this historic line, technically the first narrow gauge railroad in the world.

Prince and his railway will always be remembered and loved, and I hope that the fruit of all of the hard work I will put into this faithfully represents essence of the magic felt seeing these trains, the little toy trains of Wales working in the mountains of Snowdonia.

Drawing in graphite using a 0.7 technical pencil, measurements in centimeters, 16mm scale.

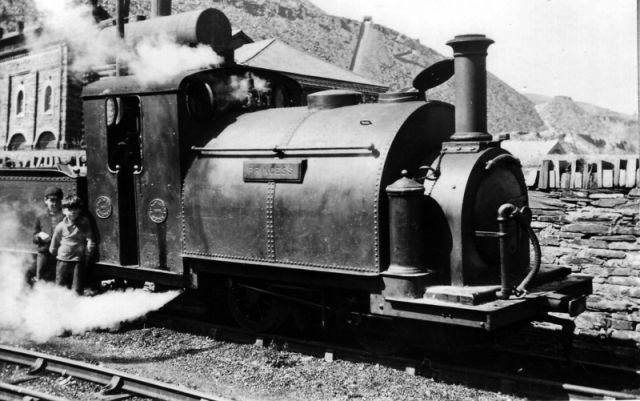
Prince's sister engine, Princess, at the Harbor Station at Blaenau in 1930, (www.festrail.co.uk)
While studying some amazing photographs found online, I wanted to make Prince exactly how he and his brothers and sisters on the Ffestiniog railway looked, from the 1900's until before World War II. I drew the sketch I shared from one of the previous posts to measure how I want Prince to look when he is made, with a side view and a front view. 
This is amazing because I really love drawing these blueprints, and I find that it pays off to measure out the shapes ahead of time. I am actually making a lot of these, for Rusty, Duncan, Peter Sam, and my buildings made from the past few months.


The cab, tanks, tender, and their details such as hand rails, are all made of card, braced with balsa wood, all glued together using white glue and crazy glue, with some scotch tape here and there! The tape was used to brace the tank and the smoke box together.

I use a Lego chassis to make each engine move, which allows each engine have interchangeable bodies when I want to make more engines, as I have two of these cool Lego motors!

I am planning on adding working coupling rods, so we'll see how that works!


I used spray primer to give Prince his color. First I was going to pick a color from my stack of textured card stock from Bazzill Basics, or paint it using Plaid Folk Art and Apple Barrel acrylics, but after using my spray paint primer, I liked the terracotta color it had, so it stuck.

The funnel is made from coiled strips of card glued together. The same technique was used to make the gold handrail supports on his tanks. The sides of the footplate is balsa, the bolts and details made by gluing strips of card together. When fully assembles this will be generously weathered for that extra bit of realism.

Here is the tender. Here the handrails are made from painted toothpicks!
To make the Lego wheels fit snugly underneath the chassis, I used balsa wood to brace them.
Here is the inside of the tender, which will be filled with coal later.

I am very happy with how good Prince looks. He has always been one of my favorite narrow gauge engines, and it feels wonderful to make him after practicing and using some new modeling techniques.

So far things are going on schedule. More photographs will follow soon.

"Slate Quarry:" A Short Film: Storyboards

Last semester in the fall, I created a storyboard project for my final assignment for Pre-Production, and here I am posting a few of my chosen panels to give you a rough idea of how I want the dioramas and the shows to look.

These are all drawn with Cole-erase pencils and graphite, on index cards. Now as a scale modeler, I do know that it takes a long time to model each diorama, and all of the elements that make it special, so while every single detail in these boards might not be covered immediately, it is something I will plan on making.

I hope you have enjoyed looking at these! Next time I will begin posting photographs of my models for progress.

"Slate Quarry:" Concept Drawings

Today I am going to start posting work I am creating for a short stop motion / live-action short film pitch for my Junior Animation Seminar. It's currently called "Slate Quarry." This is something very exciting and personal relating to British Narrow Gauge, from the inspiration I had from Thomas, that I believe you will enjoy. So here is the first post!

I am making models for this short I am just drafting for the future to make as I advance as an animator. The highlighted feature of the Ffestiniog Railway will bee the connection to the Slate mines of Dinorwic. I plan to show how the quarrys and inclines worked, and the journey the slate train makes from the mines to the harbor, where the slate is unloaded and shipped by sea or the river.

I have greatly appreciated your comments and words of encouragement for the past year, and for sharing your enthusiasm about Thomas and Model Railroading on YouTube. Thomas as you all know has been a huge inspiration for me. Often people on YouTube have said how much they look forward to seeing more of my own work. I have taken this very seriously, and for the work my school faculty have remembered me for was my scale modeling. So starting today I am going to share with you the model-making work I am doing for college class.


Let's get started!


This sketch shows the models I plan on making. I am going to model Prince! That is exciting because you know that this draws inspiration from Duke, Stuart, Falcon, and the Mid Sodor Railway, right? Well, this is the locomotive and the first model I've started working on which I will share later, so stay tuned for the coming weeks! There is also a little shunter, a classic Hunslit tank engine often built for British narrow gauge railways and industries.

I plan on modeling quarry wagons as you see here, with a slate load in each made of foam core. Also a guards van, this one based on those cool narrow gauge trains that would be loaded on standard gauge piggy-back wagons!

Then the quarry buildings, with a few open air-sheds I plan on using over and over again on different dioramas for different scenes.There is also the incline winding houses and side buildings, a water tower, lamps, posters, and maybe a station at the harbor quayside.


I've also tried sketching out how I want to make my dioramas, from the buildings to the scenic elements down tot he overgrowth, cargo and other bits and bobs lying next to them, the walls and bridge. These will all be modeled in card braced with balsa, and the stones for the quarry will be modeled with DAS modeling clay and foam core.


Now I know you will enjoy this! This is a blueprint I've made for prince, based on looking at some great photographs of him in the old days of the Ffestiniog railway. This drawing shows the locomotive measured in centimeters. This is the same deal as with the other narrow gauge engines in the past for Skarloey and Rheneas' line: it will be made out of cardstock, running on a Lego chassis, fully weathered, and spoiler alert: I've figured out how to make coupling rods for this engine!

I am really excited about this! I have shared it with my faculty, friends and fellow classmates for this class and they loved it! I believe you will too.

So be on the lookout for updates and progress, this is going to be a fun and exciting animation project!

Thursday, January 9, 2014

Tool Sheds #2: Platelayers Hut


A newly completed plate-layer's hut at Tidmoth's Shunting Yards! This was a nice building to make, taking only a day to construct it and weather it, with a few nice accessories to share for this post.


For this tool shed, I wanted to make a building that could add interest in the yard. In addition to  experimenting more with my mix of brick colors, and adding a sloped gable-overhang to the shingled roof, I wanted to make some eye-catching details. In these pictures, I added posters on the sides, one for a notice and a timetable, each with cream paper and hunter green trim. I have them attached with rolled scotch tape so I could rearrange them.


I am especially happy with making these scratch-built fire buckets! At yards and stations, they are full of ether sand or water to put out fires or for other emergencies. I rolled a thin strip of card-stock around a brush handle and glued it to make the side of the bucket, then glued on a thin strip for the lip of the bucket, and the handles. I also glued it on a strip of paper and cut it for the base.


Two of the buckets are hung onto the wall of the shed with painted toothpick ends. One of the separate buckets on the ground has its handles down, and for the other bucket, its handle is up for these workmen to use! 


For this shed, those red buckets and signs add a nice spark of color that can be pleasing to look at on the layout, and these small details give buildings their own character and charm.


Until next time!

Tuesday, January 7, 2014

Brendam Docks Layout Plans

These are some drawings of a layout for Brendam Docks! If I was to make a huge layout, for this section of Sodor, these are a few sections of how I would like to see Brendam Modeled.

Carefully observing how the scenes were filmed on the dioramas of Brendam for Thomas' TV Series in seasons 2 - 10, I tried combining them together into one whole section of the main port, where you can see Cranky, the Sidings, the Unloading Bays in front of the Sodor Shiping Co. Building, and even the Passenger Unloading Dock where Evening Star is a welcome visitor. There is also the Ballast Unloading Dock, with its nearby open air shed, factory buildings, The Supply Shed, and a few other sheds, one by the sidings, by Cranky, and at the end of the quay.

The whole site is dotted with cranes, cargo, and sidings. I have modeled a couple of versions of this location a few times, yet as I come back to the TV series, even the Railway Series, I find intriguing details and beautiful shots I can draw to remember for the next time I model a layout. That is the beauty of making temporary dioramas! You can change or redo any location.


I found some beautiful photographs of the Ramsgate Harbor Railway Station, and a few models of the terminus on flickr, I thought it would be nice to draw Brendam's Passenger Station, seen in a few shots from seasons 2 - 4, just made up of Knapford's building props. This drawing has platforms for buses to pick up and drop off passengers, many benches on the quay for the people to enjoy the ocean view while they wait, and of course a large glass roof. A beautiful scene showing one of the harbor's ferries could be seen in "Gordon and the Gremlin" in season 5, one of Fulton's Car Ferries.


Finally this drawing shows what I perceive to be East Brendam, where Bill and Ben's branchline from the China Clay works connect to the Docks. This layout plan displays many of the scenes shown in season 3, with its tall warehouses and quay, cranes, and canal boats, from "All At Sea" and other episodes with Bill and Ben.

These were fun to draw! I hope you like these. Even if I break them up into smaller, temporary dioramas for photographs and video, these scenes seem to me that they would be beautiful models.


 Click here to see how I made the scenes of Brendam

Friday, January 3, 2014

Tips for Realistic Track: #2: Overgrowth


Once I made a small diorama for an old disused branchline, and I used some materials I'd like to share for creating some really old and overgrown sections of track on your layout.

In this picture, every scenic element is actually loose, not permanent! I wanted to create this on a wooden board to see what the track would look like with different scenic materials. Dried sand is used with sifted dirt, rocks found out in the yard and on the driveway in various courses, and some sprinkled ground foam from Woodland Scenics. In the corners of the photo are small twigs, moss, and lichen. This was very beautiful for and old section of Toby's tramway, this track running from the mountains down to the marketplace in the village.

So if your diorama or railway layout is going to be temporary or permanent, as I have stressed before, it is a good idea to do a little research and study from life, from photographs online to other model railroaders and their work. This will help you achieve the look you want.

Here are some links to somevery useful and successful scenic products you might know:

Thursday, January 2, 2014

Tidmoth Goods Shed #3: Completion


Here is the completed goods shed! All finished and ready for service. For the structures in the yards at Tidmoth, this would be good for storing coaches or mail cars, or to fix the wagons needing repair. For this post, here are some more pics for you to see.


In this view, you can see the weathered windows, the semi-columns in relief, and even the drain pipes, made both from card and some wood skewers. I liked making this effect for the Walthers Warehouse, as it made the drain pipes three-dimensional. Strips of card wrap around the "tube" to fasten it to the roof.


Here is the completed glass roof, and a picture showing it under construction. I made it from the A-frames, and glued more strips of balsa to make the window panes. Then I glued the clear styrene for the glass, and built the metal roof around it.


On the other side is the blank wall, with a close up of the small spires on the gables for railway ornamentation. As I plant this shed in my scenes, I can add a lean-on or side buildings, or show it on a different side, so I could use it in more than one diorama.


Thomas and James are shown here for some shots of the interior. They look nice under the light that shines into the shed from the glass roof. So do the A-frames and roof supports.


 Overall this was a great project, and I was glad to make buildings again. Using the foam core made this structure stronger and gave it depth, and it was fun creating the gables and the glass roof. I think as I make more drawings, I'll post them for you, and some more of the photographs from the sets I made in my room as I created them. Feel free to leave comments!

Happy Modeling!