

This pair of Scottish Twins are still two of my favorite characters of the Thomas and Friends show. I was excited when Bachmann USA released them for Thomas fans and collectors to add for the HO scale layout, and after owning them for a few years now, I finally gave them a long overdue upgrade to make them more realistic and transform them to competent, good looking models. Here’s how I dit it!
1) First Pass of Changes

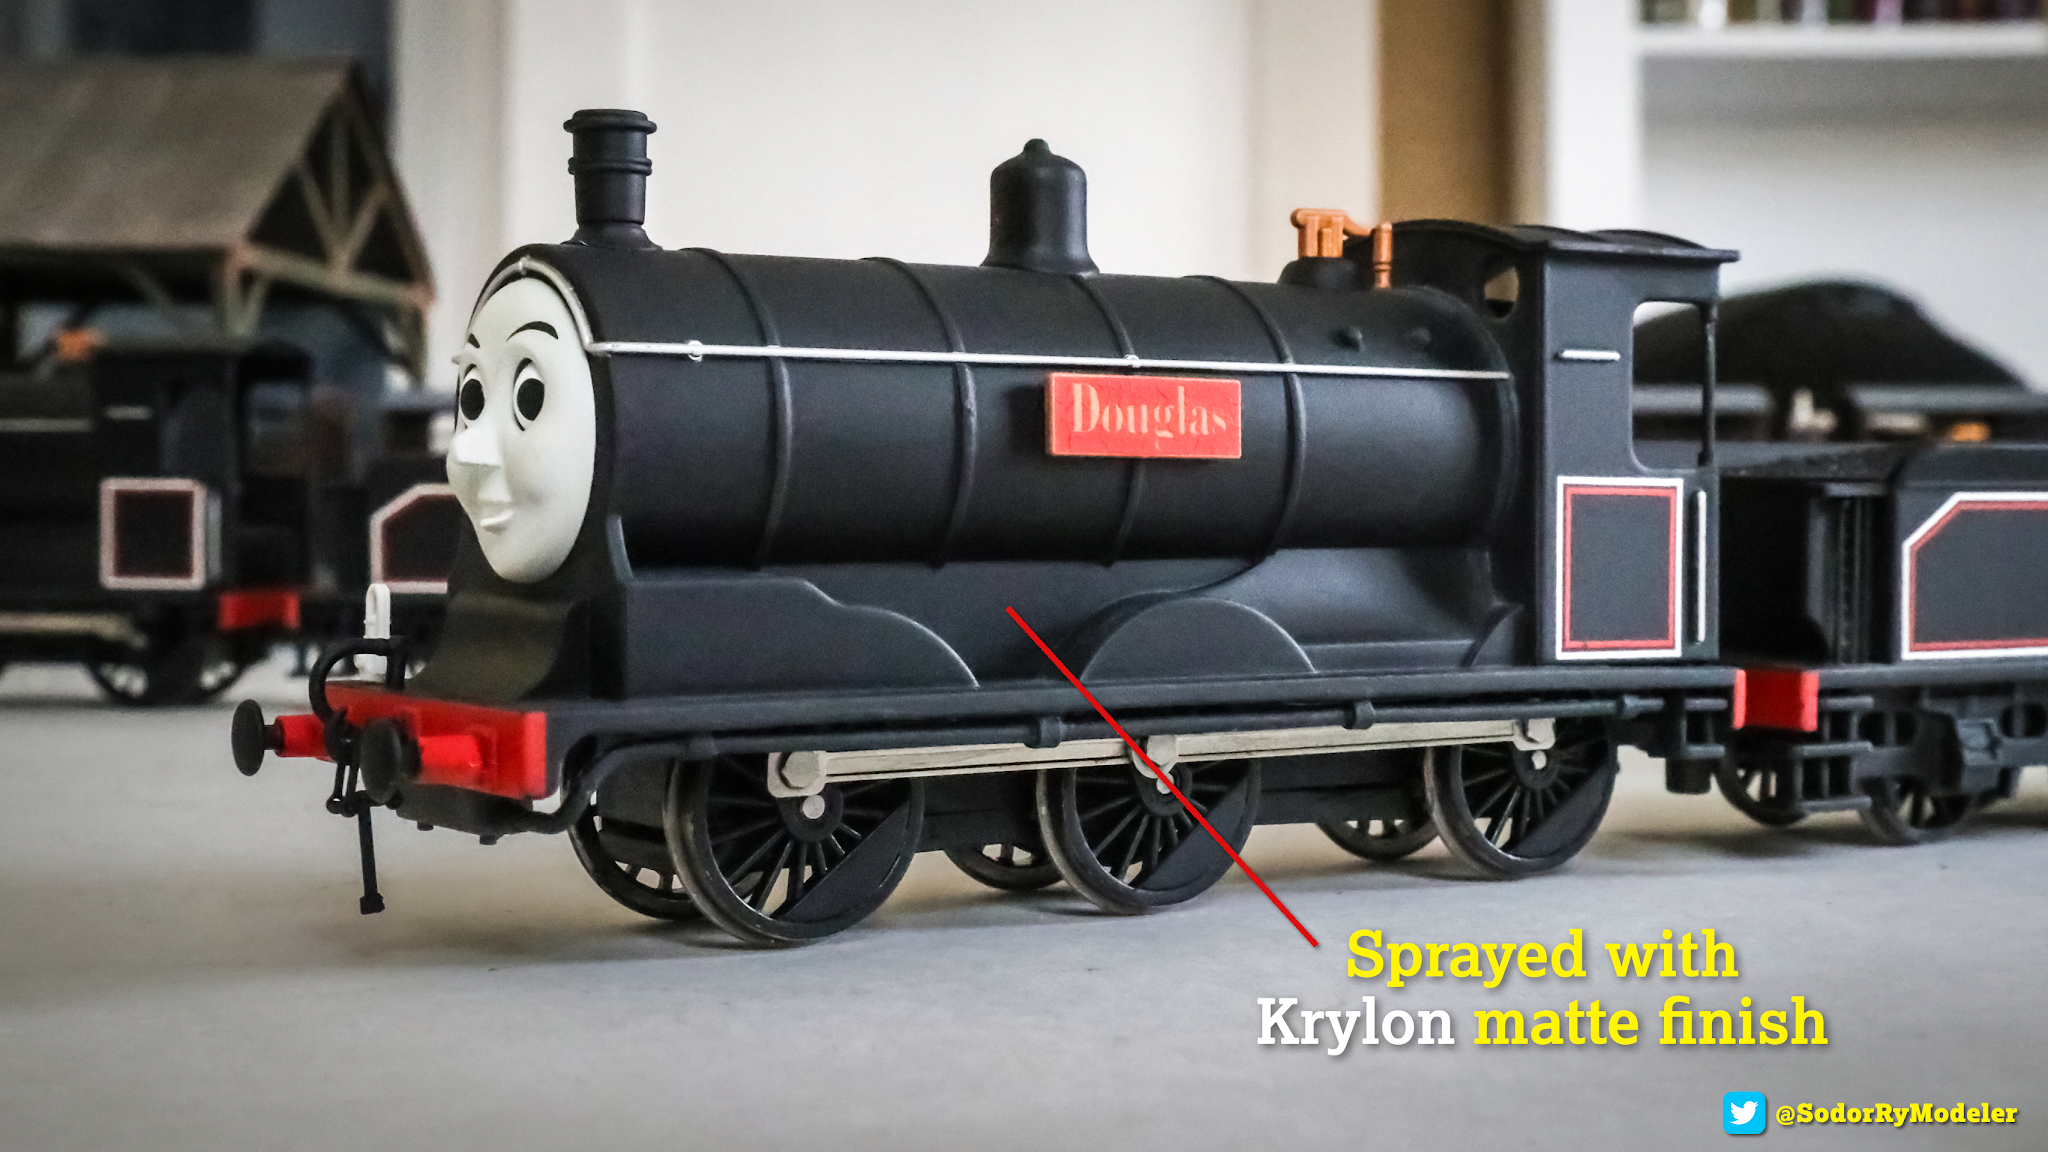
First thing I tried was giving them a spray of Krylon matte medium I get from the drawing section of the craft store! This gives them a really nice finish to knock the plastic toy-like shine, but feels like a nice mix of a very flat to a satin finish, which gives them a very nice look, and a great starting point for fixing the body and weathering them later. I recommend Tamiya's TS-80 Clear matte finish for the best results. I also gave them a few details right off the bat, which includes pipes along the bottom of the running board, made from 16 gauge craft wire wrapped with strips of Sticky Note paper! I also added two peelable gems for firebox bolts.
- Tamyia - TS-80 Clear Flat Spray
- Tamiya - Modelers Putty
- Micro Mesh - Sanding Files
- FitGrip Hobby Knife - Set of 2
- Tweezer Set - 8-Piece
- Slim Line Precision - Pin Vise
- The Rogers - Drill Bit Set
2) Body Shell Modifications

Now for the tricky part, taking off those molded handrails! I use a
combination of my flat-head hobby knife and 240-400 grit sanding files.


I carefully press my knife into the corners of the boiler bands to pluck off the handrails, then evenly scrape all the way along the boiler, which helps the strips of plastic to coil and when finished each section I can just grab them and throw them into my trash bin by my desk. Then once done I sand the boiler and the cut sections as smoothly as I can with my sanding files.
3) Handrails

Now I can drill the holes I want for the handrails using my pin vise! This Weill give both engines a really nice profile once finished. While I’m here I fill the holes made for the nameplates I plucked off with filler putty to completely hard and sand smooth. I next masked and spray-painted the boiler and body with a flat black paint.
NOTE: Please spray outside or in a well ventilated area, with a mask, and make sure that there is a consistent temperature in the room of choice, not too hot or not too cold, as it will effect the spray application. Having good lighting also helps with drying. As the trim tape for the lining was glossy, I spray the model a very light first coat to help painting, apply the paint I want for the body shell, then once dry I add he glossy lining before a final coat. Weathering will come later!


Now for the handrails! This was one of the trickiest jobs I’ve done as it required extra bending and shaping with my pliers. I put one of the handrail knobs in the middle of the 0.45 gauge wire and bent the wire carefully on something round like a thick screwdriver to bend the wire to its semi-circle shape. Then bend each side flat again. I’m very pleased with the results! I also added some on the cab.
The handrails I use are made by Nairnshire Modelling Supplies in the UK I found on eBay. I had to have them shipped to a friend who lived there who then shipped it to me, as listing didn't offer shipping to the US, but this can work with any you choose from model railroad suppliers or eBay, like Cal Scale (US) or Markits (UK), and a wire that's stiff enough to hold it's shape but can be bendable if neede
4) Couplings

At last the finishing touches! I use Smiths from gaugemasterretail.com in the UK, for locomotives and some coaches I get the LP8 screw-links kit to assemble with my modeling tweezers. I have something like the metal tip from a fine tip paintbrush handy to bend the "hooped" parts, then squeeze them to the center piece to swivel freely. I use the same technique as I do with the lamp iron and brake pipes to snip the bottom and wrap the end with Sticky Note strips to glue on as the bottom weight.
Now I have to make a slit on the buffer beam to fit the couplings in, so I hand-drill two holes with my pin vise, then simply cut the excess plastic in between with a hobby knife. Next, I make the coupling "mount" piece from scratch, the thing the couplings fit securely in place with the buffer beam. I cut two pieces of cut Evergreen styrene, each with a slit for the coupling made from drilling two holes and cutting the excess away like before, and then gluing both square pieces together, one square bigger than the other. I use RustOleum's "Chalked" Barn Red spray paint to color the piece, then once it completely dries glue it in place using Crazy Glue, making sure to keep it aligned with the slit made in the coupling mount, then slipped on the coupling on to dry!
If first starting out, I recommend getting the LP5 assembled screw links, or the spare ones Hornby now sells on eBay or most UK suppliers. If you're using Hornby's screw links, it's just one round hole, so you can just pop it right in the coupling mount, just make sure it's secured well with glue if you want it to pull trains!

I add lamp irons I make from 20 gauge wire, with the base made from strips of Sticky-Notes wrapped around the middle of my wire, with some room on the bottom to fit snugly in the hole I hand-drill on the running board. I spray paint them black on a piece of foam before fitting, and secure in place with Crazy Glue. The headlamp and tail lamp on the tender are Bachmann Branchline dummy lamps!
The one thing I really want is to give them new custom nameplates by Light Railway Stores in the UK, which offer a great selection of brass etched parts that are easily customizable at great prices, and other details for model railroading projects.
5) Weathering

Now the weathering! I really enjoy using any of Dave’s Decals weathering powders, which hold well to flat paint and breaths life to any model. I add generous patches of dust in between the corn sets of the boiler, the firebox, and splashed. I also added rust pigments on and around the undercarriage detail and the axle boxes of the tender. I even add coal dust on the bottom of the funnels and stream it down the smoke box sides with my fingers or Q-tip. This really helps transform the Twins to look like industrial, hardworking engines.
6) Tenders and Coal Load


7) 3D Printed Faces


After I give the spray paint 12-24 hrs to completely dry, I use craft acrylics to add white for teeth, and grays for open mouths. I touch up any painting mistakes using a half-and-half mix of Americana "Gray Sky" and "Cobblestone." I use fine-tip brushes applying it, thinning the paint with a bit of water when necessary. The final touches are the eyebrows, which I first draw out with a technical pencil to serve as a guide to draw over using Faber Castell ink pens, either XS (extra small) size. As ink takes a while to dry, leave it for a while before handling the face if you don't want smudges!


I'm very happy with how they turned out! These engines look really good pulling either passenger or freight cars on any layout and are fun to operate! From their closeness to each other to their courage from escaping the negative effects of the Nationalization of British Railways and their industrious work ethic, they are a proud pair!
Thanks so much for reading! Let me know in the comments below if you have any questions about the process. Linked here are the supplies I used you can look for your own projects!
- Stephen
Cool that you are finally updating your blog!
ReplyDeleteReally appreciate it. As I've been working on my newer customs the last year, it felt right to bring it back from Twitter to begin talking about them more in depth here. Thanks for reading!
Deletehow did you do the detachable nameplates?
ReplyDelete