Sunday, December 29, 2013

How to Paint Realisic Track

From the helpful information I found from model railroading over the years, here are a few simple steps to help you create better track:


  1. Study photographs of tracks in books, model railroad magazines and online. Google search weathered tracks in sidings, main lines, old and new tracks, to achieve the look you want, based on the location of your section of the layout. Tracks from a quarry or an old siding might look very different from tracks from the main lines!
  2. Using track cleaning fluid, rub it on the tops of the rails using a paper towel wrapped around your fingers.
  3. Paint the track with primer paint. It might be useful to paint the primer by hand for delicate track work such as turnouts.
  4. When dry, carefully rub and scrub the primer off the top and edges of the rail. Make sure the edges of the ends of the track rails are covered with tape or a track clip when you paint the primer, so they remain clean to carry the electricity!
  5. Paint the ties, using mixed colors of gray or brown, making sure to paint the sides of the rails.
  6. When it dries, dry-brush lighter shades of your chosen color, light gray or either tan or light brown, to give depth to the wood.
  7. For older track, paint the sides of the rails and spikes using terracotta or nutmeg colors. Remember it doesn't always have to be orange rust. You can mix terracotta or tan with your chosen tie color, or a lighter shade of the tie color.
  8. Later, weather sections of the track with dust, or rust on the spikes.
If the track will be permanent, use white glue mixed with a little water to thin it, and spray it on the track using a spray bottle or and eye dropper. After it dries, you can use scraped chalks or pastel powder to add dust, or soot and oil where the engines stop at the stations, the yard, or a hill when the train is working hard and drops oil on the rails. If temporary, like my layouts are, stick with using paint, and practice making permanent scenes or dioramas to prepare for larger layouts!

Tips for Realistic Track: #1: Basic Painting

I was looking at a few pieces of track the other day, and I thought I would take my paints out and detail my track again. Today I thought I'd take a few pictures to post.


I realized that the knowledge I have gained from looking at layout tips and tricks was helping me make my track look better, and more realistic. I have done this for years, but I wanted to see if improvements could be made.


I wanted to just try and paint one piece in just one color, a weathered gray. In this photo, this ballasted piece had peen sprayed with just a gray primer. After it dried, I rubbed off the paint from the top of the rails using a rubber track cleaner and a paper towel wrapped around a finger, then I used a track liquid cleaner to wash the rail surface from any grime. 

It looked nice enough. I have painted my track using dark brown, plus the side of the rails. This would be effective in killing that "toy" look from the tracks on your layout. But here the gray looked a little dull to me. So next I tried to detail the next piece, and I think it looks so much better:


Here is the result. For this older look, I painted this piece using sage, a light greenish gray.  This color would be perfect for the quarry or mine, such as Bill and Ben's Brendam Clay Pits, where the wood of the ties is very dry, brittle from the sea air, the rust covering the ties and rails, and the quarry dust creates the light rail color.

Next I used terracotta to paint the sides of the rails and even the spikes. This looks nice because it created the illusion of rust. Compared to newly laid track, which is often a dark brown, and even track that is aging out on the main lines, they still look brown, fading in lighter shades. But as you can see, track can tell the viewer a lot about where it has been laid, in this case a quarry or an old siding, how old the track is, and whether or not it has grass or foliage creeping up from the ballast.


I feel these extra steps makes the track look so much more realistic. There are times when I look at some amazing layouts and dioramas, I notice for instance that the buildings and the scenery are very meticulous and beautifully modeled, and no consideration was taken at all to do the same with the track. They are a crucial part of the scenery. Lines have the power to direct the eye around your scene. Results to this idea offer pleasing curves in and out of valleys and trees, villages and yards, and mountains. Finally, studying from life really helps you to decide how to paint your track based on condition and location. 


Looks like some workman are checking this cattle wagon's brakes and chassis for repair! I set up this small mockup on my desk to test how these tracks look ballasted.  These are Code 100 Atlas track, not that very appealing, but you see what a huge difference it makes when consideration to weathering and detailing your track rewards you for a better-looking railway.

Thursday, August 15, 2013

Yard Wall: Made from a Duran Stick!


I was looking around my Father's supply of wood and tools from the garage, and I noticed there were a few Duran paint sticks. I though these could make long walls to divide the yard from the scenery. I'll share with its construction, which took about thirty minutes to make.

  • I cut several strips of balsa wood to make the raised dividers, and had them glued to the Duran stick.
  • Next I cut long strips of my textured card-stock to the stick's height, and glued it to the wall.
  • I mixed acrylics to make various brick colors to paint on the paper, and then weathered it using lighter colors.
  •  A long strip of balsa was cut and glued on the edge, for the wall's trim on top, and glued a long card strip to texture it.
  • Finally, squares of card were glued on the trim for the wall's caps.

Sometimes there are wires that run along walls to power yard equipment, from signals to lights. For a finishing touch, I added wire that was painted and bent using pliers to fit snug onto the dividers, and glued rolled paper to add fasteners. The generator was a spare part I found and painted, then it was taped to the wall so I could take it off and use it for something else if I wanted to.


You can get an idea how it looks as a great compositional element in this photo. With the balsa dividers, the Duran stick stood well upright by itself. If I made more for a diorama, they can be braced, glued along hills and textured, maybe a few doors and gates for people and vehicles. Maybe there could be a gate made with a metal decorative arch, over iron doors, which say Tidmoth!

So if I make a batch of these glued in different lengths, they will look nice used for Knapford Yards, Wellsworth or the Harbor. This method of using sticks could also be used to make the brick facade on docks.

Placed flat, these can be made into low, freight loading platforms for wagons in the sidings, warehouses, or transfer yards.

Wednesday, August 14, 2013

Workman's Office #1


This is a building commonly seen at Tidmoth Sheds, Brendam, and Knapford Yards, well known for its large windows. I have been planning to make more structures seen in these locations by drawing their dimensions in my sketchbook, so in addition to the Knapford Goods Shed, here is the Workman's Hut.


As usual, it's made from Bazzill's textured card-stock paper, but this was when I began painting the paper and other parts in better, custom colors. Long pieces of balsa wood made the long, narrow structure shell bond together with extra strength, and smaller strips to glue the sides.

By the way, the decorative spikes on the gable is a toothpick cut in two!


At the yards and docks, dust and dry dirt stuck on the building's foundations and brick walls, so I used dry-brushing to realistically generate this weathering effect, using tans and light earth-toned colors mixed with the brick color for the walls.

The windows have clear plastic for the glass, super-glued to the back of the paper window panes to simulate glass. I found in the process of brushing thacross the whole front facade, the paint caught the doors as well as the window glass. I rather liked this effect, and although this building might be recently built, it was still exposed to aging and getting dusted by the trains or lorries passing by, the dust getting kicked onto the facade.


Similarly to the Open-Aired Shed, I created the roof using strips of card, cut in varying length, and glued them to be overlapped as steel planks.


Finally for the back, I have seen a rare photo of the building having only one door on this side, so I also added a drain pipe for the gutters.

I have also glued the building on a strip of card stock with a hollow rectangular opening, so I could install LED lights for nighttime scenes.

More coming soon!

Wednesday, August 7, 2013

How To Paint Realistic Brick Structures


Reading some articles on various modelling blogs, I came across very useful tips to create a realistically painted brick surface for model buildings. I organized what I know into this post in simple steps for you modellers to keep for future projects:
  1. Mix together tan or any light shade of earthy colors acrylics, then paint the plastic to create the color for concrete mortar. As you paint, add blotches of mixed variations on the wall for variety. Then let the paint dry.
  2. Now you want to create the brick. Dry-brush very lightly on the raised brick texture on the plastic, careful not to paint into the mortar. Have many shades of red mixed in sections on your mixing surface, an egg-carton or pallet, gives a very "natural" appearance that make a very pleasing result as you paint for extreme realism.
  3. After this layer of paint dries, mix lighter shades of red, and dry-brush again to create depth.
  4. Finally weather the building using more dry-brushing acrylic scraped pastels for rust, quarry dust and coal ash, and any element of being exposed to its specific industrial location or nature's elements.
It was amazing when I tried this with the Walther's warehouse, and I recommend trying it yourself for whatever building you make. Try reading more articles in magazines and online for modelling tutorials, and it helps to study from real life. I guarantee with a bit of practice and patience, you will see amazing results.

Happy modelling! 

Kitbashed Lean-On Warehouse


I was cleaning and organizing my boxes full of old model railway kits and parts, and I found two spare sides to the Walther's 2-Stall Engine Shed. I wondered what I could make with them, and as my model-making skills were getting better, I thought I'd try creating the building in this post.

The front wall you see is made up of two separate pieces with gaps for windows. These were sprayed with primer and sat on the table to dry. I wasn't sure what to make with them, but I finally landed on an interesting idea.

Quite often in the classic TV Series of Thomas and Friends, you will notice that the Freight Shelter Sheds that make up the left side of Knapford Station were used quite often in other sets. They became warehouses built up with dividing yard walls, to either direct the eye around the yard dioramas, or just hide the table edge and scenic supports for these sets. I decided to make a larger version in red brick color with some modifications.


The wall pieces were glued together and braced using white glue, Crazy glue, and balsa wood sticks. Here you can see one of the angled size walls, made with my textured card-stock paper. I used acrylic colors mixed to paint the entire building, so the paper and plastic parts match perfectly with weathering. It is wood-looking texture verses molded brick, but this would be used in a background scene or for close up shots with lots of detail, so this can be distracted with posters or leaning parts on the set.


Some of the window pieces were missing, so to give variety and character to the building, I made boarded windows on two sections of the wall, again using card-stock. There are gaps between the boards to be seen through when the interior is lit. These and the molded plastic windows were painted green, and glued after the brick was painted.


For the first time I also used metal wire to create gutters. It was cut with pliers, painted, and attached by wrapping paper strips around the brick edge to glue it. It looks so much better than flat paper strips, but you can see I combined both to model it with realism and depth in mind.


Looking inside, there are two warehouse doors made from scratch, again using card-stock paper that has been weathered. I thought this would be great to add when I have it wired with LED lights for a lit interior, then I can add or rearrange cargo and other details inside for realism.


That is why I made the roof bendable, so I can access the inside later. Strips of card-stock were glued in layers, then weathered by dry-brushing using acrylics.


So here you go. I placed it on my table with Percy, and some spare parts to show you how it looks on set. I feel happy with the result. As I try modelling using model railroading kits again, I'll think about customizing them by always painting the plastic parts first, and then add or change details to make them personally unique, so they don't look store-bought or toy-like.

I think I'll add three smokestacks, either the thin metal tube type, or brick for interior boilers...

Until next time!

Thursday, July 25, 2013

Knapford Station Goods Shed

I have been waiting to post this newly completed project! A few days ago I completed my new and most favorite building for my future layout, a goods shed commonly scene in Thomas's classic episodes.


Completely scratch built, as usual, it is made out of textured card-stock and balsa wood, but I feel this structure is special as I used a number of new model-making techniques that I wish to share with you, and a little background of the prop's history on the Thomas Show.

You will find this shed in the sidings that run parallel to Knapford Station. If you look carefully, from season 1 to 5, this shed had a wall in the back, some drain pipes, and there are a few differences in the structure's design.

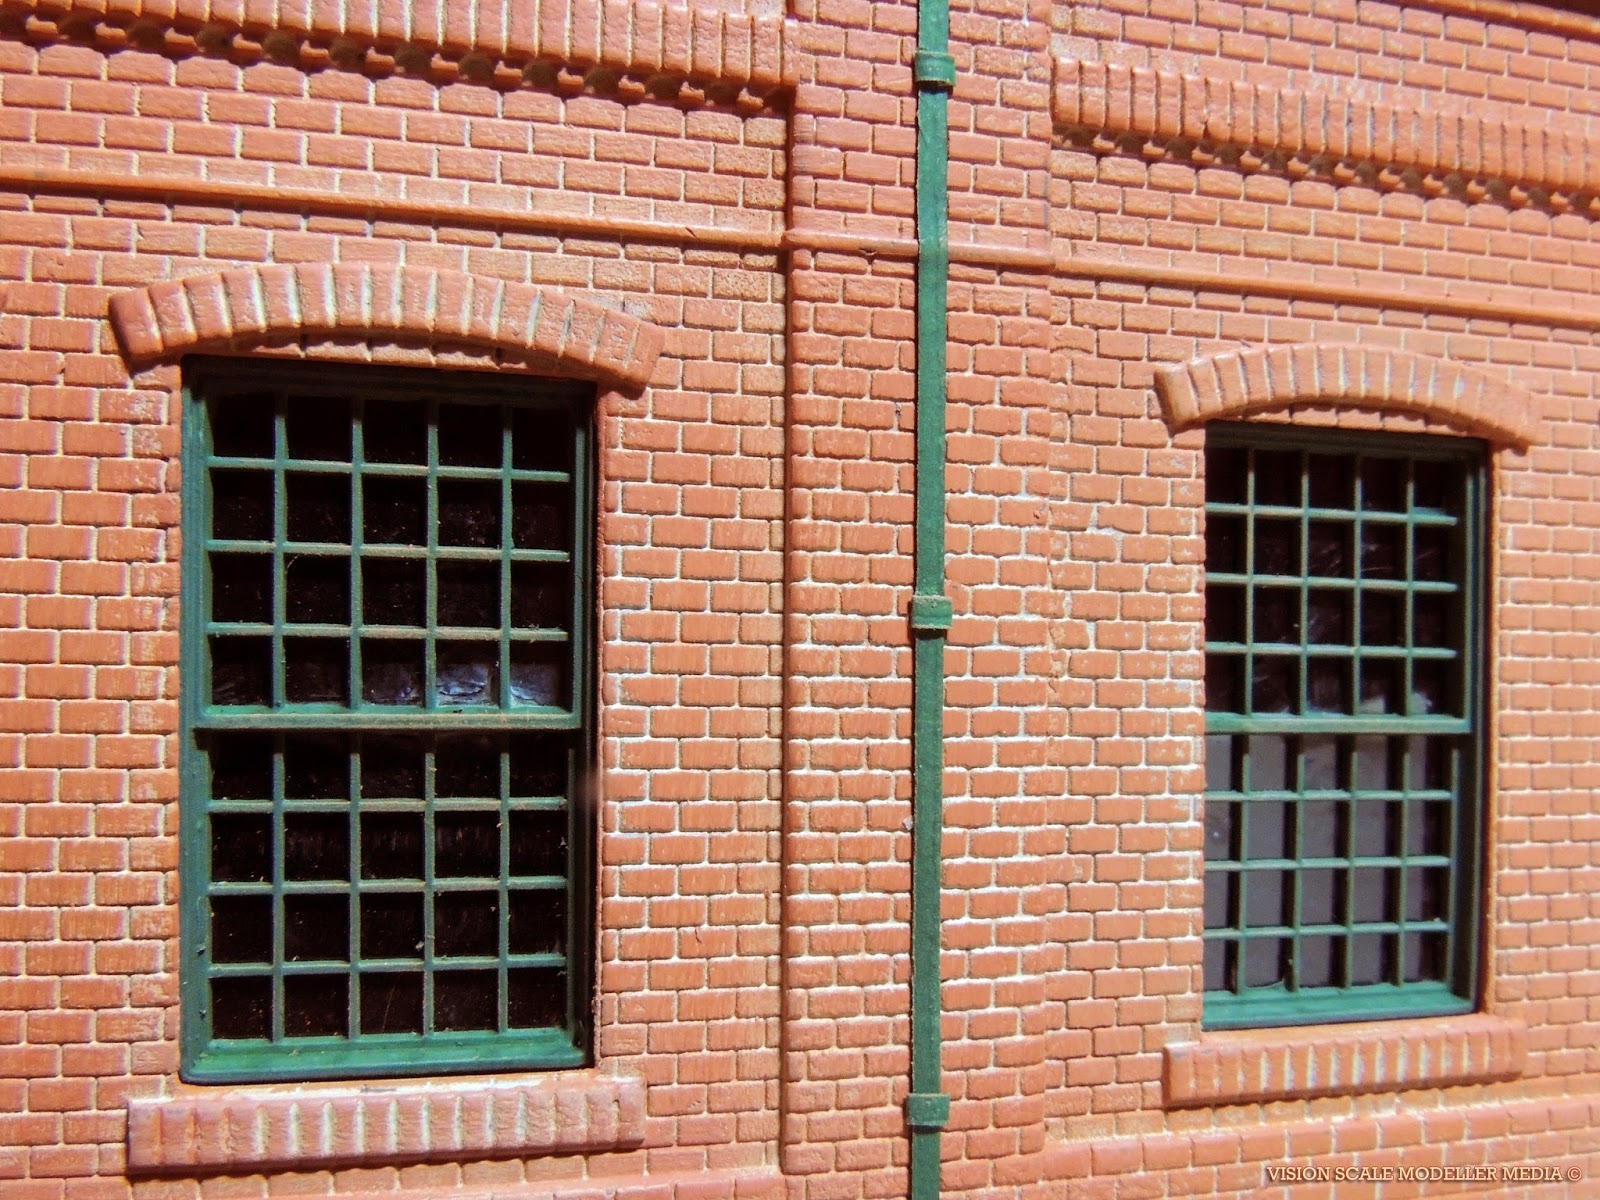
In the production of "Thomas and the Magic Railroad," many of the buildings commonly used on the sets through the years were remodeled, remolded, and painted very realistically, including this shed. It noticeably gained some faded green roof frames with gables and braces, as well as the brick reliefs on the side of the outside wall.

I found that I liked this look better, so I based construction on how this shed looked then onwards. The shed first housed two tracks, probably as a 2-stall goods shed for only 2 cars (maybe for the mail cars perhaps?), then only one, probably as a spare single stall engine shed. Both Diesel 10 and Donald have been seen when the set was made this way.


In this post I want to pin up my detailed drawing of the goods shed. Recently I have been practicing making a measured sketch of every building I want to make, pages of them, from tool sheds to stations and mostly warehouses and sheds. I find that sometimes I have to sketch different versions as I feel the measurements can be changed or are not accurate to the original or reality.


In this case I found the width of the entrance to be too narrow to have two tracks as I cut the textured card out to piece together. The Bachmann Percy model has the widest clearance space compared to the other engines as his footplates are spaced quite far from the chassis (I'm not sure the width of Diesel's though, as he is on my wish list...). So I simply made the adjustments as I redrew the measurements on the card to be cut for the shed's walls. I also decided to exclude the molding on the roof as there isn't any on the original. Photographed is the finished product.


A thick piece of balsa wood serves to add thickness to the wall and extra strength, much better than just the fragile card super-glued on the edges! I used wood and layered paper to create the relief wall and arches, and the four reliefs you see with the added tiles.


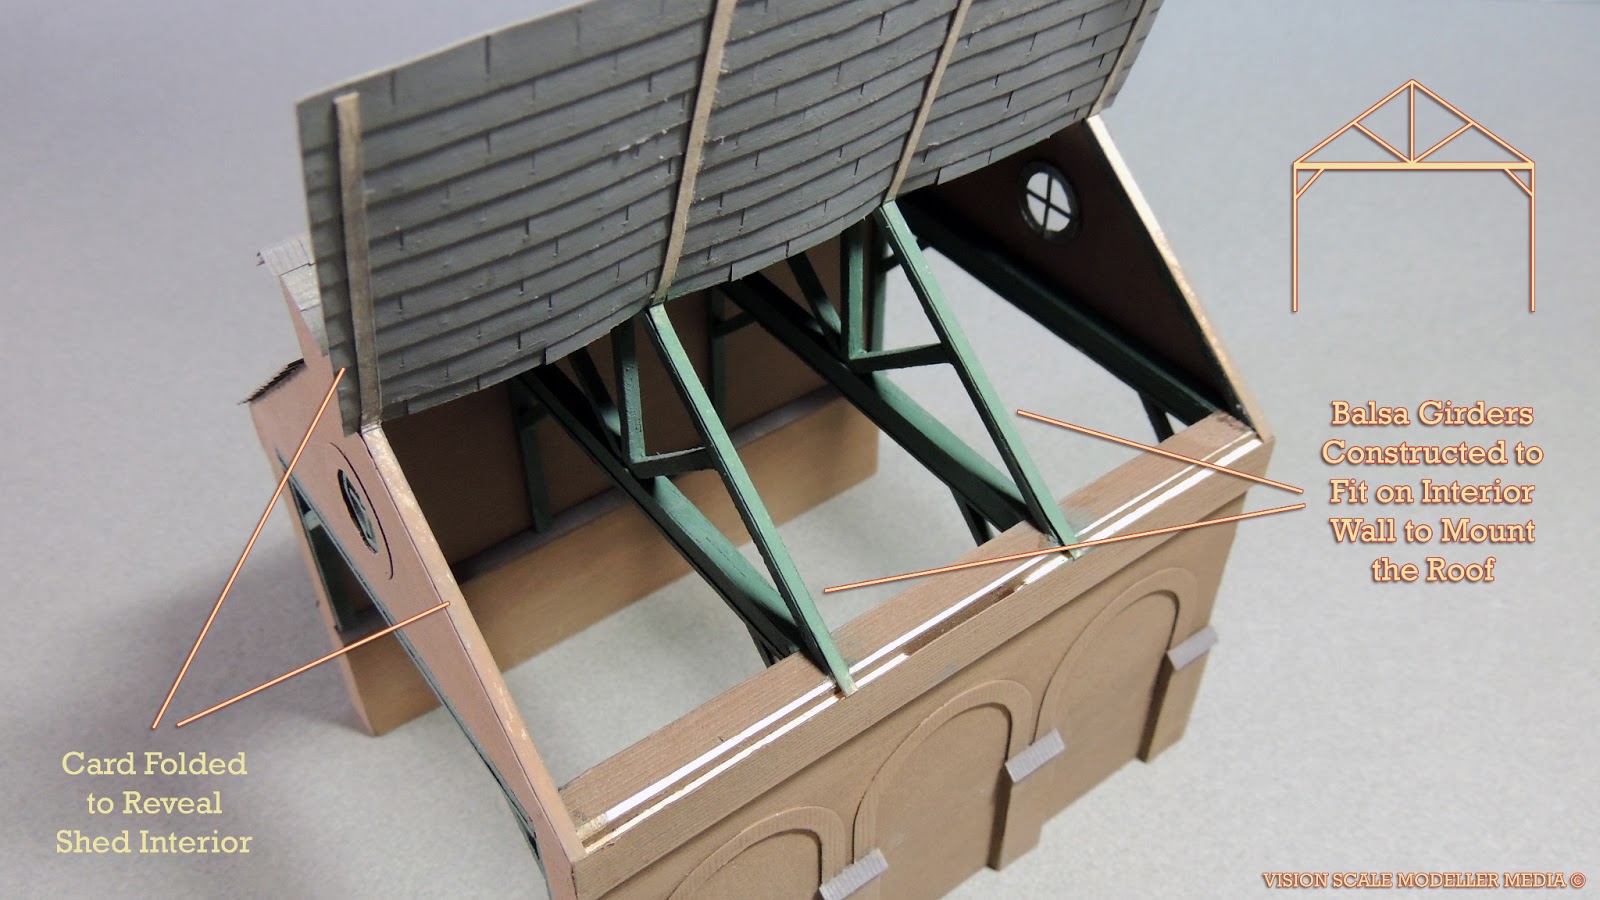
Thick strips of card was used here to construct the vent structure on top of the roof. If an engine uses this shed at night or is just passing through, these vents allow the smoke exhaust to escape the shed.


Here I wanted to try and make the roof removable, so I could fit this spare piece of balsa to mount LED shed lamps in the future.


When the time comes to make the diorama or layout of Knapford, I can have holes drilled to mount the lights and then have them wired.

The wires would be fed under the table and connected to a small power box, but I hope there can be a way to do that without the building being permanently glued to the table for showings.


There is a great book called "The Encyclopedia of Model-Making Techniques" by Christopher Payne, and I recommend this book for beginner and professional scale modellers.

In it there is a great tip on how to make tiles using strips of card with slits cut with a craft knife. Many railway layouts use this technique in the British Isles, and as I did want to model the shingles in 3D, I thought I would have a go. The results look fantastic and very convincing once dry-brushed.

I am very happy with it; it takes a while but a little time can produce a better model whatever your subject!


On top of that, I glued one side onto card strips so you could open it and see the interior. Here I made the sections of gables that support the roof, all from painted balsa wood.

This will also make it easier to wire the lights and fasten the wire onto the wall to make it appear realistically wired as it would be in real life.


Here is a look inside looking up into the gables. This would be a great prop to film on the diorama for close ups of the engines.


I really wanted to take my time and do my very best with this building, and I think compared to some of the other buildings I have posted, this is by far the best one so far. Thomas is a great inspiration, and a prime example of fine scale modelling.


Finally here it is on my table with some other props to show you how it looks on set. It is a quick set up and not as detailed, but it does show you the stuff I've been making for the past few months in my summer holiday from college.

Feel free to post some feedback. Comments and suggestions are welcome!

Wednesday, July 3, 2013

Boats and Trawlers #1: Fishing Village

One Time I wanted to film scenes of the Fishing Village, so here are photographs of the set I made and the small fishing trawlers docked alongside the waterfront.


I used wooden planks, blocks and boxes to create the hill in the background, so I could lay the row of houses and terraces I made (from scratch with card-stock), in two rows with Woodland Scenics trees. The water is plexiglass laid on top of my green quilt for grass, the edges of the glass covered with garden pebbles. Here you can also see a good view of the painted wall of rolling hills and distant mountains my Dad and I painted for the landscape backdrop.


Here on my desk is the largest one of the fleet, "Burkett Fish." The body made with card-stock, mast with a wooden skewer, and a bit of thread to support it. Generous weathering for paint stains on the hull and bits of rust were added for the finishing touches.
You can also see how I made windows using ink squares drawn on the paper. Now I use clear plastic, and by far, it looks much more realistic, and it is much easier to use a craft knife for those delicate cuts! Crazy glue is used to glue it into place.


Here is the trawler on the set, dropping off some crates of seafood off for Stepney to take back to warehouses at Knapford Yards for the marketplace. This is a personal favorite, and it looked really nice on the waterfront alongside the Railway.


Here were the two smaller trawlers, "Rebecca" and "Susan Lee," simpler in design but are very good for background elements or of course adding variety to the scene, inspired by some of those found in Seasons 3 and 4. Also made from card.

Thursday, June 27, 2013

Wagon Loads #1: Timber, Crates, & Machinery


A while ago now, I shared how to paint these flat cars from Bachmann Branchline to look how they might be on Sodor. Here, I will share the loads I made for them.

Freight cars look the more realistic when time and care is taken to weather them, as well as adding loads. It is exciting to make them yourself, and even when you buy them from the hobby shop, cargo looks much better when repainted and weathered too. Loads are important too.


Even in an empty wagon like this one, pastel and chalk dust brushed onto the plank boards inside the wagon gives us a clue that this car has carried coal, or quarry gravel, or what have you.


So here we go for the flat cars. These lumber piles are made from scratch by cutting lengths of balsa wood, and using Elmer's white glue to piece them together with the smaller supporting planks.


Using this technique, you can make loads of lumber for any car you want, using different lengths of balsa, more or less stacked together, and made into smaller sizes for vehicles and smaller cars, or really large sizes for bigger cars! The small load of pipes were made from spare cardboard tubes I found. Any spare part from your plastic kit you want to throw away can be a key element to add interest on your layout!


These crates are made from textured card-stock. I was inspired to create these from looking at Preiser spare parts and loads in my Walther's Catalog! It is amazing what you can create from what little you might have lying in the cupboards of your art studio or in your home! I made sure they were decorated with small stamped stencils drawn with pen, and small colored labels made from copy paper and bits of spare card. Some I made open with foam for packaging, or loaded with something like spare track pins as ties to display the load they carry on a dock or platform. It takes a little time, about a half and hour or so for me, but very easy to make.


Finally here are a cluster of covered machinery from Chooch Enterprises. Painting can enhance shadows and lighting effects in addition to wear and tear as well! I painted them using light gray acrylic, then lightly brushed them using the same paint mixed with white to bring out the folds of the tarp. I might also slam dunk them in a mixture of equal parts of water and india ink to enhance the shadow, and a little grime.

There's loads for you!

Monday, June 3, 2013

Visions of Sodor ~ The Watermill

Here is the Watermill on Thomas' Branchline. This was always a well-known scene on Sodor, and so I wanted to recreate the diorama for my model railway to take photographs and film.


Here my green afghan quilt is used for grass. The hills are made with spare wood planks, pieces and boards placed underneath, with cardboard boxes to make the shapes. As nothing is permanent, this is a great method for me as I can change the scene to how I want it to look. I could rearrange the Woodland Scenics trees or the rocks until I am happy with the final finished scene. Bushes are spare Woodland Scenics ground foam, and the water is a sheet of plexiglass.

I built the watermill and the bridge from scratch using textured card stock paper, cutting the pieces with scissors, assembled with glue and Scotch tape, and weathered them using acrylic paint.


In this picture I recreated the scene for Percy's Ghostly Trick episode, using a large office light with a blue fluorescent bulb for the moonlight, and a small LED light taped inside the watermill to light the interior. I made the window panes from scratch, with clear plastic for the window glass so I could make this beautiful effect for this scene.


I also made these figures and the boat from scratch! The boat is also paper card, cut and glued into the hull shell, with strips cut for the seats, rudder, and separate oars. You can see how I made the figures here.


This was one of my favorite scenes on the Thomas show, and it wasn't to difficult to model. It took me about a half and hour to set everything up, and then I filmed the scenes I wanted to capture from the episodes. It is really fun to learn how the modelling team on the Thomas show made their sets, and it is great practice as a model railroader, too.