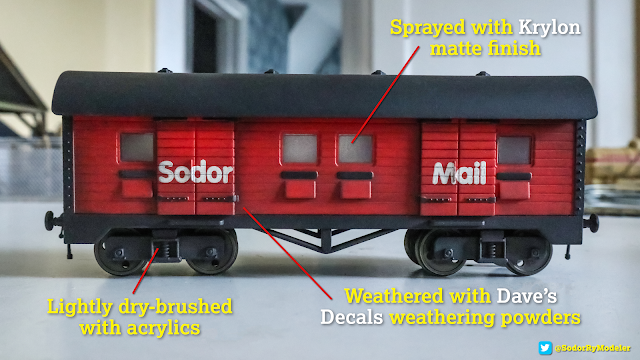
An essential piece of rolling stock for carrying letters and parcels, the red mail vans by Bachmann USA for their line of Thomas and Friends products are great to have on any layout, and look wonderful being pulled by Thomas or Percy like the classic series! I had the original ones with the Sodor Mail lettering when they first came out in the mid 2000s, before they replaced it much later with the CGI series logo that had a envelop and a wing on it. So I decided to take these original vans and give them a detailed upgrade! Once weathered customized, they look very close to the real thing, dusty and well used being pulled on the main line across vast distances for the mail trains. I'll show you how I did it step-by-step. Let's get started!
1) Varnish
The very first thing I do is give them a spray of Krylon matte finish, which helps make the livery have a flat look. It kills the shine of the manufacturer's plastic and paint and gives some tooth for the weathering powders, which we'll add later!
NOTE: Please spray outside or in a well ventilated area, with a mask, and make sure that there is a consistent temperature in the room of choice, not too hot or not too cold, as it will effect the spray application. Having good lighting also helps with drying. As the trim tape for the lining was glossy, I spray the model a very light first coat to help painting, apply the paint I want for the body shell, then once dry I add he glossy lining before a final coat. I've been trying out Tamiya's TS-80 Clear matte finish and I highly recommend it for the best results. Weathering will come later!
- Tamyia - TS-80 Clear Flat Spray
- Micro Mesh - Sanding Files
- FitGrip Hobby Knife - Set of 2
- Tweezer Set - 8-Piece
- Slim Line Precision - Pin Vise
- The Rogers - Drill Bit Set
2) Weathering
Weathering these vans helped add that extra touch of realism needed to bring these models to life! I first see what I can do with dry brushing with acrylics, working from dark to light to add lightness to the details using earth-toned and rusty colors. Once dry, I enjoy using Dave's Decals weathering powders I use a lot for my models. I used the dark soot color to go around the doors and brackets using a soft brush, a medium sized one along the sides, and a smaller one along the details. I also used a rusty color for the the bogies (trucks) around the springs.
3) Roof Detail
Now the best detail to give these vans, the roof ventilators! The molded ones look very flat and less noticeable, so doing a search on Shapeways I found an excellent vent pack of GNR Ventilators and Gas Lamps made by Mike Trice. When I get them in the mail, I use my flat head craft knife to scrape off the molded details and completely sand the tops of the roofs flat. Then I drill holes back where the vents should go by hand with my pin vise, using a ruler and marks from a pencil to help as a guide.
Finally, I take the 3D prints and spray them matte black with spray paint. Once dried I snip them away with my pliers, and glue them in the holes once they fit snugly. I also glue around the bottom underneath for a secure glued fit. Once dry, I might go over it with a bit of my weathering powder to add some dust or suit along the edges to bring out the detail.
4) Couplings
For couplings, I use Smiths from gaugemaster.com in the UK. For these vans I tired the LP8 or the LP8F screw-link kits to assemble with my modeling tweezers. I have something like the metal tip from a fine tip paintbrush handy to bend the "hooped" parts, then squeeze them to the center piece to swivel freely. For the counterweight that hangs in the middle, I snip the bottom of the nail and wrap the end with Sticky Note strips to glue on to create a "nib." That gives it a distinctive profile that acts as the bottom weight. Of course you can use the LP4 chain link couplings more like the show used for these versus the screw links, but I like how these look a lot better!
To install them on the ends, I snip the molded hook on the coupling plastic piece on the buffer beams, and used a pin vise to drill two holes by hand, one above the other, then use my hobby knife to cut a slit out of the plastic, all the way through the buffer beam to the back end, so I can simply push the Smiths coupling right in and glue it on, snipping any excess metal from the coupling itself first with pliers.
Now they're ready to make their deliveries with Thomas and Percy at the yard! They look so much better and feel like realistic models I can be proud of when I run them on the layout. They were a fun project to tackle, and the Bachmann Thomas engines look good pulling them!
Thank you so much for reading! Let me know in the comments below if you have any questions about the process. Linked here are the supplies I used you can look for your own projects!
- Stephen


No comments:
Post a Comment