Tuesday, May 21, 2013

Flat Cars #1: Repainting Bachmann Flat Cars


A few years ago Bachmann Branchline made a rake of new flat cars, The prototype is from a more recent era, in the 80s and 90s, compared to the era Thomas and his friends worked in the 1930s and 1950s, but it was a great find, and I bought two to paint and weather.

I thought they needed some cleaning from dust and some fresh paint, and here I posted some pictures for progress.


When I last painted them, the sides and the well were painted acrylic grey, the plastic brown of the wood for the flatbed masked with tape to be painted later. Then I painted the underframe and bogies black, then added a little grime and rust.

Still looks good, but the plastic wood needs to be painted to kill that plastic shine.


Here I masked the edges of the flatbed so I could start painting a mushroom color for the wood floor, pictured is the first coat with light paint strokes.


While the final coats were drying, I sprayed a grey matte to the flatbed supports which came with the package, then just dry-brushed the grey I used for the wagon's sides, and glued them into place.

They look much better with their new modifications, ready for some loads! Check out this post:

Wagon Loads #1: Timber, Crates, & Machinery   


Monday, May 20, 2013

Open Wagons #1: Weathering and Painting Tps

Here are some wagons to demonstrate the techniques I found helpful in adding a touch of realism to your roster of freight cars.

I try to be accurate as far as the Thomas show and the Railway Series, but I always look at any photographs I can find of real 7-plank open wagons, so I can have a better understanding as how to weather them. I think that is vital to achieving realism and believability for painting and weathering rolling stock.

So here we go:


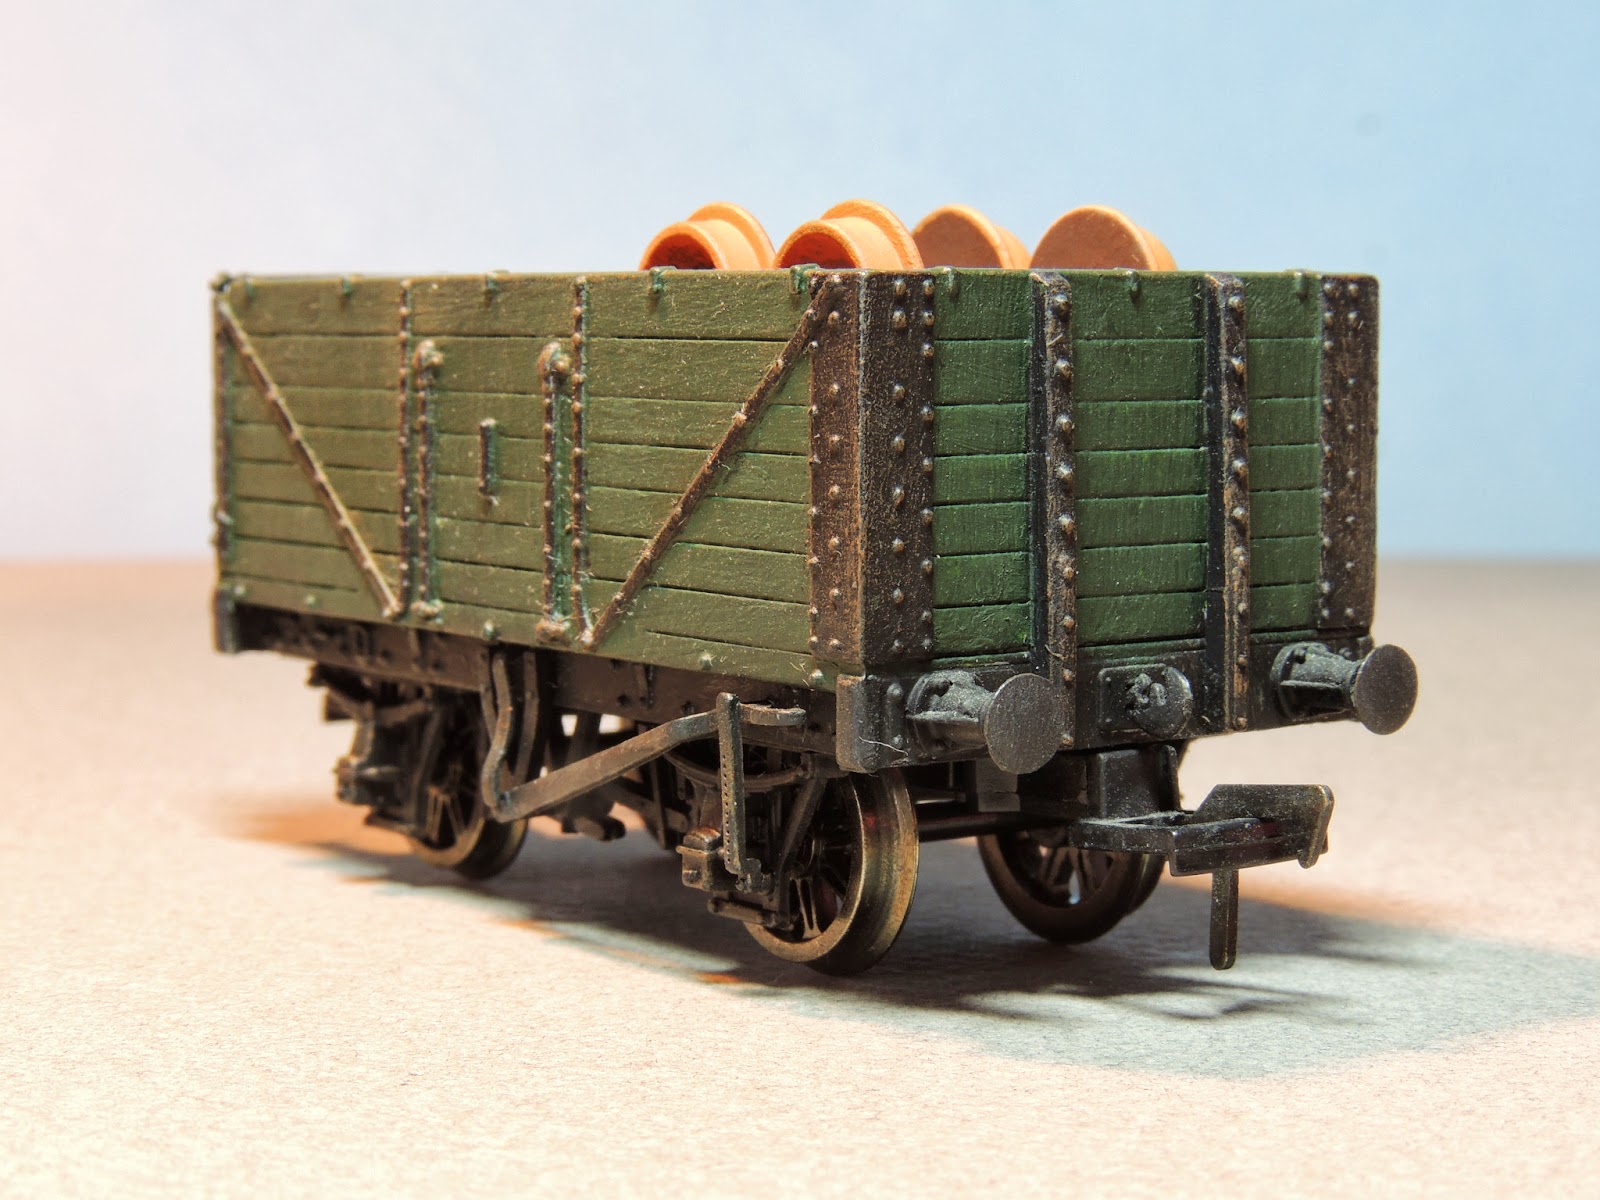
Here is a wagon painted in the green paint scheme seen from Season 2 to the new seasons. I have used many wagons of Bachmann Trains' lineup of Thomas rolling stock, thought I found Bachmann Branchline being the best choice for rolling stock, twice the model quality and realism at a better price for the pound!


I use acrylic FolkArt paints to color and weather these cars. the main body is painted a dark green, with black for the bolts and underframe. Care was taken to paint the chains on the door, and add hints of rust and grime on the body and the parts.


Inside are ties, a large barrel and some spare wheels painted to look old and ready for the scrap yard.

This is the main color type for wagons found on the TV series, though there are many other wagons with different colors for the aging of the wood and debris from the loads they carry.


For this planned consist, this wagon is brown with plenty of dust and rust! I used a combination of acrylic and scraped pastel dust to weather this wagon. Many professional model railroaders use this technique for their models, and it was great to try it out for the first time, matte finish at hand!


 This car is heavily weathered, and I think the more variation of how each car is painted the better for achieving realism.


Inside the wagon in this photo are some spare parts and kits painted as wagon loads. Any scrap piece of leftovers from kit building is a must for added detail for any model railroad, very useful for scrap, cargo, and elements that add interest on your layout, as well as for freight cars.


Without the cargo, you can see here traces of soot and grime from coal dust on the boards in the wagon. a lot of black pastel was scraped and smeared with a finger and a brush.


For this wagon, I painted it in a gray-black, Great Western color scheme, full of ballast dust from the harbor or the quarry. This is a double-ended, 7-plank open wagon.


It took a few coats of the black with different shades of gray to get the look I want, with weathering colors such as nutmeg for rust, with a few dabs of paint on the bolts, and mushroom for the ballast.


In the wagon here are some weathered Lego chains, and a pile of fishing nets, made from scrap onion plastic casing! Primer spray paint and a little pastel powder is all that is needed to weather them.

I recommend purchasing Bachmann and Hornby items of ehattons.com, in great prices and great service.

There are many freight cars and coaches planned for remakes, to fill the yards and make extra train consists!

Wednesday, May 15, 2013

Yard Structures and other Objects!

I made a few small props today, for the yards and sidings, to add some extra detail and interest. They are small but just as important as the bigger structures on any layout!


Here is another example of some buildings in direct reference to kits made by ether Bachmann or Hornby. This is a tool shed that leans against another structure or wall, equiped with bent card for the water hose spout and gutters! All is needed to make this is Bazzill Basics textured cardstock paper, with Balsa wood to strengthen it. This took me about forty minutes to make.


These tool sheds can be found near the track or the adjacent roads and walkways in-between the sidings, based on the two sheds included in Hornby's Coal Loader resin structure.


Here are some four sacks I made from scratch using Sculpy clay. I used a carving knife to cut rolled logs of the clay to pinch the ends in such a way that it looks like sown ends. I pinched the bags together in certain arrangements, some leaning up against another, and sorted stacks stacked differently for variety. It would be good to paint and weather them to kill the clay shine.

Knapford 2-Stall Goods/ Engine Shed

Adding to my collection of yard structures, I wanted to try a goods shed that can double as an engine shed, based on Will's Craftsman's goods shed kit. This won't be the only one to model, as I really enjoyed creating this unique structure.


It was an elaborate structure to model! And a lot of firsts were accomplished.


Here you can see the inside, with a few spare ties lying in the corner! I used the same technique I developed for the floor of Duck's engine shed, so the tracks had a nice flat floor for the workman to have easy access to the engines or wagons.


The glass roof was made using several strips of green card glued together to create the window pains, these were glued on the wall's edge, then strips of grey paper were glued on the sides for the roof overhang. These are some of the nicest windows I have modeled, and they would look great with lights for night scenes. For a while my fingers were aching after all that cutting, so I would suggest taking extra care when cutting parts to give your fingers a chance to stretch and be cracked in place!


There are doors on each end that can open and close. The exhaust chimneys were made using sections of cut card  glued to strips of Balsa wood. Eight were made for this model. Even the drain pipes are cut from strips of card.


Relating to Thomas and Friends, this type of building reminds me of how Callen Station's shed on Duck and Oliver's Brachline looked in the Railway Series, as well as the long, 7-road shed at Knapford made and filmed only for a few times since Season 7 onwards.


I can't wait to use this for the yards planned for future remakes! Duck, James, Percy, or any of the engines would look great chatting inside as they rest, or either vans or coal cars awaiting to be collected.

Water Tank #1

 Here is a water tank made for the yards at Knapford, loosely based on Superquick cardboard buildings. I really like these little structures, the large water tank placed on top of a building containing the pumps, pipes and tubes to feed the nearby water cranes. So I decided to make one myself!


For the pictures above, there is an added wooden ladder made from Balsa wood, which was also used for the trim and wrapping trim surrounding the tank.

Acrylics were used to weather the brick and tank, wear and dust, and grime from the rain. Important details like that give show how the building stands in the elements of weather and age.


The windows are made as follows:
  • On the wall, I sketch the window opening and arch, on thw back of the wall so the erased pencil would not effect the texture grain.
  • Then I cut the opening out with a craft knife, and cut the arch using scissors.
  • I use a similar technique to create the cream window casing, just drawing the opening smaller than the window opening.
  • After I cut several strips of card to make the window panes or grills (careful cutting!), then I glue them to the back.
  • Finally I use a sheet of clear plastic to glue on the back for the glass!


For the tank, I would like to add a dividing wall in the middle of the tank to make two separate wells. A paper square attached to a strip of wood for the trim would be needed to connect it to each side of the tank wall.

Using this technique, it would be smart to use clear plastic squares, glue on painted strips of wood, then attach on the wall sides to create the illusion of water. One level could be full and the other half full!

I thought this water tank would be perfect for Knapford and other yards around the island. It was a lovely structure to model, I think it would be great to model more in different sizes and styles!

Tuesday, May 14, 2013

Open Air Shed #1

I have tried a few times to make balsa wood designs of the open air sheds seen at the docks or at the yards at Tidmoth or Knapford. I wanted to share my latest model, the large 4-road shed seen in many episodes. So here are a couple of views of my model to share with you.


This shed is constructed using balsa wood. I usually build things from the ground up from beginning to finish, but in this case it was helpful to do a sketch of the tresses and supports to align them together snugly and with more precise cuts. I painted it using green mixed with brown and grey to give it its look as it was on the set.


As you can see of the finished product, I thought this shed would be great for interior shots of freight cars or engines inside, maybe when I find appropriate lamps I could also light the interior. Of course I needed to make sure that the tresses for the peaks were repeatedly made so each matched with accuracy. So I tried a new technique to create a strong shell:
  • I cut a nice, flat, new sheet of wrap paper and taped it to my table top. 
  • Then I glued each tress piece of balsa wood by piece using Elmer's white glue.
  • Finally I taped each to the wax paper so the beams can sit still as the glue can work as it dried to bind the beams together.
Constructing the beams this way for the peaks allowed me to assemble the long crossbeams on the side, so I can glue the four peaks on the four sections. The picture above shows a smaller, older one I was reconstructing so you can get an idea how it looks. The grey is spray primer.


For the roof, I cut long sections of card-stock paper, varying the length of each, as the metal roofing, I layered different sections together. I find this to be a nice approach to make realistic metal roofs. Later after the glue dries, I can dry-brush a light grey color and rust color to weather it, maybe with some scraped pastel dust.


Here is how the completed shed looks with a fuel tanker and three Dapol gunpowder vans shunted inside. It can house a total of sixteen wagons, with four on each road.

This is the largest and strongest open air shed, and as there are many different possibilities of designing these sheds alongside buildings, or with mobile cranes inside, I hope to experiment how I make them using real photographs or books as a reference.

Friday, May 10, 2013

Bachmann HO Scale Duck

Bachmann Industries Duck
I am really exited that Duck is going to be released soon, expected to come out in June. This photo was recently uploaded by Bachmann Industries after upgrading their Thomas range product page. He even has the grey footplate paint. So far he seems to me to be the best engineered model produced. Looking forward to seeing Oliver, Toad, and the red suburban coaches come in soon!

I remember the very first electric locomotive I ever got was Hornby's Duck as a gift from my parents on my twelfth birthday. Duck has always been one of my favorite characters of Thomas and Friends, and I hope I can include him in my planned sets and video uploads in a few months.

After I purchasing Duck along with Diesel, Donald and Douglas, My biggest hope is to make the three episodes most known of Duck and his triumph: Duck and the Diesel Engine. It will take a long while to make the new scenes I have been aching to make for years now, but in my spare time during the summer, I look forward to get my layouts organized, set up and filmed to make more episodes for you viewers. I am excited!

In the meantime, feel free to Like, Join, Comment and Recommend these posts and videos showcasing the model and sets I make. I look forward to read and respond to any questions and comments you may have.

Happy Modelling!

An Early Home for Duck in Knapford's Yard?


I wanted to make some more buildings over the winter a few months ago, so I made this shed to be placed for planed sets at Knapford or other yards around the Island. I thought it would make a nice home for Duck, as the shunting engines need a place to sleep if Tidmoth is full, or when they are covering long distances and need a place to sleep before they go back on their journey during the day.


Each building I make is made using Bazzill Basics cardstock paper, the walls drawn on the paper, then cut, taped and glued together. Now I found using strips of balsa wood, glued and painted on the corners of the walls, reinforces the building as a hard shell, so it is a much stronger structure, and doesn't get bent or squashed in tight storage! Always take good care of your models.

I was in my teens when I first tried making my own buildings. I didn't have plastic card, plastic brick patterns or metal, so I used what paper card I had found at A.C. Moore, Michaels craft stores to be a really useful material (no pun intended!). Bazzill Basics cardstock became my signature material to work with.

This shed is based on Hornby's Great Western goods shed. Fitting for Duck, right? When I model my buildings, I usually look at real life photographs or structured made for modeller companies such as Bachmann Branchline or Hornby. eHattons provide excellent photos of the models they sell, and that is where I buy my OO scale models.


Here is a shot of the shed interior. There are a few boards leaning against the wall, with the clear plastic glass glued in place for the windows.


Here, the card floor is glued onto strips of balsa wood, which work as guides for the tracks, so the ties can be covered by the paper floor, with an extra strip for the center added in later. The ballast will loosely be payed in from of the shed to make a nice transition from ballast to shed floor.


I folded and glued strips of paper together for the handles on the door, with a grey pen to draw the planks. The hinges were bent and then glued to the wall, so the doors can swing to open and close. I use acrylics to weather the building with rust, grime or dust accumulated with rain or age, even a few paint streaks from the brightly painted window panes.


I changed the style of the exhaust structures to have a peak roof, with the grades on each side to let the smoke out as the engine's smoke can escape the shed.


Here is James and some of my sculpted figures to give you an idea what the shed looks like in scale-wise. This was a nice model to make, and there is more to be posted.

By the way, James is shinning in a freshly painted coat of flat acrylic paint, with gel pen used for the handrails, stripes, and window.

Guard's Passenger Van

I published this photo of my scratch-built version of the Narrow Gauge Guard's Van, which was uploaded on my "Old Film Test" & "Skarloey Model Showcase" clip on YouTube, but here I wanted to share with you how I made it.


Of course as is with my other Narrow Gauge rolling stock, this van is made of textured Bazzill Basics card stock paper, as I like the simulated wood grain texture, and works well for buildings or wagons such as this. It took a lot of practice and kit-bashing to reuse parts I drew to remake new models. I liked the model repainted light blue in the Narrow Gauge episodes from Season 11, so I wanted to take on this model to improve my accuracy of molding details.

Side view of the ticket window
The best example is the guard's protruding window. This was a complicated detail to model, but I wanted to actually model the windows open, so you could see the inside, and glue cut pieces of paper using scissors to glue on the moldings.

Close up of the ticket window, with pen and pad!
Here you can see the pen and pad on the shelf the guard would use to write the ticket count. I used scissors to cut the windows, taped and glued the pieces together with the shelf, and then glued this separate piece on the body.

It looked so much better for me to make these added details, as I wish to achieve the most of realism I could model, but it was a huge improvement. Before I just used a marker to draw the shape of the window of the piece. I feel I have come a long way in researching photographs of the prototype and the old Thomas films, as it helps me greatly to improve accuracy.


The van also has sliding doors!

Modelling in large scale can be a big advantage adding movable parts or other details compared to smaller scales! I used a long strip of card bent to an L shape, then applied a bead of glue on either end, so when dry, I can insert the door. This can slide open and closed using this technique.

You can also see the open windows of the ticket window on the opposite wall inside the van.


Displayed here is the Lego chassis I taped underneath using spare kit parts. It is made this way so I could have the option of using the chassis for another car, or remaking the van here if I ever need a spare chassis.


I hope I can make more variations, and try modelling extra details, such as the bolts for the rivets, molding the rivets separately and gluing them on the body instead of drawing them. Maybe making the whole van of balsa wood would be cool! We'll see, as there is a huge range of modelling possibilities.


Just to give you an idea, here is a digital drawing of a planned van for the Mid Sodor or Skarloey Railway, made up of pixels. I like making these as they help me figure out different ways of decorating, painting or modelling rolling stock.

There is a heavy American influence as I like the box cars of Maine's "two footers," railroads by the ocean with cars having ladders, footplates and "catwalks" up on the roof. And of course Welsh quarry wagon details too!

The logo is a diamond-shaped one I designed for Duke's Mid Sodor Railway. Skarloey's line has red as the background color instead of dark terracotta