
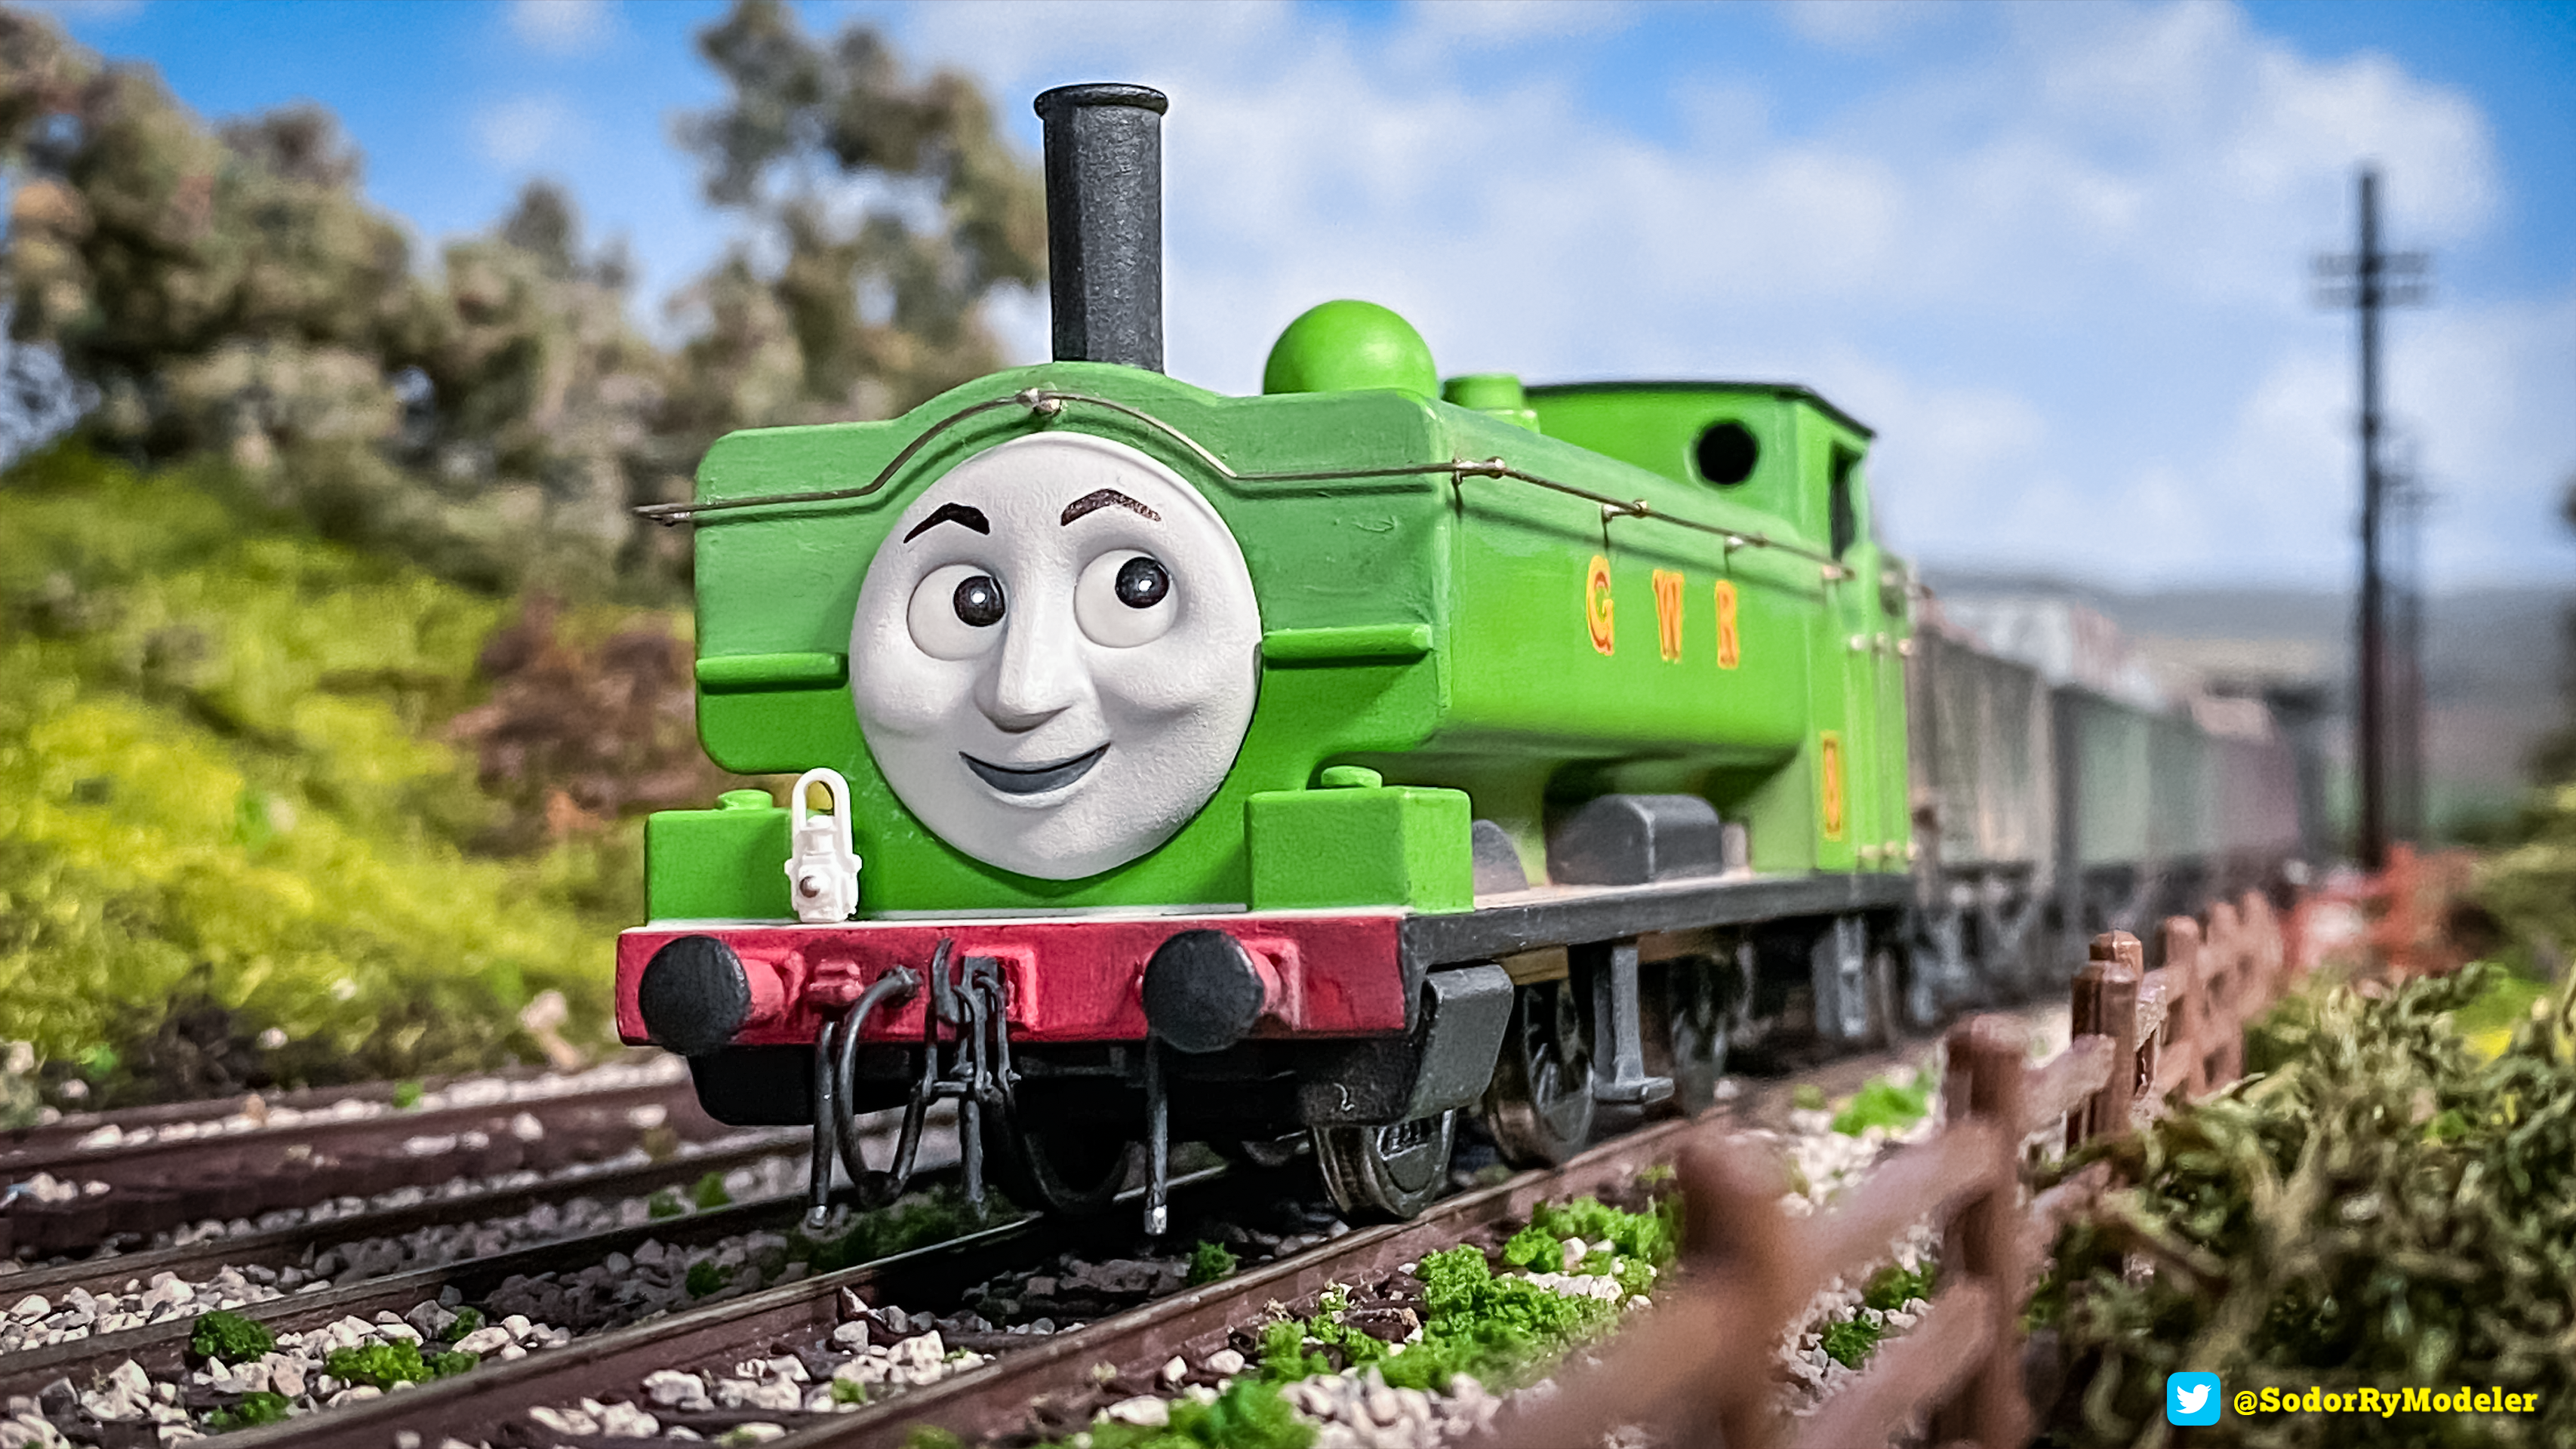
Duck ... well, actually his real name's Montague, but he goes by "Duck"
as he "waddles" down the line. Anyway, Duck has to be my favorite Thomas
And Friends character. Dependable, reliable, and an engine who's always
top notch with any job he's given, Duck has a strong work ethic. So I
was excited when Bachmann USA first announced they were making him and
got him back in 2014 when he first came to hobby stores. In this
tutorial I'll show you how I transformed him into a believable model
with real handrails, couplings and weathering. Let's get to it!
1) Body Shell Modifications

The first thing I did was give Duck a spray of Tamiya's TS-80 Clear matte finish. It helps kill that glossy shine from the manufacturer and gives his green livery a flat look and perfect for helping weathering powders to stick better.
NOTE: Please spray outside or in a well ventilated area, with a mask, and make sure that there is a consistent temperature in the room of choice, not too hot or not too cold, as it will effect the spray application. Having good lighting also helps with drying. As the trim tape for the lining was glossy, I spray the model a very light first coat to help painting, apply the paint I want for the body shell, then once dry I add he glossy lining before a final coat. Weathering will come later!
Next I used my flat head hobby knife to scrape off the molded handrail detail to add real ones later. I use a pin vise to match the size of the handrail knobs I use for a snug fit. I color match craft acrylics to paint over any scraped plastic once sanded smooth using 250 - 400 grit sanding files.

For years I've used the handrail knobs I get from the UK by Nairnshire Modelling Supplies, which they make in small, medium and long sizes. I get them from eBay UK but since they only ship to the UK, I have a friend I send them to to then ship them to my address. I also use 0.45 mm sized wire for the handrail itself, which I can bend for the curved profile as shown. As they're harder to find on eBay UK, I've been using Cal Scale handrail stanchions instead, with 0.020 music wire from K&S with great results, although thicker, gets the job done.
This was really tricky. Like I did for Donald and Douglas, it required extra bending and shaping with my pliers. I put one of the handrail knobs in the middle of the wire and bent it carefully on something round like a thick screwdriver to curve it into a semi-circle shape. Then I bend each side flat again. I’m very pleased with the results! I also added some on the cab and bunker.
- Tamyia - TS-80 Clear Flat Spray
- Tamiya - Modelers Putty
- Micro Mesh - Sanding Files
- FitGrip Hobby Knife - Set of 2
- Tweezer Set - 8-Piece
- Slim Line Precision - Pin Vise
- The Rogers - Drill Bit Set
- Cal Scale Handrail Stanchions
- K&S 0.020 Music Wire
- Crazy Glue
2) Cab Sides

One thing I did was use my hobby knife and pin vise together to drill out all the excess plastic to open up the sides and windows of the cab, which looks so much better and more realistic for driver figures to add inside, so I paint the inside of the walls black and the edges the color matched acrylic to paint over the pieces of the plastic once sanded smooth.
3) Adding Real Coal

One think I love to do is add real coal that's sold as a load by Hattons.co.uk and in different grades, fine medium and course. For Duck, he has a piece of his cab pictured here I had to take out separately after a bit of unscrewing. I had to use the same technique I did for opening his cab with my hobby knife and pin vise to punch and cut away the plastic of the coal mold away. Then I filled up the empty gap from the back of the cab side behind the bunker with a piece of Evergreen plastic styrene, filled up with Tamyia filler putty along the gap to sand smooth. Then I prime it with gray primer spraypaint and then hand-paint the color matched acrylics.

Once that dries, I put the piece back on the cab, and put a piece of foam core cut to shape to put the coal on as a replaceable coal load! This is great because I can take it off or put it back on if desired. I paint on a think spread of Woodland Scenics white foam glue, then sprinkle the glue right on. Once it's cured the glue dries completely clear and rock solid.
4) Final Details

Now for the finishing touches! I added some heavy weathering around the bunker for a realistic look and heavy use. I enjoy using Dave's Decals weathering powders I use a lot for my models. I used the dark soot color to spread anywhere coal was either shoveled in or poured down from a coal hopper.


I tried something a bit different and gave Duck brake pipes. He's one of the few engines who didn't have them fitted, so I thought I'd give it a shot and see how he looks with them on! All of the brake pipes are made from scratch using 20 gauge craft wire from the craft store. I bend them around a screwdriver to make them curve, and bend them with players to make their shape using my snipers to cut the excess off. I wrap the facets around the bottom where they'll fit on the model using strips of Sticky-Notes of all things, cut with a hobby knife and a steel ruler! I use Crazy Glue to secure the edge of one end and then once it sets, wrap the strip around the wire a few times until it makes a nice nub, then glue the end and cut excess with scissors. Be careful the glue doesn't get on your fingers!
I also wanted to make Duck auto-fitted for push-pull trains, so I also bent longer lengths of the wire to look like hoses that are dangling on the ends that would connect to his auto coaches, Alice and Mirabel, so it gives the appearance the whole train would connect. As the original TV prop had brake pipe bases that were a part of their kitbashed Marklin engine pieces and were never utilized, they look perfect with the hoses on.
Once that's done, I stick them on a scrap piece of blue foam and spray all the parts matte black. Once dry, I drill a hole where I want to put them on the red buffer beam, and secure them in place with Crazy glue. The auto-fitted hoses I used a silver Sharpie to color the ends to mark the metal fixtures!
- Dave's Decals - Weathering Powders
- Tamiya - Weathering Master #1
- Tamiya - Weathering Master #2
- 20 Gauge Craft Wire
- Sticky Notes
- Knipex - Needle Nose Pliers 6-1/4''

I use Smiths from gaugemasterrail.com in the UK, for locomotives and some coaches I get the LP8 screw-links kit to assemble with my modeling tweezers. I have something like the metal tip from a fine tip paintbrush handy to bend the "hooped" parts, then squeeze them to the center piece to swivel freely. I use the same technique as I do with the lamp iron and brake pipes to snip the bottom and wrap the end with Sticky Note strips to glue on as the bottom weight.
Now I have to make a slit on the buffer beam to fit the couplings in, so I hand-drill two holes with my pin vise, then simply cut the excess plastic in between with a hobby knife. This will make the slit you want to slide the coupling in! I cut any excess metal off the coupling hook back itself with snipers, install it, then glue it in place using Crazy Glue, making sure to keep it aligned with the slit made in the coupling mount, then slipped on the coupling on to dry!
I also added Bachmann Branchline dummy lamps on the front and the back, first hand-drilling a hole where I want it to fit and glue the lamp on.
- Smiths Screw Links - LP5A
- Smiths Screw Links - LP8 Kit
- Hornby - Spare Screw Link Couplings
- Ian's Coupling Bases
- RustOleum "Chalked" - Farmhouse Red
- Testor's - Black Flat Spray Enamel
- Bachmann Branchline Dummy Lamps

... Numberplates? I love using custom ones made with real etched brass
by Narrow Planet in the UK that make excellent name- and number-plates
for engines in a variety of gauges. I have a pack saved I bought of his
Railway Series number, 5741, handy in case I ever choose to use 91
percent alcohol or paint thinner for removing the "8" decal off to glue
or tak the new ones on. might be cool for a different look sometime in
the future!
5) 3D Printed Faces
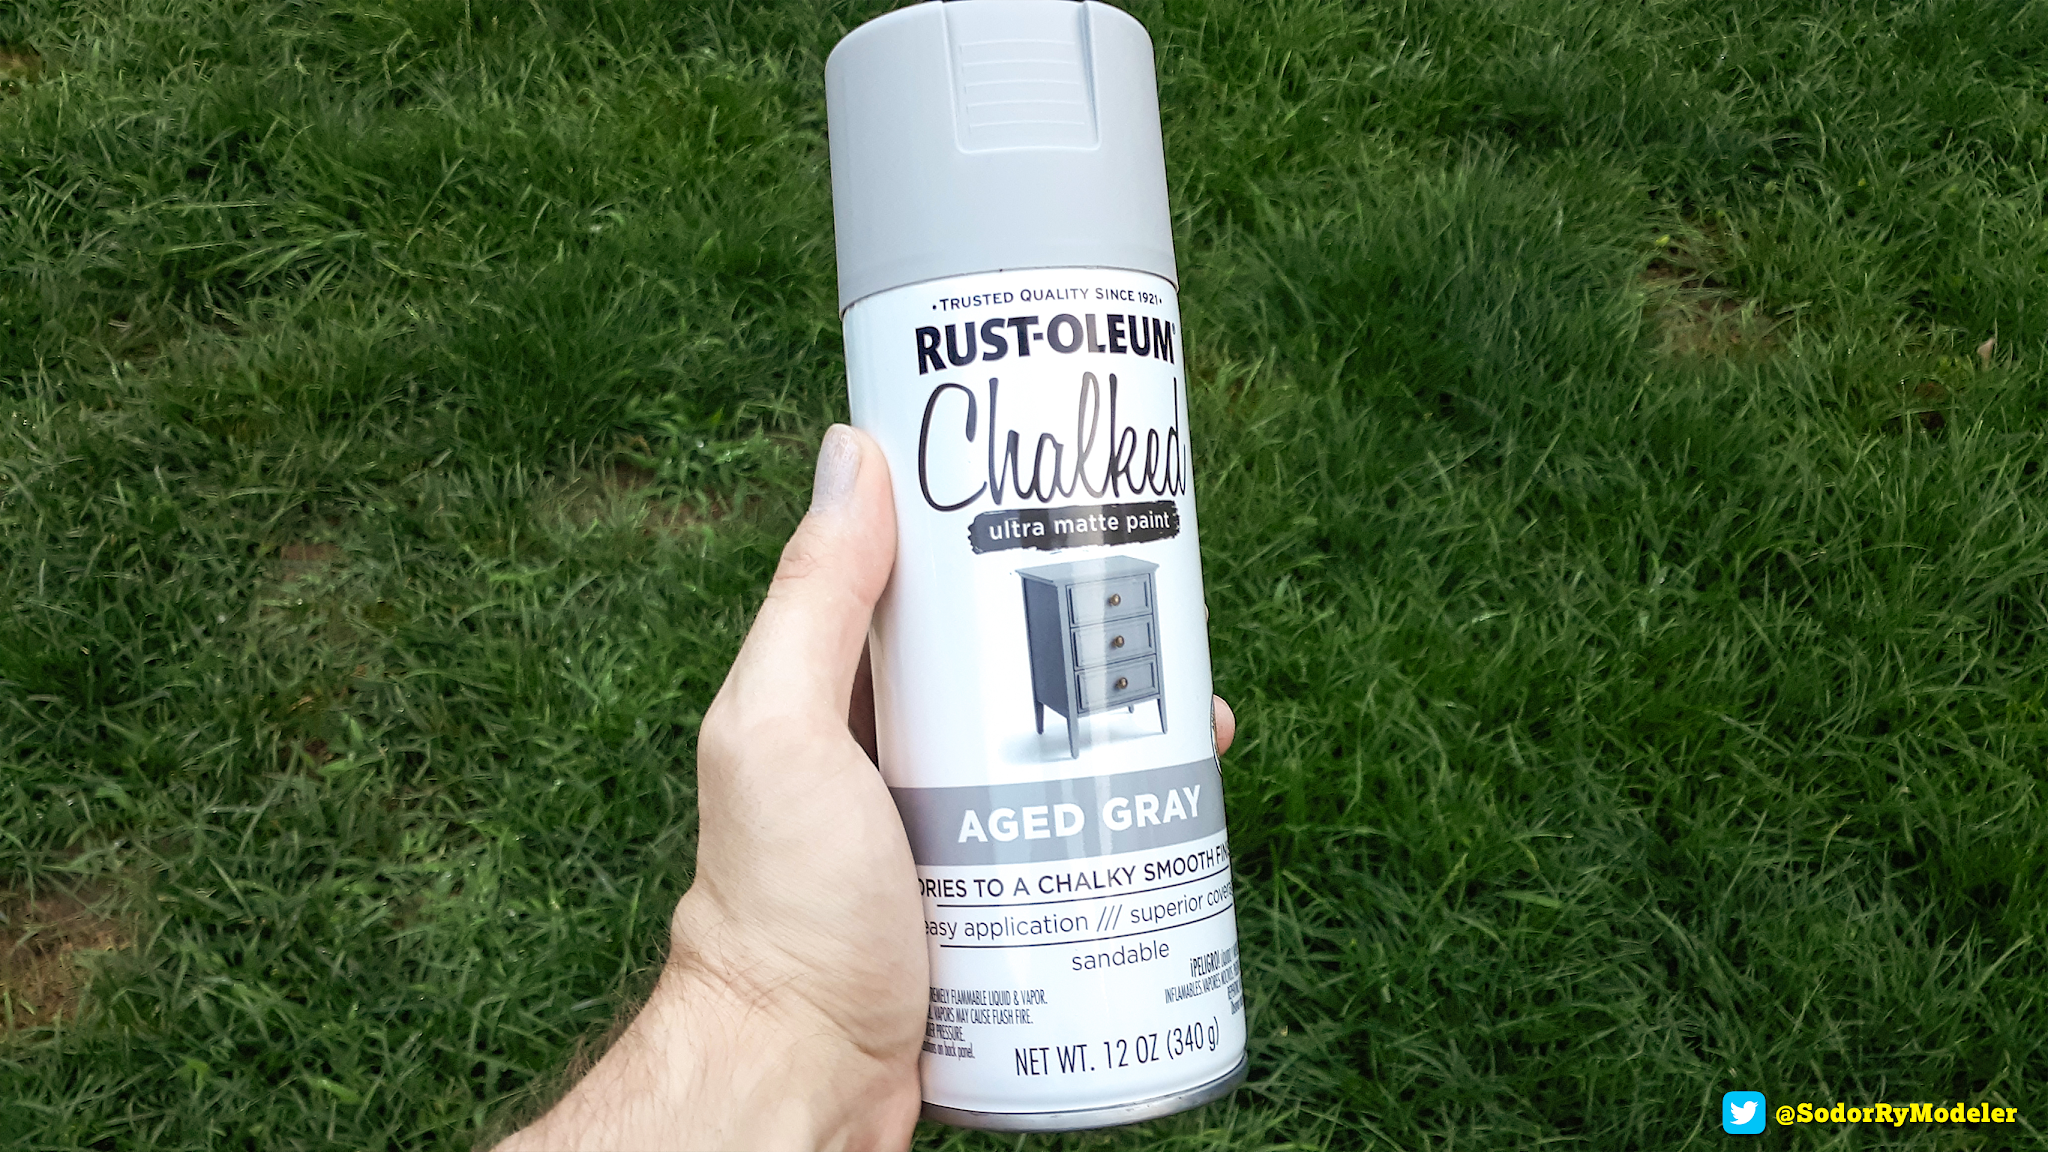

Andrew @the_chairlord designed faces to recreate Duck's facial expressions in Blender, and I commissioned them to scale their designs for HO/OO scale, and my buddy Louis @ThomasTankMerc printed them for me in resin. I love how expressive they look and a few, including this smug face, Andrew designed themself for an original expression.
Before painting, I make sure I clean the faces if they have any dust or residue left from the printing process with water and dish soap, scrubbing them with a soft toothbrush and drying them with a paper towel, making sure they're completely cured for spraying them with RustOleum "Chalked" Super Matte Aged Gray spraypaint!


After I give the spray paint 12-24 hrs to completely dry, I use craft acrylics to add white for teeth, and grays for open mouths. I touch up any painting mistakes using a half-and-half mix of Americana "Gray Sky" and "Cobblestone." I use fine-tip brushes applying it, thinning the paint with a bit of water when necessary. The final touches are the eyebrows, which I first draw out with a technical pencil to serve as a guide to draw over using Faber Castell ink pens, either XS (extra small) size. As ink takes a while to dry, leave it for a while before handling the face if you don't want smudges!

I use white Airsoft paint pellets for the eye balls, so I used 8mm size for Duck, which you can find on Amazon, eBay or BB stores. I commissioned George @bowledout95 to make pupils for me, cut from black glossy vinyl sheets at various sizes for my face projects. I fix the faces and the eye balls together using Blue Tak!
- RustOleum "Chalked" - Aged Gray
- Americana Craft Acrylics - Gray Sky
- Americana Craft Acrylics - Cobblestone
- Americana Craft Acrylics - Titanium White
- Airsoft Pellets - 6mm
- Faber Castell - Ink Pen XS
- Faber Castell - Eraser
- Techical Pencil
- Blue Tak


All finished and ready for the layout, Duck can cruise along and pull his trains! He looks very handsome with any train he's given and with his modifications he feels a lot more like a believable model. I'm quite pleased with the result!
Side note, he looks awesome pulling auto coaches by Bachmann Branchline! I had them custom weathered by TMC (The Model Centre) in the UK who specialize in world-class custom weathering. It's so much fun to have on the layout and they look beautiful. Might showcase them in the future and maybe make more faces!
Thanks for reading! Let me know in the comments below if you have any questions about the process. Happy modeling guys!
- Stephen
No comments:
Post a Comment