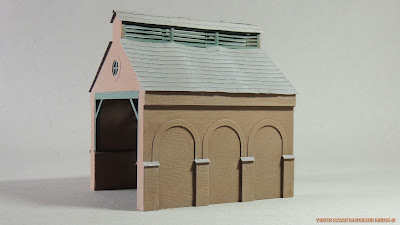
I have been waiting to post this newly completed project! A few days ago I completed my new and most favorite building for my future layout, a goods shed commonly scene in Thomas's classic episodes.
Completely scratch built, as usual, it is made out of textured card-stock and balsa wood, but I feel this structure is special as I used a number of new model-making techniques that I wish to share with you, and a little background of the prop's history on the Thomas Show.
You will find this shed in the sidings that run parallel to Knapford Station. If you look carefully, from season 1 to 5, this shed had a wall in the back, some drain pipes, and there are a few differences in the structure's design.
In the production of "Thomas and the Magic Railroad," many of the buildings commonly used on the sets through the years were remodeled, remolded, and painted very realistically, including this shed. It noticeably gained some faded green roof frames with gables and braces, as well as the brick reliefs on the side of the outside wall.
I found that I liked this look better, so I based construction on how this shed looked then onwards. The shed first housed two tracks, probably as a 2-stall goods shed for only 2 cars (maybe for the mail cars perhaps?), then only one, probably as a spare single stall engine shed. Both Diesel 10 and Donald have been seen when the set was made this way.
In this case I found the width of the entrance to be too narrow to have two tracks as I cut the textured card out to piece together. The Bachmann Percy model has the widest clearance space compared to the other engines as his footplates are spaced quite far from the chassis (I'm not sure the width of Diesel's though, as he is on my wish list...). So I simply made the adjustments as I redrew the measurements on the card to be cut for the shed's walls. I also decided to exclude the molding on the roof as there isn't any on the original. Photographed is the finished product.
A thick piece of balsa wood serves to add thickness to the wall and extra strength, much better than just the fragile card super-glued on the edges! I used wood and layered paper to create the relief wall and arches, and the four reliefs you see with the added tiles.
Thick strips of card was used here to construct the vent structure on top of the roof. If an engine uses this shed at night or is just passing through, these vents allow the smoke exhaust to escape the shed.
Here I wanted to try and make the roof removable, so I could fit this spare piece of balsa to mount LED shed lamps in the future.
When the time comes to make the diorama or layout of Knapford, I can have holes drilled to mount the lights and then have them wired.
The wires would be fed under the table and connected to a small power box, but I hope there can be a way to do that without the building being permanently glued to the table for showings.
There is a great book called "The Encyclopedia of Model-Making Techniques" by Christopher Payne, and I recommend this book for beginner and professional scale modellers.
In it there is a great tip on how to make tiles using strips of card with slits cut with a craft knife. Many railway layouts use this technique in the British Isles, and as I did want to model the shingles in 3D, I thought I would have a go. The results look fantastic and very convincing once dry-brushed.
I am very happy with it; it takes a while but a little time can produce a better model whatever your subject!
On top of that, I glued one side onto card strips so you could open it and see the interior. Here I made the sections of gables that support the roof, all from painted balsa wood.
This will also make it easier to wire the lights and fasten the wire onto the wall to make it appear realistically wired as it would be in real life.
Here is a look inside looking up into the gables. This would be a great prop to film on the diorama for close ups of the engines.
I really wanted to take my time and do my very best with this building, and I think compared to some of the other buildings I have posted, this is by far the best one so far. Thomas is a great inspiration, and a prime example of fine scale modelling.
Finally here it is on my table with some other props to show you how it looks on set. It is a quick set up and not as detailed, but it does show you the stuff I've been making for the past few months in my summer holiday from college.
Feel free to post some feedback. Comments and suggestions are welcome!


wow thts goods
ReplyDelete