Showing posts with label OO Gauge Scrapyard. Show all posts

Friday, July 15, 2022

Project Showcase | The Sleepy Specter

"MYY SLEEEEP!" Lurking in the darkest areas of the Scrapyard, a Specter lies in the shadows, ready to scare anyone who dares wakes him from his Slumber. This is a character created by my good friend Mike @TheBuriedTruck for a story called Demons. It was an intriguing character and I really wanted to see if I could create my own take on this engine as a working scrap locomotive in HO/OO scale, as I have really enjoyed making scrap customs the past year. This was a great challenge, and probably THE most intense operating scrap model I've worked on.

1) Some Background

Mike was inspired by a ghost seen in a shot in one of the newer seasons of Thomas called "Halloween," where it passes the camera under some yard lights and disappearing into the fog, and if you look carefully, you see it's moving right next to Tidmouth Sheds where the engines sleep at night. Quite an alluring shot! It appears to be an old Gordon shell with Murdoch's 2-10-0 wheelbase to make it move, and one of the sludge tenders from S3 in tow.

Although the on-screen prop is a freelance design, there is a basis that looks very similar to it on the LNER that is a P1 class, which is a good version of the A4 but a 2-8-0. A very elegant design for a mixed traffic engine. As there isn't a model of this prototype ready to run, I considered trying another LNER engine, an O2 class 2-8-0 made by Heljan in OO gauge. With a basis I was happy with, it was time to find a suitable model!

2) Acquiring the Model

Looking on eBay I found one that was used and had some very light weathering on it. On one side the valve gear was cut off for some reason. I didn't mind as I felt it would add character to the model; and from the description it looked like a good runner. So I bought it, and after waiting a few weeks for it to travel to the US, I finally got to have a good look at it.

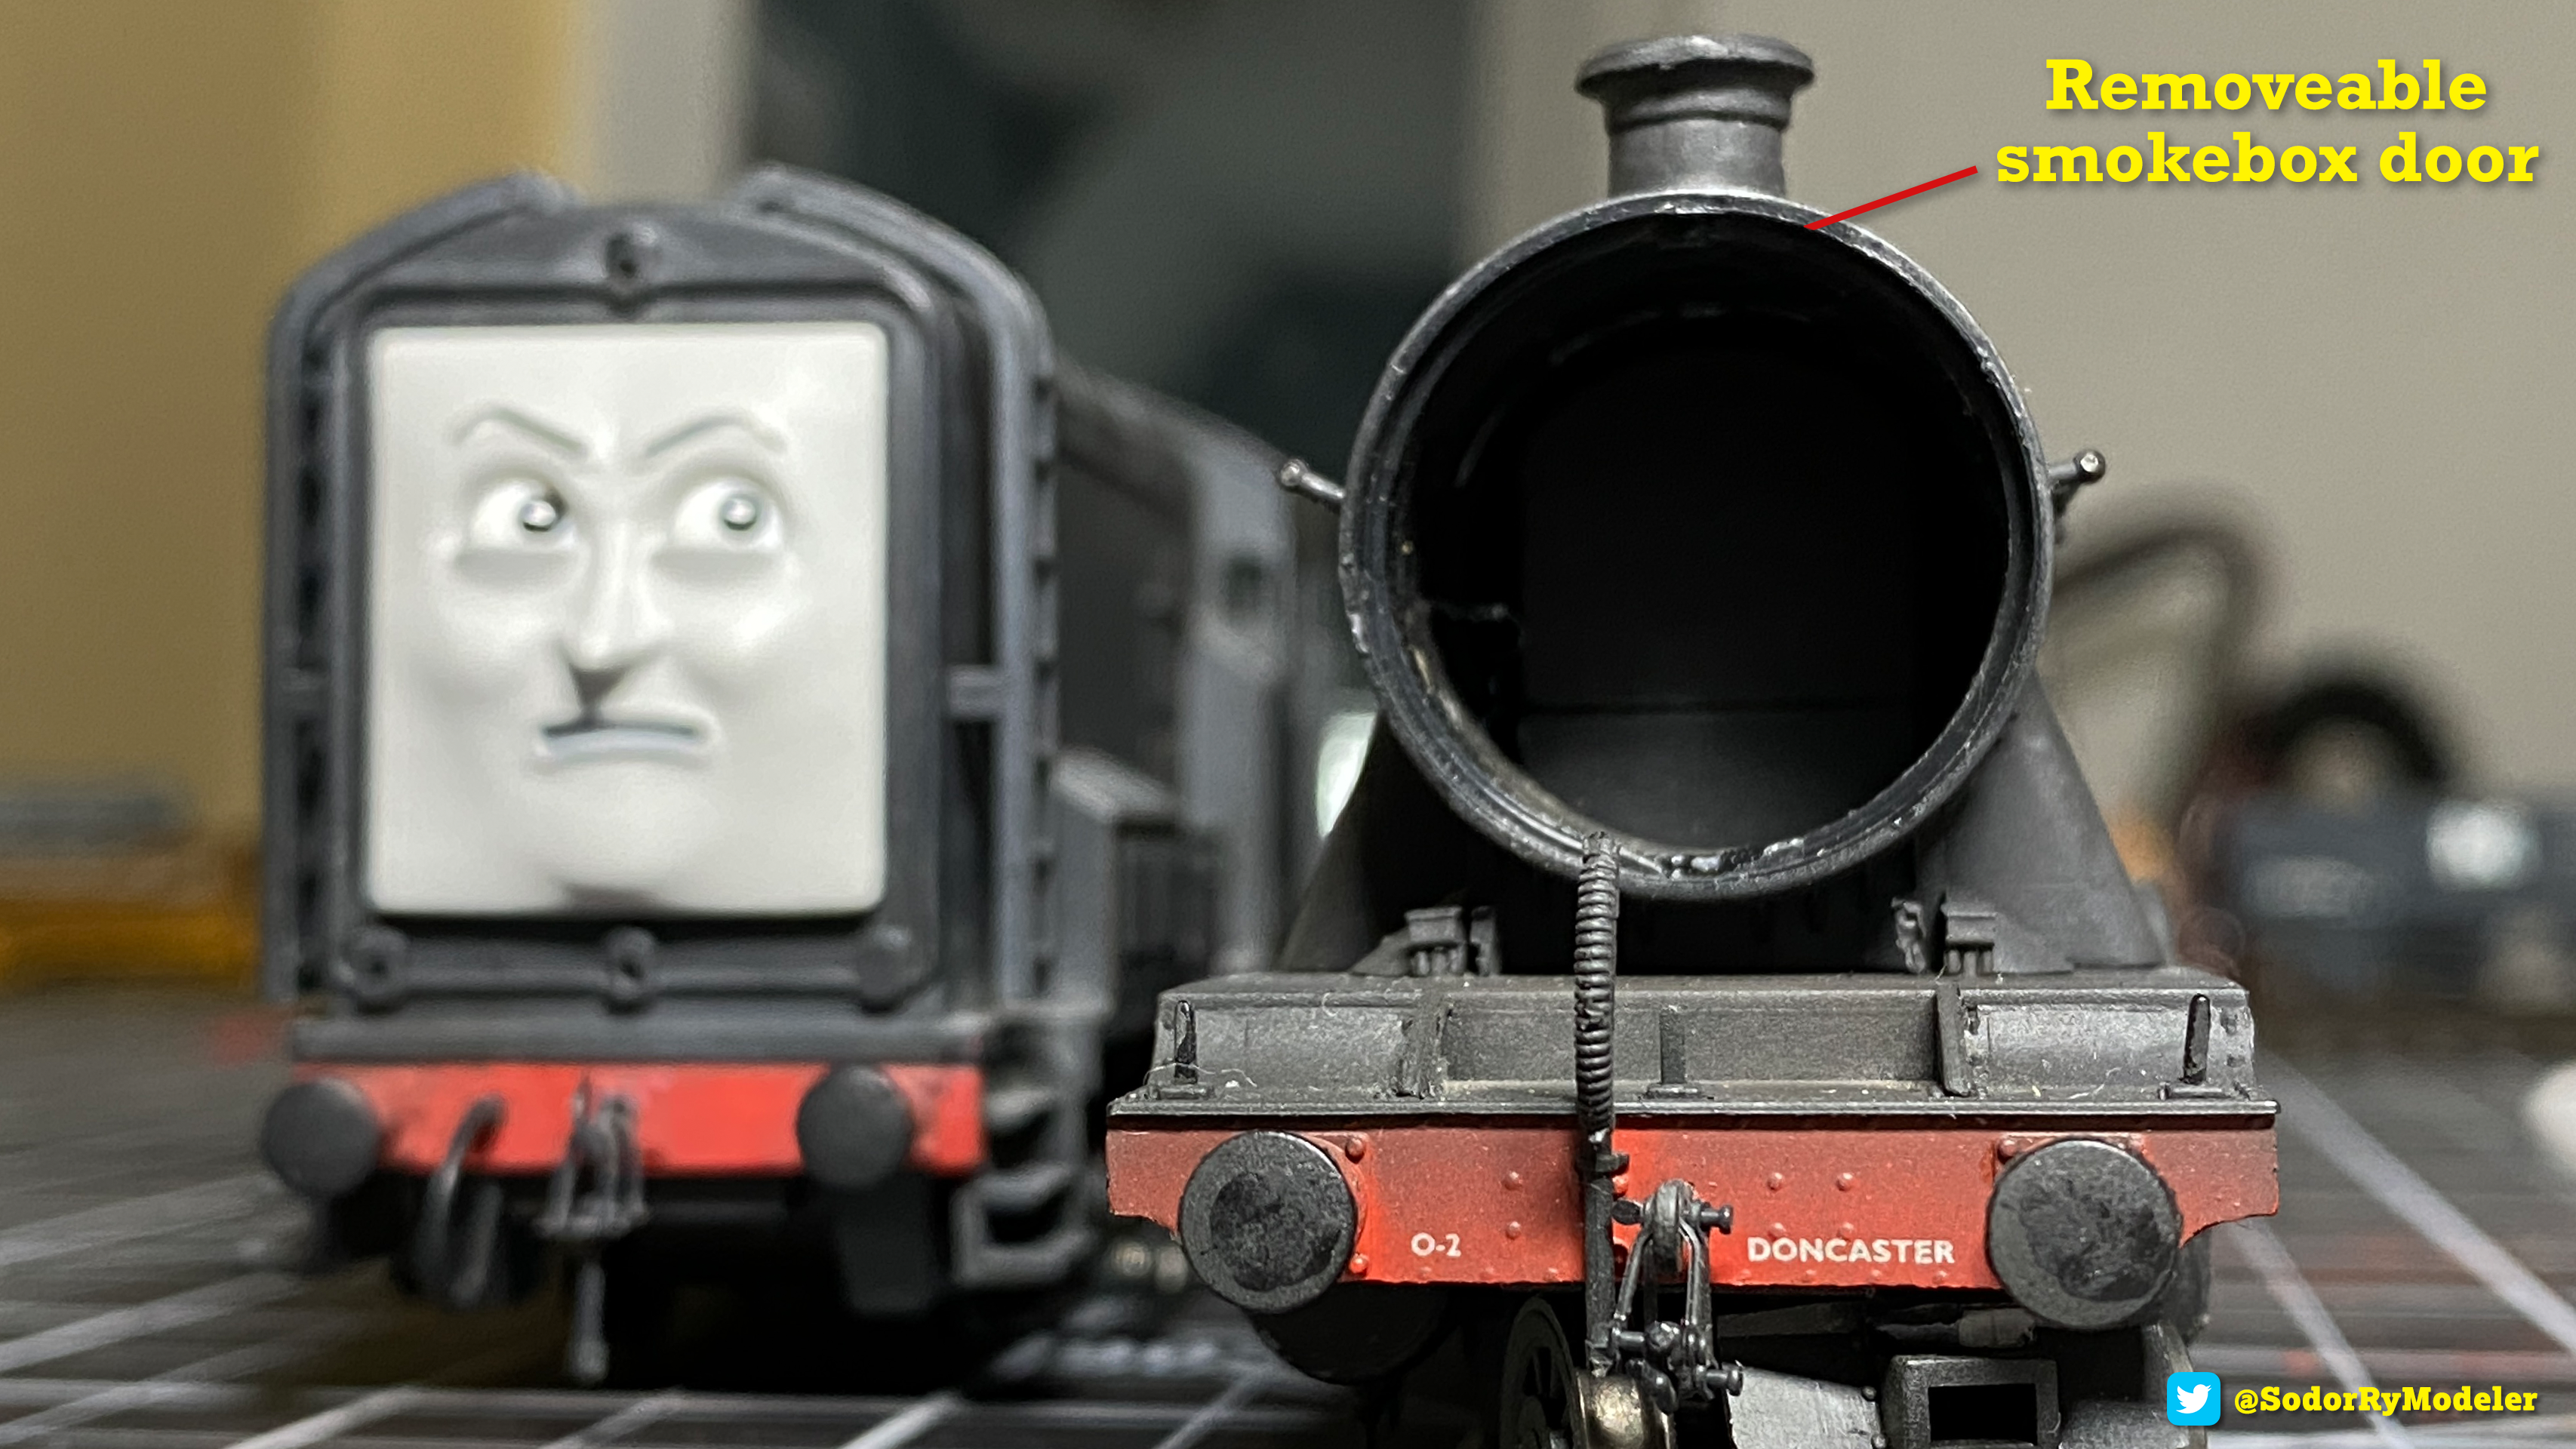
Upon examination it looked very good and ran well on tests. I carefully cleaned the driving gears in the chassis and added some motion lubrication that's conductive, which is a big help for smooth running locomotives. I took off the NEM chopper coupler on the back of the tender and snipped off or bent some of the handrails for an uneven look. I even found I could take the smokebox door off of the locomotive so that would be perfect to accommodate the Specter's faces!

3) 3D Printed Faces

For the faces my friend Jake @Jje09 developed a full render of what the Specter's faces would look like in Blender, and he and Xavier @LightAndCoal were kind enough to send me the STL files of the designs they made together to try out on the model. This engine has a face that looks very aged and dirty to the point where you can see the jawline of the skull around the mouth, with heavy wrinkles and big, deeply set eyes.

Tom @TomTeeLegend printed out the designs in high quality resin. After giving them a wash in isopropyl alcohol to scrub off any printing residue with a toothbrush, I paint the faces like I always do with other Thomas customs using RustOleum Aged Gray to color the face, my Faber-Castell ink pen to draw his distinctive eyebrows, and used Blue Tak to put in some 8mm Airsoft paint pellets for the eyeballs, which have vinyl pupils! I highly recommend my bestie George @bowledout95 if you want to commission some. Now to make it more ghostly!

NOTE: Please spray outside or in a well ventilated area, with a mask, and make sure that there is a consistent temperature in the room of choice, not too hot or not too cold, as it will affect the spray application. Having good lighting also helps with drying. As the trim tape for the lining was glossy, I spray the  model a very light first coat to help painting, apply the paint I want for the body shell, then once dry I add he glossy lining before a final coat. Weathering will come later!

Recently I've been trying Dave's Weathering Powders I use for rolling stock to dirty up faces for an industrial look for engines, OR an aged, decrepit look like in Jake's test render for some ghost engines. I applied soot and dark gray powders with a soft brush all around the edges and cracks of the face, blending them in the gray color of the face, and added a little red around the eyes for some bloodshot eyes and dried blood around the sockets!

4) Painting and Weathering

I pulled all the stops on this custom an brought out all the earth-toned and rust colored craft acrylics I have to begin the weathering process! I still love using the craft acrylics I find from craft stores such as Hobby Lobby or Michael's. Studying some reference photos, I wanted to try out a new technique and use a small piece of a sponge I cut up to use with my pliers to dab the paint on the boiler, cab, motion and driving wheels for a chipping rusty effect. I also took out some of the cab glass windows and bent the handrails up even more for worn details. I liked where I was going with it but wasn't happy with the appearance of the first pass.

So after trying to spray some RustOleum Camo and Rusty primers, it gave a much more of a rust-colored base to blend in some acrylics to paint on and try the sponge-dabbing method again. The first layer provided a rough texture in patches that looked quite believable with some dry-brushing and further dabbing. This improved the orange look of a typical scrap engine I was going for, but much, much more realistic and as the layers dried I began another new process, chalked graffiti!

5) Chalk Graffiti

In Mike's story, the scrap engine is covered with all kinds of chalked markings. In real life, chalked notices informed workers and visitors which engines were bought for preservation or to be cut down. Jake took some liberties and added some warning messages from workmen who might have seen the Specter, with some ominous words all over the body. I first tried drawing them out with my 0.5 technical lead pencil where I wanted to paint them, and then went over the lettering with a long, fine brush with thinned white acrylic for a smoother application. This was a fun challenge as it makes for an effective drawn style.

6) Practice Photography and Ligting Effects

After some more dry-brushing and final touches, it was time to see how the engine looked under the Smelters lights! I use my Apature MC LED lights that are also RGB for all sorts of colors I can control with my iPhone to create a range of colors I choose, in this case the hot, hellish red of the Smelter's Shed on the locomotive, right on my office desk. It was breathtaking to see how good the model looks with the graffiti and the rusted detail all over, and the vengeful face with its aggressive expression.

After some more dry-brushing and final touches, it was time to see how the engine looked under the Smelters lights! I use my Apature MC LED RGB lights I can control with my iPhone to create a range of colors I choose, in this case the hot, hellish red of the Smelter's Shed on the locomotive, right on my office desk. It was breathtaking to see how good the model looks with the graffiti and the rusted detail all over, and the vengeful face with its aggressive expression.

It's not often I surprise myself like this, but this has got to be the most intense scrap engine custom I’ve ever done, and the fact that he runs too, I’m really quite proud of him! Scary engines are so much fun to do, and I have also learned a lot by utilizing new techniques to create something very different from what I used to. I hope you all have enjoyed it and are inspired to try making your own ghost engines for the Spoopy season! I'll be sure to try out more stuff like this in the future.

Let me know what else you would like to see in the comments and any questions you may have. As always, happy modeling!

- Stephen

Project Showcase | Custom Sludge Tenders

Inspired from the Thomas and Friends story, "Tenders for Henry," when the big express engine, Gordon, gets a visit from his brother, the Flying Scotsman. Henry is jealous of his 2 tenders, so Duck plays a trick for him to have 6, when they turned out to be old and filthy boiler sludge tenders. So, what are Sludge Tenders? When steam locomotives are scrapped, sometimes their tenders would be used as spares for working locomotives, fitted with snow plows to help clear snow, or carry the sludge that's cleaned out of the boilers that are emptied to help with maintenance when cleaning.

For this big project, I'll show you start to finish how I made them in HO/OO scale from scratch, using spares, detail parts, and cardstock!

1) Body Construction

The very first thing I did was browse eBay.co.uk and looked for OO gauge spare tenders, and found a handful of different sizes from Bachmann Branchline and Hornby. This included some for various classes such as a GWR castle, and mostly LMS tenders, with one smaller than the rest. They all had metal slabs added for some weight. Some had no buffer beams. This would give me the ability to make the tenders in the exact shape I wanted, and would prove to be far cheaper to build than getting fully assembled tenders.

When they finally arrived from the mail on the office desk, I began scratch-building! I built around the weights and molded parts of each chassis themselves, using chipboard. All the added buffer beams were balsa wood strips cut to length either end, one end having brass buffers also found on eBay.co.uk, and left the other end that connects to the locomotive blank with the edges cut at an angle in the bottom (much later I would add couplings like the TV model props).

Before spray painting the buffer beams red, I tried brass brake pipes from a lot I found on eBay.co.uk to see how they look with the detail. Later I'd also try some made by 51L also on eBay, white metal castings that have a great appearance, and look very prototypical. In the end, I ended up making my own TVS inspired ones from craft wire.


Soon the body began to take shape. I made them entirely from Bristol board! Picked up from a pack of them in the drawing section of the craft store, which is very strong and easy to cut, and for the basic construction of the tenders, it felt right to use. Any other "molded" looking details I glued strips of Bassil Basics cardstock, such as for footsteps, and curved edges on the top of the body.

It was here I also began to add the handrails, the ones I used were Nairnshire Modelling Supplies from eBay.co.uk. I have to have the purchases ship to a friend in the UK and then to my home as they don't offer international shipping. They're the medium sized ones, with 0.45mm wire. They look great and are a nice detail for the body! Any handrails and wire will do, but since these are hard to find, I've been using Cal Scale handrail stanchions and K&S 0.020 music wire.

2) Painting

At last, paintwork! I gave the bodies an even spray of RustOleum's Camo dark brown. Next I followed up by using Tamaya's Weathering Master kit, which like makeup you rub on with the included foam-tip to "streak" the stuff from the top down, creating a fine application of the smeared powder. The more you add, the thicker it gets.

Then I added the details, including Smiths couplings! I first tried the LP5 screw links, but opted for the LP4 chain links like the show later.

3) Lettering


After a while, I finally got the N E lettering for the bodies made from cut vinyl from a friend. The N E stands for the North Eastern Railway in the UK. I cut the lettering away from the sheet I want to apply with scissors, then use Scotch tape to peel the vinyl away from the backing, and stick the lettering on the body. I remove the excess vinyl using metal modeling tweezers and my hobby knife to pluck it off when necessary. The result is a clean, sharp application that makes it look brand new, so now the heavy weathering can begin!

4) Extra Weathering

I started using acrylic thinned with water to add streaking from the top down to the bottom, using Folk Art or Americana craft colors for some rust, some tan for contaminated water. Once that dried, I dry brushed the plastic chassis detail.  I did the same thing for the Bristol body edges, along the top, and on the handrails. This helps bring out the detail and add a touch of extra realism. I even added some blotches of green to mimic moss, that might have crept up from standing on the sidings for a long time.

Now for the best and important bit, the actual sludge! My good friend ED @EDsTrainz recommended enamel washes by Mig, which acts like an oily stain that dries that dry clear, flat, or shiny depending on the bottle. This ended up to be just the look I was looking for to match the sludge streaks catching the sunlight on the TV model props on screen. So I ordered Dark Wash for the muddy off-black type of look I was going for.

As it is enamel based paint, they need a vigorous shaking before use so the actual "color" is mixed with the enamel oil. Having a cordless paint mixer works very well for this. Then I carefully opened the bottle, and applied the wash with a fine brush, working in two streaks on the side of the body top to bottom, and along the bottom edge of the footplate of the tender's chassis, all the way around. While wet I could use a Q-tip to blend the streak close to the bottom so it fades from a hard drip to a blended spread with the body's dry paint. This was exactly what I wanted, and once dry, created an amazing effect that looked great under the office and studio lights.

Thanks Ed for the suggestion! If you want to see his exquisite professional model work, go check out his Patreon! patreon.com/EDsModelingCorner

5) Final Touches

The last thing I did was update the front and back detail. Looking more closely at footage and photos of the VHS tapes and the Thomas Wiki, I learned the actual TV model props had couplings added, but no buffers, so they could couple together. So I replaced the Smith's LP5 screw link couplings with LP4 chain links, which I spray painted with RustOleum terracotta primer, perfect to give them a rusty appearance!

Then the brake pipes. I swapped most of the model ones with my own from 20 gauge craft wire, each bent using a screw driver handle, and cut the excess with pliers. I wrap the facets around the bottom where they'll fit on the model using strips of Sticky-Note paper, cut with a hobby knife and a  steel ruler. I use Crazy Glue to secure the edge of one end and then  once it sets, wrap the strip around the wire a few times until it makes a  nice nub, then glue the end and cut excess with scissors. Be careful the glue doesn't get on your fingers! Once I make a batch of them I also spray paint them with black RustOleum primer, then drill a hole on the buffer beams using a pin vise, and secure them in place with more Crazy Glue.

They look so good! This was a fun project and scratch-building them really helped make these tenders look exactly how I wanted them! Henry looks pretty funny pulling them, and they're a great show-piece.

At the moment the only thing I would love to add is Woodland Scenics Realistic Water to pour sludge in the body shell, which is like a epoxy that dries glossy when cured, and can be colored. I put a piece of foam core on the bottom of each tender and sealed the edges with Woodland Scenics foam glue. Adding a bit of green-brown dye Woodland Scenics sells to the mix in would add that dark color to make the "water" look milky and muddy as I pour, and will harden to a glossy finish. That would be something that would sell the look of a tender holding sludge once cured without worrying spilling actual liquids on the layout! If I go ahead with it I'll update this page with pictures when finished!

Thanks so much for reading everyone, I really appreciate it and enjoyed sharing this project with you! Let me know in the comments below if you have any questions about the  process. Linked below are most of the supplies I used you can look at for your own projects!

- Stephen