Showing posts with label Narrow Gauge. Show all posts

Saturday, June 14, 2014

"Slate Quarry," Walls & Sheds


So on my desk you can see a few new things I've arranged for you to see for today... including some wooden wagons I scratch-built from balsa wood for Prince's quarry train. They have the garden ballast I use for the large-scale Lego tracks for the Skarloey Railway.


This is one of two retaining walls, made from foam-core wrapped in Bazzill Basics cardstock, and painted with Plaid FolkArt and Apple Barrel acrylic paints. I also used balsa strips for the semi-columns and the cap running on top, with strips of thicker card folded over to give the illusion of individually placed blocks.


I was also in the middle of making an open-aired shed for this scale, so it could be in the slate quarry sidings and other scenes. It will have the A-frames and roof, shingled in card for the corrugated metal roof, and painted green and weathered.

Wednesday, March 19, 2014

Modeling the Prince: Part 3


Here he is! The Pride of the Ffestiniog and Welsh Highland Railway is finished... thought I'd upload some photos of the finished 16mm scale model, with a lot of detail and a few surprising features!


It was a lot of fun building this famous locomotive from scratch, and it feels exciting that I'm getting back to my model-making for my Junior Animation Seminar Stop Motion class project. It did take a little longer than expected, even with the heavy workload for my classes and other important obligations. Well today, the George England has pulled out of the workshops from the glory days of the Ffestiniog Railway's operations.


Since I published the photos of the cab interior, I gave it the roof it needed, finished his tender, and added a lot of other details, such as his number and name plates, bolts, his whistles, valve gear, and even working couplings.


Here are his working coupling rods! I have been hoping for a long time to have the rods of my scratch-built models actually work and move for my narrow gauge stock. I decided try and make them myself.
  1. I cut some disks of cardstock to make the wheels, with a lip and a center bolt
  2. I glued four of these onto the wheels of the Lego chassis, with spokes to place the rods, made from very thin cardstock tubes
  3. The coupling rods themselves are made from balsa and wooden barbecue skewers
  4. They have fasteners made from cardstock to allow the rods to be linked and slide smoothly together
  5. The sliders are toothpicks glued to the cylinders
  6. After they are assembled, they were painted using Medium Gray, Dove Grey, and a little weathering
After running the locomotive on the tracks for a while to loosen the parts, the movement was quite smooth, and the coupling rods work very well. They look so much more realistic compared to static mockups! I am very happy that they came out nicely.

In the first photo of this selection, you can see the Lego track ballasted using the Woodland Scenics Grey Ballast I have used for my HO scale dioramas, which does look very realistic, and I think it might be useful for the yard scenes.


Here you can see Prince's new smoke box, as I thought the first from a few years back looked too old. After gluing a strip of cardstock to make a ring, I glued it on a flat piece and cut when dry to make his door. Then some strips were placed for his door hinges, and for the door handle, I cut anther smaller ring with a few strips for the spokes, and the handle.

The coupling can be raised or lowered, and his lamps are replaceable. His water tank cap can be lifted too.


Prince's name-boards and number-boards were made, with strips of gold-colored cardstock glued for the edges. I wrote his letters using an EK Success Dual Tip Metallic Pen, which I recommend for writing gold calligraphy for nameplates or for any art project. It flows like a liquid, and after a bit of practice, it's really fun to use.


I mixed some colors to weather the body's tanks and cab, with grime, rust and dust, using Plaid FolkArt and Apple Barrel paints. His coat is Light Red Oxide, which I mixed with a few other colors for the weathering:
  1. Light Red Oxide and Terra Cotta was mixed with Dark Gray and Wrought Iron for the grime
  2. Calico Red was used for his buffer beams
  3. Honeycomb and Caramel Candy for dust

I decided to model Palmerson's smaller tender as I liked its narrow size. I folded strips of paper and cut the angles to glue for the angled trimmings. Here you can also see his rear lamp.


A few of the gauges on the firebox can be seen inside the back of the cab. I assembled a bumper, which in real life allowed the tender to glide smoothly without it bashing against the back as it moved.


Overall I am very happy with how Price has turned out. This scratch-built and Lego hybrid running system has evolved to something very special for me, which has allowed me to produce my model locomotives I always wanted to make and work with what I have. It feels great to see how far this has come since the Skarloey Railway models, and now I can also make my own railway rolling stock for some short film projects, since I really love the history of these little railways of Wales and their trains.

I also have made the bodies of my freight cars, and they need to be painted and detailed, so pictures of these will be published soon. Let me know what you think and feel free to drop a comment or question!

Enjoy the photographs, and happy modeling!

Wednesday, March 5, 2014

Modeling the Prince: Part 2

Here are some photographs of the interior that is completely modeled, with the gauges, the throttle and the brakes.


This usually takes the most time to model for these large scale engines, but it is worth it! I used card-stock for all the parts, rolled up and glued into cylinders and decorated and detailed each for each part.


Pictured here are two scratch-built shovels! The handles are each toothpicks! The pail itself is paper.

Now Prince is finished. Posted soon will be photographs showing him in profile!

Sunday, February 23, 2014

Modeling the Prince: Part 1

In progress, the icon of the Ffestiniog Railway, The Prince! All of the body work is completed. I am going to try and describe his construction as I did with Rheneas, this blog's signature series of posts, all made possible by the grace and kindness of Greg Tiernan and Nitrogen Studios. 


Prince will be the main engine or character that will be taking the slate train from the quarry inclines to the harbor. As I have loved the Mid Sodor Railway, This line that belonged to Duck, Stuart and Falcon had inspired me to make a animation short of something real, showing the workings of a quarry, the railway and its engines that work there. Prince is famous and a well recognized engine as one of the oldest surviving roster of engines of this historic line, technically the first narrow gauge railroad in the world.

Prince and his railway will always be remembered and loved, and I hope that the fruit of all of the hard work I will put into this faithfully represents essence of the magic felt seeing these trains, the little toy trains of Wales working in the mountains of Snowdonia.

Drawing in graphite using a 0.7 technical pencil, measurements in centimeters, 16mm scale.

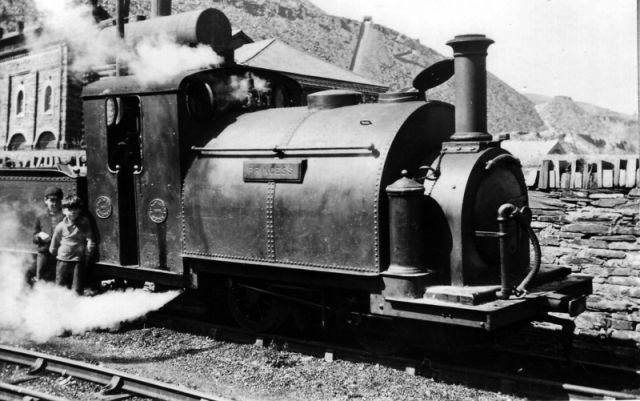
Prince's sister engine, Princess, at the Harbor Station at Blaenau in 1930, (www.festrail.co.uk)
While studying some amazing photographs found online, I wanted to make Prince exactly how he and his brothers and sisters on the Ffestiniog railway looked, from the 1900's until before World War II. I drew the sketch I shared from one of the previous posts to measure how I want Prince to look when he is made, with a side view and a front view. 
This is amazing because I really love drawing these blueprints, and I find that it pays off to measure out the shapes ahead of time. I am actually making a lot of these, for Rusty, Duncan, Peter Sam, and my buildings made from the past few months.


The cab, tanks, tender, and their details such as hand rails, are all made of card, braced with balsa wood, all glued together using white glue and crazy glue, with some scotch tape here and there! The tape was used to brace the tank and the smoke box together.

I use a Lego chassis to make each engine move, which allows each engine have interchangeable bodies when I want to make more engines, as I have two of these cool Lego motors!

I am planning on adding working coupling rods, so we'll see how that works!


I used spray primer to give Prince his color. First I was going to pick a color from my stack of textured card stock from Bazzill Basics, or paint it using Plaid Folk Art and Apple Barrel acrylics, but after using my spray paint primer, I liked the terracotta color it had, so it stuck.

The funnel is made from coiled strips of card glued together. The same technique was used to make the gold handrail supports on his tanks. The sides of the footplate is balsa, the bolts and details made by gluing strips of card together. When fully assembles this will be generously weathered for that extra bit of realism.

Here is the tender. Here the handrails are made from painted toothpicks!
To make the Lego wheels fit snugly underneath the chassis, I used balsa wood to brace them.
Here is the inside of the tender, which will be filled with coal later.

I am very happy with how good Prince looks. He has always been one of my favorite narrow gauge engines, and it feels wonderful to make him after practicing and using some new modeling techniques.

So far things are going on schedule. More photographs will follow soon.

Monday, June 3, 2013

My Workbench

To keep interest going for my blog, I am going to post pictures and sketches of my old model railroad and some plans for future projects. I know that fans comment on how much they like the tests and sets I have made on my YouTube channel, so I hope you come and see my ideas and tips on a daily/weekly basis, and enjoy the pages you see and read!


Here is a picture I took of my work space in my room, for creating art for college and my scale modeling! You can see Sir Handel, a Knapford goods shed, some freshly painted freight cars, and other projects I have done for the past few years.

Pictured are also the common tools I use:
  • a cutting mat
  • pencils
  • craft knife and Atlas track knife
  • scissors
  • rulers and templates
  • Scotch tape, white glue and Crazy glue
  • acrylic paint
  • technical pencil and pencil lead
  • gel pens
  • pencil sharpener
 You can see the posts I have in order of my projects in the Workbench pages I have at the top of the blog panel, check them out to see the engines buildings and other cool stuff made!

More posts coming soon.

Sunday, April 14, 2013

Modeling Sir Handel: Part 1

Recently I began construction on Sir Handel, and as I have been planning on trying out an original look for the Skarloey engines, Here is the third engine to join the team!


Here he is gleaming in his Railway Series color scheme! As you have seen with Rheneas and SkarloeyI am modeling these characters based on how they looked  in the Railway Series, and the large scale models used from season 5 onwards in Thomas' TV series, loosely based on their prototypes.


Here is a drawing of Sir Hayden done in blue pencil in his former glory days. I mentioned in earlier posts I love to draw, and today I like drawing the engine first, in a three-quarter view, and each side measured out, which can be transferred as templates on paper to cut the pieces.out for the model.


This engine is made of card-stock, Bazzil Basics textured card, glued together using white glue and crazy glue. For parts such as the cab and chassis I brace the pieces together using balsa wood.

Sir Handel still needs his wheels, coupling rods and valve gear, but I'd say after making him a few times, I think this is the most representational and original look Sir Handel deserves. I liked how Sir Hayden looked engineered in his original shape.


I use Scotch tape to assemble parts like the tanks, wrapping the outer shell together to the shape of the tanks either end, so it is seamless, and it is easier to put together, too. The funnel, smoke box, water cap and domes are made by wrapping the paper in a cylinder shape and gluing it together, then cut to match the curve of the parts.


On one side of the cab, similar to how Sir Hayden looked when he was first bought by the Talyllyn Railway, I have the door closed in a "metal" sheet, which was added on to protect the crew from knocking their heads on the very low bridges and clearances on the line at the time.

 
Here is the cab interior, with reverser, gears, brakes, pipes, and even the gauges! All made once again from scratch using wood and card-stock. It does take a while, especially painting the interior, but it looks so much more realistic and worth the time and effort to make, and it feels good to try something new!


Until next time!