Tuesday, December 30, 2014

Culdee & Patrick ~ Blueprints

 Here are scale drawings for two engines of the Culdee Fell Mountain Railway, Culdee and Patrick!

Culdee, No. 4, Built by SLM in 1896
"Mountain Engines," is one of my favorite books from the railway series. I really enjoy reading the stories of Culdee, the history of his line, and the operation of a very unique roster of equipment that were designed for climbing up steep slopes, through rocky terrain, and windy weather. It was a goal of mine to make the rolling stock and the sets of the Culdee Fell Railway many years ago, and for the past few days I made measured drawings of Culdee and Patrick (one Lord Harry), so when I decide to scratch build them, I could have these handy to keep them on-model to the real thing. They'll be the basis for the other engines, such as Wilfred, Shane Dooiny, Alaric and Eric.

Culdee, Front and Back Views
When I do make them, the coupling rods will work as they look in these drawings, so they'll move as the engine rolls along the track. It would be cool to hand-lay custom track with Midwest Balsa Wood and Evergreen Plastics to make rack rail, and I also plan to put together dioramas with foam rocks and props for recreating those memorable shots of the line seen in the books.
Patrick, No. 6, Built by SLM in 1962
The engine's Swiss-patented designs and their special equipment, along with both the atmosphere and nostalgia of the location of the railway were some of the reasons why these were some of my favorite stories. These engines needed bravery and courage for the dedicated operation of their railway. The moments of their adventures were illustrated well in the beautiful paintings of Peter and Gunvor Edwards.

It was wonderful to see the modeling team of the Thomas and Friends show create the larger scale sets and equipment for the Skarloey Railway and "Jack and the Pack." Each of these two industrial systems had their own charms that made them special. Narrow gauge, and construction! Looking back to their period of making model dioramas and working equipment for the show, I still believe it would have been an exciting opportunity for the show to recreate some of the stories that still lie waiting in the pages of the Railway Series, like the Small Railway system, and Duke's old Mid Sodor Railroad. It would have been amazing, but I think the reason why we really enjoy the books so much is just because the Reverend Awdry's vision was captured so beautifully from page to page, and for children and people of all ages, they are truly enjoyable to read. Maybe someday soon these stories will make it to the screen. Meantime, another good reason to come back to these books and read them again (!); and for me, to keep modeling too.

Wednesday, December 24, 2014

Tool Sheds #3: Yard & Quarry Huts

During the summer I was able to get back into making some more structures for the yard scenes, and here are a selection you may recognize from some of the newer and classic seasons of the Thomas show.


Here is the first one, a little yard office often seen from season 6, the collection of structures that were made since Thomas and The Magic Railroad. This building has also been seen at the quarry and Brendam Docks.

Since modeling the Knapford Goods Shed, I make singles from scratch using layered strips of cut textured card glued on the top for the roof, painted and weathered. I also used craft wire to make the drain ducts, with strips of paper wrapped and glued for the ribbons. Mounted on the walls are notices, and a work a force announcement for the crews at the back for extra detail.


Here is a small tool shed, often seen by refueling equipment next to the water columns and coal bunkers, weathered in a little dust for the quarry dioramas where there is a lot of gravel or sand.


You might recognize this one! This structure was made for the dioramas seen in seasons 1 and 2. The first batch of Wooden Railway buildings had included this structure along with the Tidmouth Signal Box. I also have a water hose-pipe at the back for when the structure is a stand-alone in the middle of a yard when not a lean-on next to a wall. There are also more notices and some scratch-built skids.

All of these buildings have hollow spaces underneath to add lights for filming the dioramas at night. I feel every time I try making more of these classic structures, keeping in mind everything I learned reading scale modeling magazines and websites, these buildings keep getting better and better. And that of course makes me very pleased indeed.

Tuesday, December 23, 2014

Railway Series Structures #1: Lorry Garage

I would often flip through the Railway Series books to find structures I can model aside from the TV series of the Thomas show. A few years back I modeled a shed that is seen in an illustration found in the "Toby the Tram Engine" book, in the story "James in a Mess." I liked the size and the little vents on top, so I thought I would try and give this building a shot.


I cam back to it recently and added some extra details. I took off the original plain roof, and added balsa wood to strengthen the structure inside. I then glued strips of textured card-stock for a metal roof, painted and weathered, with a little rust coming from the tiny smoke-vents.

Next I made a wooden gable with a spire at each end for an elegant touch, as the structure could be next to a station or a yard with buildings that have that extra bit of ornamentation.


I added bits of Woodland Scenics ground foam for a little bit of overgrowth along the base of the structure, in addition to mounted notices outside and inside. The lorry is one of Base Toys' models from eHattons I used for the Horrid Lorrys remake I made a while back. It fits nice and snug indoors, and is a great shed for any large open vehicles.

This was a good one. I would like to add a grill above the entrance that's seen in the illustration, but otherwise, I'm pretty happy with how it came out, ready for filming!

Tuesday, August 5, 2014

Tidmouth Signal Box #1


Here is today's newest scratch-built model, Tidmoth Yard's very own signal box. I'm calling my first version of these classic structures seen from the early episodes of the Thomas show, Box # 1.


David Mitton's model building team used this structure in many of their dioramas of various locations from seasons 1 and 2, in places such as Tidmouth Sheds, the entrance to Knapford Station terminus, and in Tidmouth Station's shunting yards. It was used with the wall having a stucco surface texture for Kirk Ronan's station in season 5, before it was remodeled for the newer seasons after the Thomas and the Magic Railroad movie. It was even featured painted in Tidmouth Shed's colors in season 6.


This project was on my mind for a while to draw into a blueprint, so one day I measured out the structure in centimeters, first as it looked in newer seasons.


I thought it would be a good idea to try and see if I can make this box as it appeared in the first seasons, with tan brick, Hunter Green trim, its cream woodwork, along with its maintenance porch in the front of the windows, and having another go at making a shingled roof!


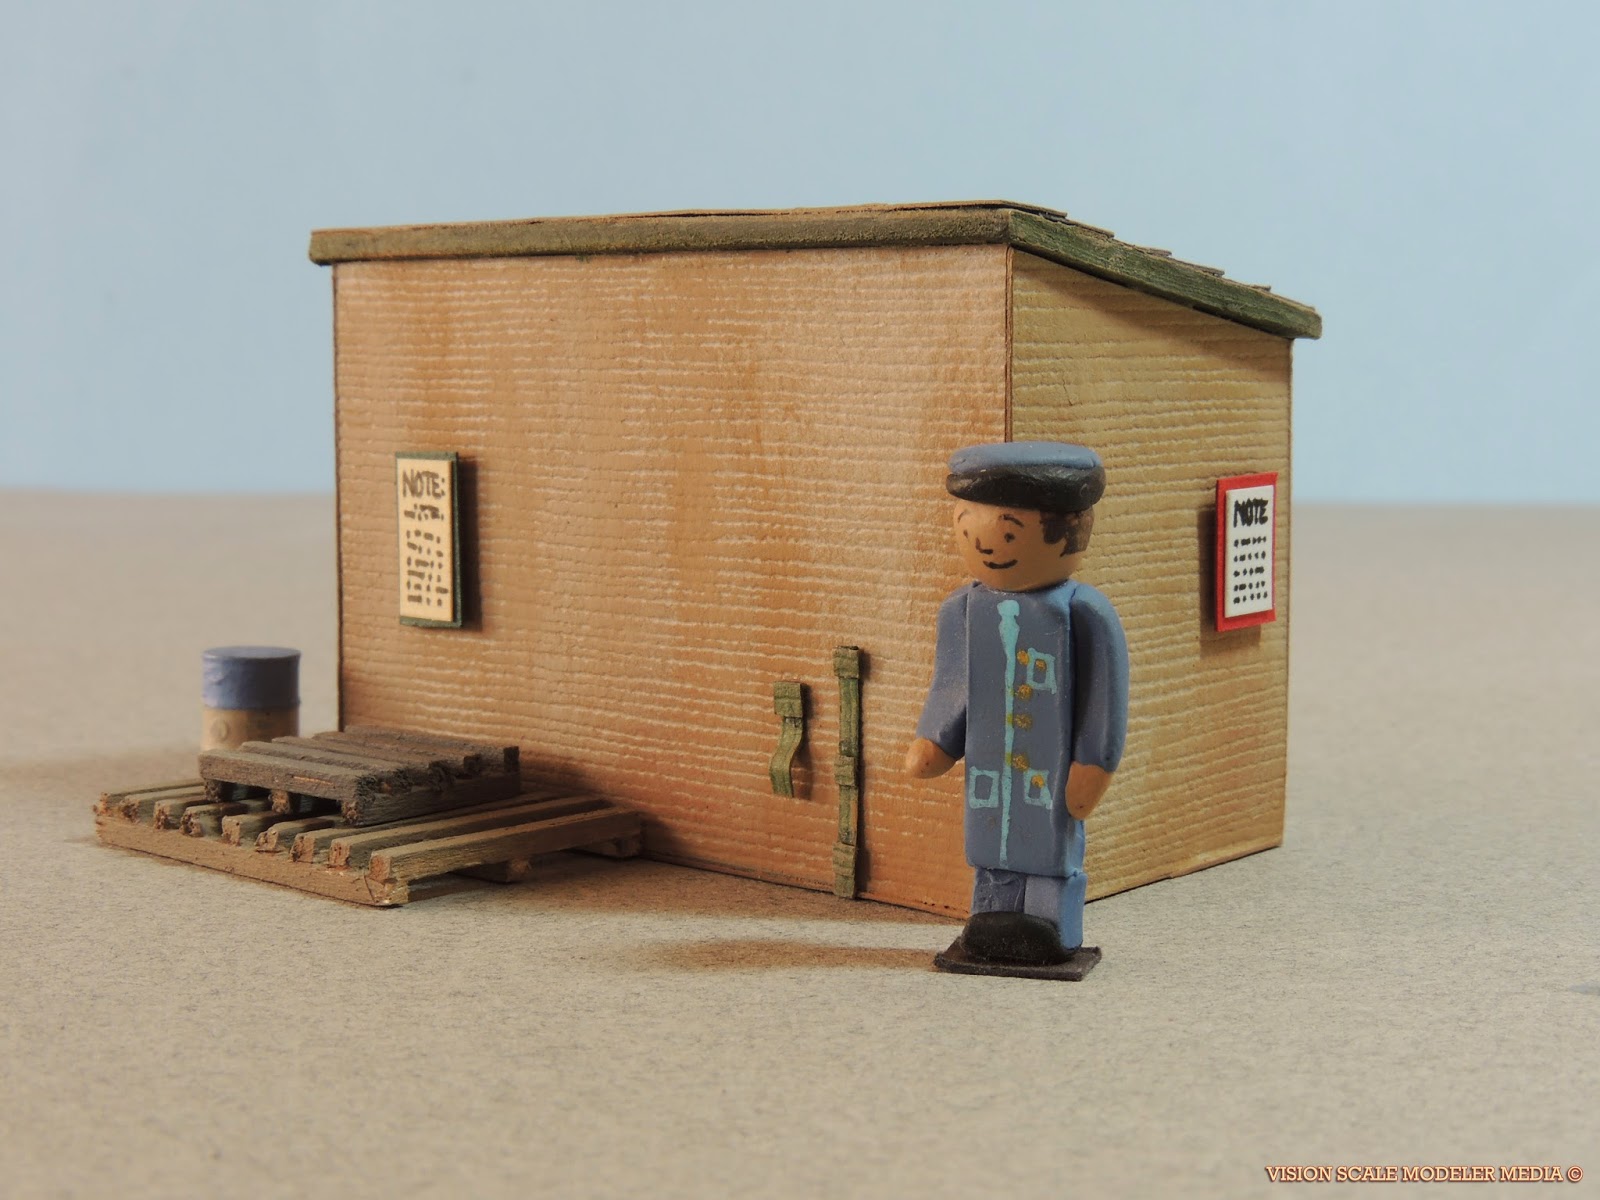
At the back there is a single window, and I thought it would look nicer if it had a door at the corner, with a simple little notice posted next to it. This would allow the signalman to access the levers and mechanics, operated by the controls inside the upper room, to throw the switches and change the signals.


Here I did give it the stair case it had in newer seasons, the steps wrapping itself facing one way to the other, away from the track. All of the steps and handrails were made from scratch, and glued together, using painted balsa and card-stock.
The drainpipes were also scratch-built using craft wire, primed and painted, and attached to the walls with strips of thin paper wrapped around them, which would represent the fasteners. I think I really am getting better using this technique, as I like it much better than just using paper! They were also bent using pliers.


The maintenance porch in front of the windows would allow the signalman to climb onto it, and walk alongside the windows to clean the glass. You can even see the handle on the side windowsill!


For the roof I used the same technique I used on Knapford Station's Goods Shed to add shingles, painted using Plaid FolkArt and Apple Barrel acrylics to weather the textured surface, as I did with the whole structure.


Before I glued the roof into place, I took this picture to reveal the inside of the cabin, with cabinets, a clock above the table, and a LED spotlight wired into place to light the interior.


I built this little diorama to show you how the completed signal box looks at night fully lit inside! Even though the spotlight made it look a little brighter, I am happy with the result. This would be great to film for "the Flying Kipper," "Edward's Exploit" or "Wrong Road" when Henry and Edward travel past it on their late night train journeys.


Finally here it is basking in the sun as it rises in the morning dusk, the cars ready and waiting for their engines.
Hornby Skaledale made a cast resin version of this signal box a few years back. Here is is with good pictures from eHattons. It is still available in online hobby stores, and what you could do is to paint and weather it, simply adding on the maintenance porch, but I did want to try scratch-building it myself for obvious reasons. This structure came out beautifully, and I think it is one of my new favorites!

One thing I hope to do in the future is to try and use plastic textured card from Evergreen Scale Models, and kit-bashing Peco's Wills or Ratio kits for making the surface of the buildings. They also have textured plastic sheets. I'd recommend modeling structures using these kits as they are easy to paint and glue together, and they make great models for different scenes on the layout. There are more kits from these two brands, so Google them, and definitely give them a try! It gives beginners an easy start in quality scale modeling.

Happy Model Railroading!

Tuesday, June 17, 2014

Blueprints: Wellsworth Station

Wellsworth is the town on Sodor known as the stopping point at Edward's station before tackling Gordon Hill. These are measured drawings for the station buildings measured to be constructed in HO/OO Scale.


The model set built for Wellsworth was one of the first stations to premiere in the TV series of Thomas and Friends, and one of the most remembered as Edward's home from the Railway Series, the starting point for his coastal branchline to the seas at Brendam Docks. This is one of my favorite stations, and a great choice for Hornby's Scaledale and possibly even for Bachmann's new range of cast resin structures for their Thomas range!

Researching from photographs and video clips, I thought I would measure out drawings to make  the station's structures from scratch. The building seen above is the first station building, with a ticket office and waiting room. It has two floors, with a storage room in one half of the first floor for luggage, baggage equipment, and mail.


This is drawn to scale in centimeters. I like using a steel ruler to draw each measurement on the building, from the window panes to the width of the walls, using a 0.7mm technical pencil, with a Col-Erase pencil from Prismacolor for rendering the textures and shadows.


Here is the second station building with a waiting room. David Mitton's modeling team used this building without the rain canopy to double as Ffarquar station on Thomas' branch line in the TV Series. This station including Wellsworth had white windows, doors and canopies, which in newer seasons have been repainted hunter green when the cast resin model was refurbished and painted for season 6 onwards. At the back of this building, piles of ties and lumber along with tools are stored, where the track runs behind the station to Edward's big freight yard.

Monday, June 16, 2014

Blueprints: Duncan, 16mm scale, V1

Here is Duncan drawn and measured for construction!


After I designed Rusty, I drew Duncan for another possible remake in his Railway Series design, with elements from his season 5 model in 16mm scale.

I really like this design, as Duncan was one of my favorite narrow gauge characters, Rusty included. Duncan has the larger cab and his big, low windows from his season 5 cab design on "Duncan Gets Spooked, 1998" as he did in his real prototype, Douglas, the engine from the Talyllyn Railway. Duncan will be painted and even weathered in his Railway Series livery, red with blue stripes. As he works at the mines and quarries as much as he pulls his weekly passenger trains, he might have grime and dust on his paintwork, weathered in acrylics and pastels.

As I did for Prince, I'm also going to make his coupling rods move as I have drawn them, and I have figured out a way to make the mechanics move right. Looking forward to that!

Over the past few days I have seen the latest picture of Duncan for his return to the Thomas show in CGI. He looks great, having his larger cab, with his season 4 windows! I'm guessing a decision to make his running board red is from the German designs from the Andrew Barklay well tanks, which have red wheels and undercarriages. Still, I think he looks cool, and I look forward to seeing him again on the show. Cool stuff!

Blueprints: Rusty, 16mm scale

While making some measured drawings for buildings and such, I wanted to return to Rusty. As I had made him a few times before he will need an upgrade for a new model, so I gave Rusty a try!


Since Rheneas, Skarloey and Sir Handel look really good in their Railway Series liveries, Rusty is designed based on how I think he could have looked with more detail, and in his charcoal black livery. Rusty is drawn in pencil, and measured in centimeters to scale. He is in 16mm scale for large scale narrow gauge.

I studied really nice photographs of diesels built by Ruston and Hornsby, and I mixed designs from seasons 4 and 5, with his square face I really like, and even some details I had found from his CGI model. But I also had fun adding other details from the real prototype, like handrails, bolts, his shock absorbers and brake gear on his chassis, some headlights, even a shiny big horn on his cab! Every diesel needs one of those...


Just for fun, I even tried an open-cab design. There are many diesels like Rusty with no cabs, just roofs. They even have seats for the driver, the type made from cast metal found on tractors. Maybe this could be how Rusty looked when he came out of the workshops! He could have shunted trucks and helped out with the workman in the shops like Victor before he came to Sodor, which could have built his young character early in his life for the Skarloey Railway.

When made, he will be constructed with Bazzill Basics card stock and braced in balsa, glued together using white glue, crazy glue and scotch tape for tough angles and bendable parts. He will also be painted and weathered with Plaid FolkArt and Apple Barrel acrylic paints.

I believe this will be a great project. When finished he will be able to have the engine doors on his side open and close, and all of the extra detail in the drawing made on his body shell. I'm sure he'll look grand when he runs!

Sunday, June 15, 2014

Bachmann Duck ~ Review

Well he's finally arrived! Duck and his crew have made it to be photographed on the workshop table ready for a long awaited review.


I purchased Duck this summer, and overall he looks really good and runs well. I really appreciate how Bachmann had reached out to the fans and modelers with their comments and feedback to make Duck as he looked in the classic series.


One of the first things I did was use Plaid FolkArt acrylic paint to kill the shine from the opening of Duck's cab entrance. Then I painted and weathered his undercarriage, wheels, and footplate as dust and grime, just to add an extra touch of realism.


Next I used my pack of craft wire for tubes that run along the side of the footplate seen on the prototype. Strips of paper were wrapped around the wire for the pipe's ribbons. I might come back and do more of this later, as I felt this to be a great idea to add extra detail to Duck and some of the other engines, like the approach I take with my large scale Skarloey models, to make the engines look more realistic.


Then on to the black buffer sockets! I painted Duck's whole buffer beam, and also added a weathered piece of Lego chain, as I did for the videos I made on set for the front of the locomotives.

For serious modelers out there, I recommend adding chain-link couplings on both ends. The fine scale model supplier Scale Link makes beautifully made packs of couplings that are sprung and therefore actually quite easy to assemble. I always wanted to be able to replace the E-Z couplers and change to more realistic couplers as fine scale modelers do with their realistically crafted stock. I would love to see anyone try this with the Bachmann Thomas models.

All you would have to do is to use a pair of pliers and probably a craft knife to remove the plastic couplers, and replace them with the chain link couplers, with some glue and a little hard-setting putty for a firm fit.


I was glad Bachmann added the whistle. Although there was a deleted scene that shows a two-tone whistle instead of one, this detail looks really good on the cab. So does on of the custom-made figures I made to be mounted on the side of the cab using clay!


I am really happy with how good Duck looks. He has always been one of my favorite characters from the show, and the Hornby Duck was the first electric locomotive I got back when I was a teenager. Duck had been long awaited to arrive to the Bachmann product line of Thomas stock, and Bachmann did not disappoint! Pretty soon Duck'll be busy shunting cars and pulling trains about the yard. So will the Scottish Twins, Diesel, and the other characters that came out.

As always, Keep On Modeling!

Saturday, June 14, 2014

"Slate Quarry," Walls & Sheds


So on my desk you can see a few new things I've arranged for you to see for today... including some wooden wagons I scratch-built from balsa wood for Prince's quarry train. They have the garden ballast I use for the large-scale Lego tracks for the Skarloey Railway.


This is one of two retaining walls, made from foam-core wrapped in Bazzill Basics cardstock, and painted with Plaid FolkArt and Apple Barrel acrylic paints. I also used balsa strips for the semi-columns and the cap running on top, with strips of thicker card folded over to give the illusion of individually placed blocks.


I was also in the middle of making an open-aired shed for this scale, so it could be in the slate quarry sidings and other scenes. It will have the A-frames and roof, shingled in card for the corrugated metal roof, and painted green and weathered.

Wednesday, March 19, 2014

Modeling the Prince: Part 3


Here he is! The Pride of the Ffestiniog and Welsh Highland Railway is finished... thought I'd upload some photos of the finished 16mm scale model, with a lot of detail and a few surprising features!


It was a lot of fun building this famous locomotive from scratch, and it feels exciting that I'm getting back to my model-making for my Junior Animation Seminar Stop Motion class project. It did take a little longer than expected, even with the heavy workload for my classes and other important obligations. Well today, the George England has pulled out of the workshops from the glory days of the Ffestiniog Railway's operations.


Since I published the photos of the cab interior, I gave it the roof it needed, finished his tender, and added a lot of other details, such as his number and name plates, bolts, his whistles, valve gear, and even working couplings.


Here are his working coupling rods! I have been hoping for a long time to have the rods of my scratch-built models actually work and move for my narrow gauge stock. I decided try and make them myself.
  1. I cut some disks of cardstock to make the wheels, with a lip and a center bolt
  2. I glued four of these onto the wheels of the Lego chassis, with spokes to place the rods, made from very thin cardstock tubes
  3. The coupling rods themselves are made from balsa and wooden barbecue skewers
  4. They have fasteners made from cardstock to allow the rods to be linked and slide smoothly together
  5. The sliders are toothpicks glued to the cylinders
  6. After they are assembled, they were painted using Medium Gray, Dove Grey, and a little weathering
After running the locomotive on the tracks for a while to loosen the parts, the movement was quite smooth, and the coupling rods work very well. They look so much more realistic compared to static mockups! I am very happy that they came out nicely.

In the first photo of this selection, you can see the Lego track ballasted using the Woodland Scenics Grey Ballast I have used for my HO scale dioramas, which does look very realistic, and I think it might be useful for the yard scenes.


Here you can see Prince's new smoke box, as I thought the first from a few years back looked too old. After gluing a strip of cardstock to make a ring, I glued it on a flat piece and cut when dry to make his door. Then some strips were placed for his door hinges, and for the door handle, I cut anther smaller ring with a few strips for the spokes, and the handle.

The coupling can be raised or lowered, and his lamps are replaceable. His water tank cap can be lifted too.


Prince's name-boards and number-boards were made, with strips of gold-colored cardstock glued for the edges. I wrote his letters using an EK Success Dual Tip Metallic Pen, which I recommend for writing gold calligraphy for nameplates or for any art project. It flows like a liquid, and after a bit of practice, it's really fun to use.


I mixed some colors to weather the body's tanks and cab, with grime, rust and dust, using Plaid FolkArt and Apple Barrel paints. His coat is Light Red Oxide, which I mixed with a few other colors for the weathering:
  1. Light Red Oxide and Terra Cotta was mixed with Dark Gray and Wrought Iron for the grime
  2. Calico Red was used for his buffer beams
  3. Honeycomb and Caramel Candy for dust

I decided to model Palmerson's smaller tender as I liked its narrow size. I folded strips of paper and cut the angles to glue for the angled trimmings. Here you can also see his rear lamp.


A few of the gauges on the firebox can be seen inside the back of the cab. I assembled a bumper, which in real life allowed the tender to glide smoothly without it bashing against the back as it moved.


Overall I am very happy with how Price has turned out. This scratch-built and Lego hybrid running system has evolved to something very special for me, which has allowed me to produce my model locomotives I always wanted to make and work with what I have. It feels great to see how far this has come since the Skarloey Railway models, and now I can also make my own railway rolling stock for some short film projects, since I really love the history of these little railways of Wales and their trains.

I also have made the bodies of my freight cars, and they need to be painted and detailed, so pictures of these will be published soon. Let me know what you think and feel free to drop a comment or question!

Enjoy the photographs, and happy modeling!