

Here he is, "Origin" Thomas! Based on the movie special "Adventure Begins" for the 70th anniversary of the Thomas and Friends franchise, this is the first HO Thomas project I tackled and finished this year, working on him for about a month. I hope you enjoy the gallery of photos above, and the step-by-step process of customizing him for your model!

This has to be one of the most anticipated new products Bachmann USA announced for Thomas collectors in 2020! This is a green version of Thomas designed after his appearance in the movie before he would be painted blue and the number 1 painted on his side. That's why 70 was chosen for his number on his bunker when it came out that year, and the LBSC stands for the London, Brighton and South Coast Railway which is where he came from. This is basically the "origin" livery recreated in HO scale, and I was very excited to customize him.
My goal with this project was to make green Thomas like a real model prop from the classic series as he appeared with the details he had in Season 1, but with the green origin livery and white stripes. Let's get started!
1) Unboxing


... Now to begin customizing!
2) Body Modifications

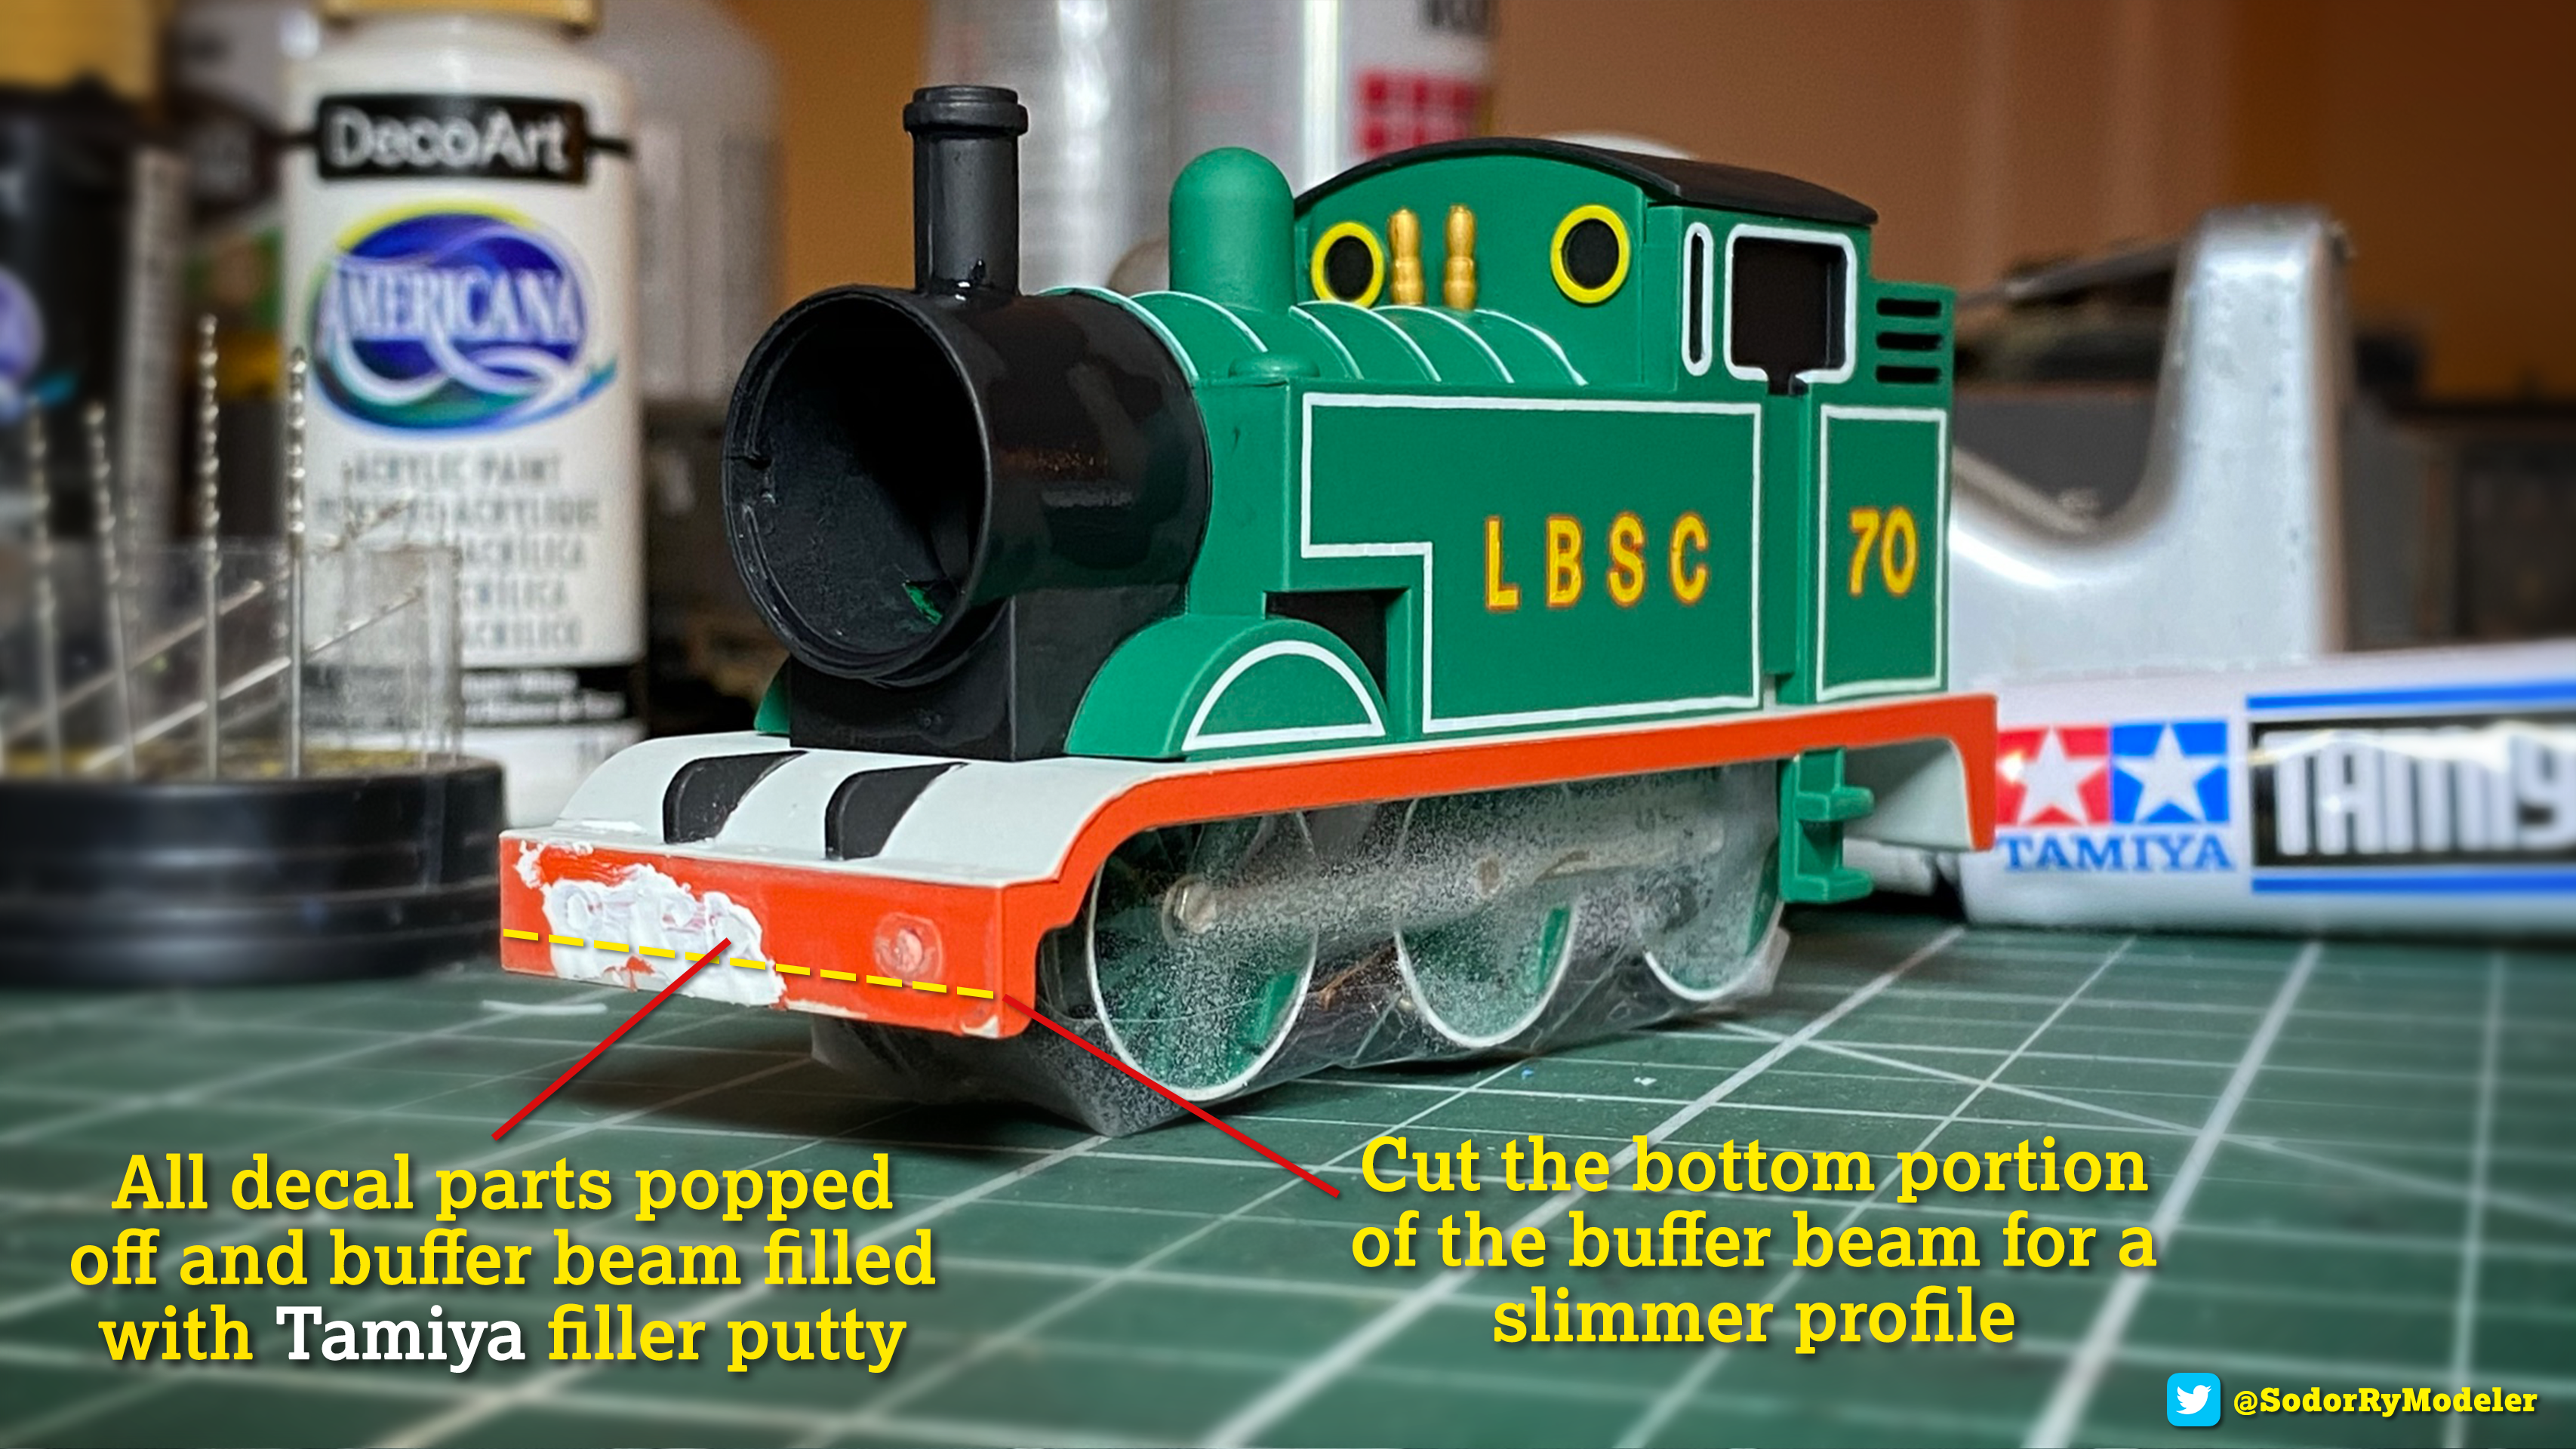
As I want to give Thomas new details, the first thing I did was take my batch of selected tools and take off all the parts from the front and back buffer beams, including buffers, the molded lights, lamp irons, brake pipes and couplings. I use a couple of different players to carefully remove them, then fill the holes up with Tamiya white filler putty.
Once it’s completely dry I take 300-500 grit sanding paper/stick to sand the buffer beams flat and smooth for painting later. I like to cut the front buffer beams of Thomas to make it a bit thinner, as it looks better and more accurate to his TV appearance. I first measure it with a pen/pencil, insert a long scribe across it with a hobby knife and follow up with an Atlas track knife. Be very careful to use a metal ruler or a straight edge! Once cut off, the bottom can be sanded smooth and painted with hobby/craft acrylics or masked for spray paint.

I've recently been trying out Tamiya's TS-80 Clear matte finish and I highly recommend it for the best results.
NOTE: Please spray outside or in a well ventilated area, with a mask, and make sure that there is a consistent temperature in the room of choice, not too hot or not too cold, as it will effect the spray application. Having good lighting also helps with drying. As the trim tape for the lining was glossy, I spray the model a very light first coat to help painting, apply the paint I want for the body shell, then once dry I add he glossy lining before a final coat. Weathering will come later!

Now on the back bunker, the lining is too high as it accommodated the
tail light in the upper part of the back, so I want to make it lower to
look closer to his TV appearance. After carefully removing it with
pliers I filled the hole with the filler putty and color matched
acrylics to paint over the filled area once dried and sanded. I add a
strip of new white lining from thinly cut strip of matte vinyl to stick
on top, then reposition the lamp where I want it to be.

It was a challenge to find a good mix of acrylic paint to color-match for this Thomas. I always mix my paints based on what I can find at the craft store that would work well for the project I'm working on, rarely am I able to manage to find a color straight out of one bottle vs. weathering colors. So I was able to paint touch-ups with any of these colors to get the right look down as I wanted.
- Tamyia - TS-80 Clear Flat Spray
- Tamiya - Modelers Putty
- Micro Mesh - Sanding Files
- FitGrip Hobby Knife - Set of 2
- Tweezer Set - 8-Piece
- Slim Line Precision - Pin Vise
- The Rogers - Drill Bit Set
- Crazy Glue
- DAS - Modeling Clay
- Hattons Real Coal - Medium Grade
- Woodland Scenics - White Scenic Glue
3) Details and Weathering

Now for faces and detailing! The TV accurate 3D printed faces are designed from friends Evan @cooldude7208 and Xavier @LightAndCoal on their Shapeways stores linked below! I use RustOleum "Chalked" spraypaint - Aged Gray to color them, then once completely dry I draw on the eyebrows using Faber-Castell ink pens. For the eyeballs they're 6mm white airsoft paint pellets from Amazon I secure in place with Blue Tak. The 2.4 mm pupils are made from glossy black vinyl sheets cut from a friend to peel and stick them on.
Sudrian Junction:
LightCoal Props:
Detailing Supplies:
- RustOleum "Chalked" - Aged Gray
- Americana Craft Acrylics - Gray Sky
- Americana Craft Acrylics - Cobblestone
- Americana Craft Acrylics - Titanium White
- Airsoft Pellets - 6mm
- Faber Castell - Ink Pen XS
- Faber Castell - Eraser
- Techical Pencil
- Blue Tak

I use 20 gauge craft wire from the craft store for brake pipes and lamp irons on the buffer beams. For he pipes I bend them around a screwdriver to make them curve and bend them with players to make their shape, using my spread to cut the excess off. I wrap the facets around the bottom where they'll fit on the model using strips of Sticky-Notes of all things, cut with a hobby knife and a steel ruler! I use Crazy Glue to secure the edge of one end and then once it sets, wrap the strip around the wire a few times until it makes a nice nub, then glue the end and cut excess with scissors. Be careful the glue doesn't get on your fingers! Once that's done, I stick them on a scrap piece of blue foam and spray all the parts matte black. Once dry, I drill a hole where I want to put them on the foot plate/buffer beam, and secure them with Crazy glue, although I might leave some fixed temporarily so I can fit a dummy lamp from Bachmann Branchline and rearrange them if I desire to.
I also add brass coach buffers I found by Roxey Moldings. They are generally hard to find, but I also recommend any of Markits brass engine buffers, or their plastic coach buffers as they look the exact same as the ones I use Thomas here. I spray-paint them red with RustOleum "Chalked" spraypaint - Farmhouse Red, then paint the front of the buffers black with acrylic.
- Roxey Mouldings - Coach Buffers
- Roxey Mouldings - Wagon Buffers
- 20 Gauge Craft Wire
- Sticky Notes
- Knipex - Needle Nose Pliers 6-1/4''

Now doesn't this look better? After I painted over the sanded putty with my acrylic mix, I stuck on the strip of white vinyl for the top lining, glued the tail light back on, and use Dave's Decals weathering powders to add the soot on top of the bunker, making it streak down the sides and on the number for extra realism!
For the couplings, I use Smiths from gaugemasterretail.com in the UK, for locomotives and some coaches I get the LP8 screw-links kit to assemble with my modeling tweezers. I have something like the metal tip from a fine tip paintbrush handy to bend the "hooped" parts, then squeeze them to the center piece to swivel freely. I use the same technique as I do with the lamp iron and brake pipes to snip the bottom and wrap the end with Sticky Note strips to glue on as the bottom weight.
You can also see where I cut out a slit to fit my Smiths LP8 screw link coupling kit in, as well as the red coupling mount made from plastic card you see below. The headlight is a Bachmann Branchline dummy lamp from the UK. I made the coupling bases from scratch with two cut squares of styrene, one larger than the other, and drilled two holes to cut out a slit with my hobby knife for the coupling to slide through once painted red, I recommend the ones Ian @IbroBro4 modeled for his Shapeways store.
- Smiths Screw Links - LP5A
- Smiths Screw Links - LP8 Kit
- Hornby - Spare Screw Link Couplings
- Ian's Coupling Bases
- RustOleum "Chalked" - Farmhouse Red
- Testor's - Black Flat Spray Enamel
- Dave's Decals - Weathering Powders
- Tamiya - Weathering Master #1
- Tamiya - Weathering Master #2
- Bachmann Branchline Dummy Lamps


I really enjoyed this project. I did not realize how much I would really like the green "origin" version of Thomas until Bachmann released it in this lovely color and how it turned out after customizing him. It's a very fresh take on such an iconic railway character most people recognize, and hearkens back to the first time he premiered on Television being adapted from the original books by the Rev. W. Awdry, and his 70th anniversary movie that gave him his "origin" color before being painted in his iconic blue and number 1. I will definitely include him in more pictures and tutorials in the future!
Thank you guys so much for reading! Let me know in the comments below if you have any questions about the process.
Happy model railroading!
No comments:
Post a Comment