Showing posts with label weathering. Show all posts

Thursday, January 9, 2014

Tool Sheds #2: Platelayers Hut


A newly completed plate-layer's hut at Tidmoth's Shunting Yards! This was a nice building to make, taking only a day to construct it and weather it, with a few nice accessories to share for this post.


For this tool shed, I wanted to make a building that could add interest in the yard. In addition to  experimenting more with my mix of brick colors, and adding a sloped gable-overhang to the shingled roof, I wanted to make some eye-catching details. In these pictures, I added posters on the sides, one for a notice and a timetable, each with cream paper and hunter green trim. I have them attached with rolled scotch tape so I could rearrange them.


I am especially happy with making these scratch-built fire buckets! At yards and stations, they are full of ether sand or water to put out fires or for other emergencies. I rolled a thin strip of card-stock around a brush handle and glued it to make the side of the bucket, then glued on a thin strip for the lip of the bucket, and the handles. I also glued it on a strip of paper and cut it for the base.


Two of the buckets are hung onto the wall of the shed with painted toothpick ends. One of the separate buckets on the ground has its handles down, and for the other bucket, its handle is up for these workmen to use! 


For this shed, those red buckets and signs add a nice spark of color that can be pleasing to look at on the layout, and these small details give buildings their own character and charm.


Until next time!

Thursday, January 2, 2014

Bachmann Mavis ~ Painting & Weathering

"Mavis purrs happily as she heads to Ffarquar Station, along Toby's Quarry Line, with her train of stone."


I remember how exited I was when Mavis came to the hobby shop! This was a picture I took for some clips of her on this section of the line, and below are some pics showing her weathered.
 

So for Mavis, I wanted to consider where she worked, at a quarry, which (surprise, surprise!) affects how she looks, as her paintwork has quarry dust, soot, oily patches, and rust. Here she will receive a "dusting" with dry-brush weatheringusing Plaid FolkArt and Apple Barrel acrylic paints, and maybe some powdered pastels scraped and gently brushed.


Here she is visiting the yards at Tidmoth, resting in the siding under spring sunshine.  Looks much better on set with good weathering!

Fish Van #1: 12 Ton Ventilated Van


For this post I thought I'd share pictures of one of many vans from Bachmann Branchline I painted and weathered as they would have from trains such as the Flying Kippar and other wagons in the yards of Knapford or Tidmoth.


This was one of the first I had purchased, and one of my favorites. It is gray, weathered in a dusty color, with a few hints of rust and grime.


My favorite part about this van is the vents on either end, and the detail in the rivets. I remember one being made for the Bachmann line of Thomas products, painted in nice colors and having the chassis molded from other wagons. Retail value was $25, this Bachmann Branchline at about $18.  I really appreciate Bachmann Branchline's attention to detail and realism in their wonderful models, which you can purchase much cheaper for excellent quality.

Thursday, June 27, 2013

Wagon Loads #1: Timber, Crates, & Machinery


A while ago now, I shared how to paint these flat cars from Bachmann Branchline to look how they might be on Sodor. Here, I will share the loads I made for them.

Freight cars look the more realistic when time and care is taken to weather them, as well as adding loads. It is exciting to make them yourself, and even when you buy them from the hobby shop, cargo looks much better when repainted and weathered too. Loads are important too.


Even in an empty wagon like this one, pastel and chalk dust brushed onto the plank boards inside the wagon gives us a clue that this car has carried coal, or quarry gravel, or what have you.


So here we go for the flat cars. These lumber piles are made from scratch by cutting lengths of balsa wood, and using Elmer's white glue to piece them together with the smaller supporting planks.


Using this technique, you can make loads of lumber for any car you want, using different lengths of balsa, more or less stacked together, and made into smaller sizes for vehicles and smaller cars, or really large sizes for bigger cars! The small load of pipes were made from spare cardboard tubes I found. Any spare part from your plastic kit you want to throw away can be a key element to add interest on your layout!


These crates are made from textured card-stock. I was inspired to create these from looking at Preiser spare parts and loads in my Walther's Catalog! It is amazing what you can create from what little you might have lying in the cupboards of your art studio or in your home! I made sure they were decorated with small stamped stencils drawn with pen, and small colored labels made from copy paper and bits of spare card. Some I made open with foam for packaging, or loaded with something like spare track pins as ties to display the load they carry on a dock or platform. It takes a little time, about a half and hour or so for me, but very easy to make.


Finally here are a cluster of covered machinery from Chooch Enterprises. Painting can enhance shadows and lighting effects in addition to wear and tear as well! I painted them using light gray acrylic, then lightly brushed them using the same paint mixed with white to bring out the folds of the tarp. I might also slam dunk them in a mixture of equal parts of water and india ink to enhance the shadow, and a little grime.

There's loads for you!

Monday, June 3, 2013

My Workbench

To keep interest going for my blog, I am going to post pictures and sketches of my old model railroad and some plans for future projects. I know that fans comment on how much they like the tests and sets I have made on my YouTube channel, so I hope you come and see my ideas and tips on a daily/weekly basis, and enjoy the pages you see and read!


Here is a picture I took of my work space in my room, for creating art for college and my scale modeling! You can see Sir Handel, a Knapford goods shed, some freshly painted freight cars, and other projects I have done for the past few years.

Pictured are also the common tools I use:
  • a cutting mat
  • pencils
  • craft knife and Atlas track knife
  • scissors
  • rulers and templates
  • Scotch tape, white glue and Crazy glue
  • acrylic paint
  • technical pencil and pencil lead
  • gel pens
  • pencil sharpener
 You can see the posts I have in order of my projects in the Workbench pages I have at the top of the blog panel, check them out to see the engines buildings and other cool stuff made!

More posts coming soon.

Tuesday, May 21, 2013

Flat Cars #1: Repainting Bachmann Flat Cars


A few years ago Bachmann Branchline made a rake of new flat cars, The prototype is from a more recent era, in the 80s and 90s, compared to the era Thomas and his friends worked in the 1930s and 1950s, but it was a great find, and I bought two to paint and weather.

I thought they needed some cleaning from dust and some fresh paint, and here I posted some pictures for progress.


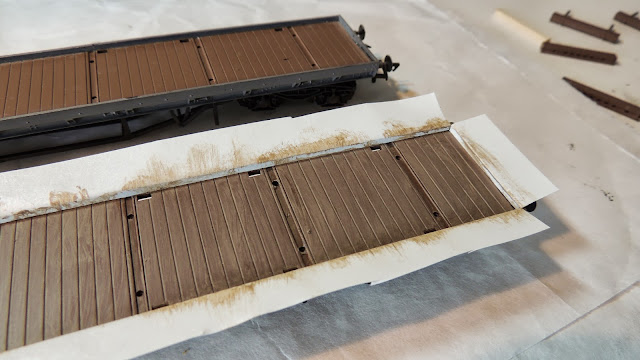
When I last painted them, the sides and the well were painted acrylic grey, the plastic brown of the wood for the flatbed masked with tape to be painted later. Then I painted the underframe and bogies black, then added a little grime and rust.

Still looks good, but the plastic wood needs to be painted to kill that plastic shine.


Here I masked the edges of the flatbed so I could start painting a mushroom color for the wood floor, pictured is the first coat with light paint strokes.


While the final coats were drying, I sprayed a grey matte to the flatbed supports which came with the package, then just dry-brushed the grey I used for the wagon's sides, and glued them into place.

They look much better with their new modifications, ready for some loads! Check out this post:

Wagon Loads #1: Timber, Crates, & Machinery   


Monday, May 20, 2013

Open Wagons #1: Weathering and Painting Tps

Here are some wagons to demonstrate the techniques I found helpful in adding a touch of realism to your roster of freight cars.

I try to be accurate as far as the Thomas show and the Railway Series, but I always look at any photographs I can find of real 7-plank open wagons, so I can have a better understanding as how to weather them. I think that is vital to achieving realism and believability for painting and weathering rolling stock.

So here we go:


Here is a wagon painted in the green paint scheme seen from Season 2 to the new seasons. I have used many wagons of Bachmann Trains' lineup of Thomas rolling stock, thought I found Bachmann Branchline being the best choice for rolling stock, twice the model quality and realism at a better price for the pound!


I use acrylic FolkArt paints to color and weather these cars. the main body is painted a dark green, with black for the bolts and underframe. Care was taken to paint the chains on the door, and add hints of rust and grime on the body and the parts.


Inside are ties, a large barrel and some spare wheels painted to look old and ready for the scrap yard.

This is the main color type for wagons found on the TV series, though there are many other wagons with different colors for the aging of the wood and debris from the loads they carry.


For this planned consist, this wagon is brown with plenty of dust and rust! I used a combination of acrylic and scraped pastel dust to weather this wagon. Many professional model railroaders use this technique for their models, and it was great to try it out for the first time, matte finish at hand!


 This car is heavily weathered, and I think the more variation of how each car is painted the better for achieving realism.


Inside the wagon in this photo are some spare parts and kits painted as wagon loads. Any scrap piece of leftovers from kit building is a must for added detail for any model railroad, very useful for scrap, cargo, and elements that add interest on your layout, as well as for freight cars.


Without the cargo, you can see here traces of soot and grime from coal dust on the boards in the wagon. a lot of black pastel was scraped and smeared with a finger and a brush.


For this wagon, I painted it in a gray-black, Great Western color scheme, full of ballast dust from the harbor or the quarry. This is a double-ended, 7-plank open wagon.


It took a few coats of the black with different shades of gray to get the look I want, with weathering colors such as nutmeg for rust, with a few dabs of paint on the bolts, and mushroom for the ballast.


In the wagon here are some weathered Lego chains, and a pile of fishing nets, made from scrap onion plastic casing! Primer spray paint and a little pastel powder is all that is needed to weather them.

I recommend purchasing Bachmann and Hornby items of ehattons.com, in great prices and great service.

There are many freight cars and coaches planned for remakes, to fill the yards and make extra train consists!