Showing posts with label Bachmann Branchline. Show all posts

Sunday, October 15, 2023

Project Showcase | Clarence the Fish Van

Meet Clarence, an old North Eastern van that carries fish on the Norramby Branchline east of Sodor, although he is known on occasion to be seen on fish trains around the island! He’s a character created by my good friend Mike @theburiedtruck. Here is a synopsis:

Clarence is a van who's been on Sir Topham Hatt's railway for quick some time, and his good nature has earned the engine's trust. He has a quick wit and is always willing to share a joke or a tall tale of the sea to keep up good spirits, even at the annoyance of others! He doesn't often get cross, but when he does he has a very good reason for it, either trucks that are too much of a hassle or engines who are not cooperative. Some of the crews joke he should be converted to be a brake van for being so resourseful keeping trucks in order! Clarence is never phased by other trucks who chatter, gossip and scheme to make all kinds of trouble to the engines, even when they make fun of him for being an old van! He takes it in his stride and it never bothers him, but always quick to put them in their place if pushed too far!

I like how endearing a character Clarence is. While Mike worked with Jake @Jje09 to visualize him in Blender, they kindly let me test how the faces looked in HO/OO scale! All based around the North Eastern van seen in the Thomas show. I'm excited to show you how I made him. Let's get started!

1) Scratch-Building the Van


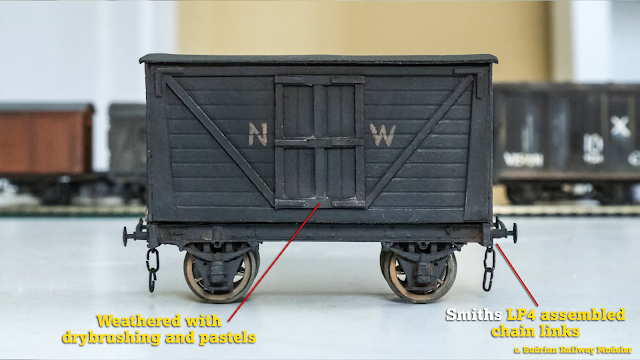
Back in 2018, I made a North Eastern van kit-bashed from a Bachmann Branchline wagon chassis as a base that I cut down with a track saw to make it shorter. The body is created using a rough pencil drawing as a guide, and I scratch-built the van body using JTT Scenery Products HO scale wood planking and strips of cardstock. I glued the sides together with strips of balsa wood, and used some thinner stripes for the brackets on each end. I found a back of cast metal wagon buffers from eBay UK I glued on a [ - shape styrene strips as buffer beams.


Once I installed the Smiths LP4 chain link couplings, I spray-painted the whole thing with RustOleum camo dark brown. The N E (North Eastern) lettering was replaced with N W to represent the North Western Railway. The final touches came with some light dry-brushing with earthy colored acrylics and scraped pastel powder, but I can recommend Tamiya Weathering Master kits or Dave's Decals weathering powders.

2) Character Design

 
Here is a render of Jake's custom 3D model in Blender! Jake worked with Mike to find the design he was looking for. He went for a very Sam Elliot look, with a pronounced forehead, thick, bushy eyebrows and a white mustache! He has an old but gentle sailor voice, similar to Willem Dafoe from The Lighthouse film by Robert Eggers. Jake captured his personality very nicely with his renders! Once the finalizing stage was complete, Jake handed the STL files over to Noah @The_lbsc_thomas to print the faces in resin and to scale to HO/OO.

We actually had to do this twice, because the first test batch of resin prints looked too thin. We tried another batch with thicker sides and the facial features were more defined with some adjustments Jake made to the faces. It gave the whole face so much more depth and the painting translated so much better on the faces!

3) Resin 3D Printing and Painting


I gave a light sanding and a thorough clean with warm water and dish soap using a tooth brush to get rid of any left over dust and artifacts left over from the printing process. Then I gave them two coats of RustOleum "chalked" aged gray, covering the corners and detailing and letting each layer dry thoroughly. I wanted to have the eye sockets hallowed out to use eyeballs, but I used a trick with Recollections' plastic adhsive faux pearls from the craft store, painted white with RustOleum "chalked" linen white spray-paint, and 2.2 mm pupils cut by my friend George @bowledout95! But how can I secure the eyeballs to the face and still allow me to have them positioned differently for shots?


I placed the pearls in the face, and glued them to a strip of cardstock! It's secured to the back of the face with blue tak, just like the face itself. I have a few of these with pupils applied with tweezers in different positions so I can use them in various eye directions for specific camera shots. This is a great option for those of you who would want faces on rolling stock with delicate parts or smoke box detail you don't want to take off but stick on for easy removal.


This way, it allows Clarence's faces to be placed on the van without drilling out an open section for the eyeballs to move around. I can place the face right on either end with a flat back, the blue tak used to secure the whole face snugly in place. I am very pleased how good the face looks on my van custom. It gives a classic van such a fresh appearance and a lot of character. The tail lamp is also resin printed by Noah and designed by Jamos @jamostrains!


Now for final decorating! I painted the open mouth and teeth using various acrylics, but for eyebrows, I tried cutting appropriately shaped eyebrows using spare flat white vinyl to apply in place with tweezers. This works so nicely and might have likely been done if these were made for a prop from the show! I like how effective this looks for the face and gives him an expressive appearance.

Above are the finished faces completely decorated and placed on the office table for this behind the scenes-inspired photo with all them together! I like how professional these look under the lighting.

4) Gallery


Here are a couple of shots of him on the layout and the modeling desk! I am very pleased how he turned out. His new faces look delightful on my van and he is a charming addition to my collection, especially for harbor and seaside dioramas! It was a pleasure to work with Mike, Jake and Noah to bring him to life. Maybe I will fix a working light for him to see in the dark when I run the trains at night!

Happy model railroading.

Thursday, September 15, 2016

Salt Wagon #1: Red

One of the salt wagons from the Thomas Show by Bachmann, as it looked in its Season 6 livery.


When I was little I used to call these "dog house" freight cars, as they have that peaked roof! I've seen great photos that have doors on the roofs as well for lowering blocks of ice, food crates, or china clay.

In addition to weathering using acrylics, scraped charcoal & pastels help with dust and coal effects. Then I finish with a clear matte spray, or leave it as it if it's just paint.

A very appealing wagon with good details and fun as always to give life for that extra touch of believable realism.

Wednesday, September 14, 2016

Fish Van #2: 12 Ton Plywood Vans

Those fish Vans! Henry's Flying Kipper had many ventilated vans like these. Of course weathering and fine painting would serve good stock like these, so here's a post to showcase the cars I've had for a while to make them look apart.


Bachmann branchline makes great vans, and back in 2007 I ordered a batch of the newest type with vents on each end, the 12 Ton BR plywood vans. Love to get more of these, especially the 12 Ton planked ventilated vans which can now be hard to find. Weathering gives such a good and believable appearance, so I had a go to give new life to these models.


For all my painting and weathering, I use FolkArt, Apple Barrel, and My Studio acrylics. Mixing  colors for the base coat comes first, then variations come in for dust, grime, ash, rust, and faded metal. Depends on what the wagon carries!


Vans 1 & 2 look more the same, painted in a BR Bauxite, one has more side vents than the other. These can be seen both in the Railway Series book illustrations and the classic television series, not quite the same type, but common on Britain's railway network.


This one is more faded, painted in a darker reddish oxide, faded down with a medium gray wash. Might have been exposed to more rain compared to the others!

Weathering is quite easy and takes practice to make good models look believable, research gathering, a lot of reading and a lot of doing!

Vans are some of my favorite wagons, mainly I think because of the Henry's Flying Kipper. So many variations of style and design, a great addition to your layout

Happy Modeling!

Thursday, January 2, 2014

Fish Van #1: 12 Ton Ventilated Van


For this post I thought I'd share pictures of one of many vans from Bachmann Branchline I painted and weathered as they would have from trains such as the Flying Kippar and other wagons in the yards of Knapford or Tidmoth.


This was one of the first I had purchased, and one of my favorites. It is gray, weathered in a dusty color, with a few hints of rust and grime.


My favorite part about this van is the vents on either end, and the detail in the rivets. I remember one being made for the Bachmann line of Thomas products, painted in nice colors and having the chassis molded from other wagons. Retail value was $25, this Bachmann Branchline at about $18.  I really appreciate Bachmann Branchline's attention to detail and realism in their wonderful models, which you can purchase much cheaper for excellent quality.

Tuesday, May 21, 2013

Flat Cars #1: Repainting Bachmann Flat Cars


A few years ago Bachmann Branchline made a rake of new flat cars, The prototype is from a more recent era, in the 80s and 90s, compared to the era Thomas and his friends worked in the 1930s and 1950s, but it was a great find, and I bought two to paint and weather.

I thought they needed some cleaning from dust and some fresh paint, and here I posted some pictures for progress.


When I last painted them, the sides and the well were painted acrylic grey, the plastic brown of the wood for the flatbed masked with tape to be painted later. Then I painted the underframe and bogies black, then added a little grime and rust.

Still looks good, but the plastic wood needs to be painted to kill that plastic shine.


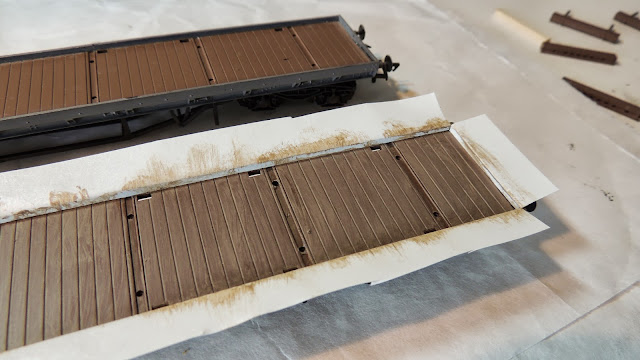
Here I masked the edges of the flatbed so I could start painting a mushroom color for the wood floor, pictured is the first coat with light paint strokes.


While the final coats were drying, I sprayed a grey matte to the flatbed supports which came with the package, then just dry-brushed the grey I used for the wagon's sides, and glued them into place.

They look much better with their new modifications, ready for some loads! Check out this post:

Wagon Loads #1: Timber, Crates, & Machinery   


Monday, May 20, 2013

Open Wagons #1: Weathering and Painting Tps

Here are some wagons to demonstrate the techniques I found helpful in adding a touch of realism to your roster of freight cars.

I try to be accurate as far as the Thomas show and the Railway Series, but I always look at any photographs I can find of real 7-plank open wagons, so I can have a better understanding as how to weather them. I think that is vital to achieving realism and believability for painting and weathering rolling stock.

So here we go:


Here is a wagon painted in the green paint scheme seen from Season 2 to the new seasons. I have used many wagons of Bachmann Trains' lineup of Thomas rolling stock, thought I found Bachmann Branchline being the best choice for rolling stock, twice the model quality and realism at a better price for the pound!


I use acrylic FolkArt paints to color and weather these cars. the main body is painted a dark green, with black for the bolts and underframe. Care was taken to paint the chains on the door, and add hints of rust and grime on the body and the parts.


Inside are ties, a large barrel and some spare wheels painted to look old and ready for the scrap yard.

This is the main color type for wagons found on the TV series, though there are many other wagons with different colors for the aging of the wood and debris from the loads they carry.


For this planned consist, this wagon is brown with plenty of dust and rust! I used a combination of acrylic and scraped pastel dust to weather this wagon. Many professional model railroaders use this technique for their models, and it was great to try it out for the first time, matte finish at hand!


 This car is heavily weathered, and I think the more variation of how each car is painted the better for achieving realism.


Inside the wagon in this photo are some spare parts and kits painted as wagon loads. Any scrap piece of leftovers from kit building is a must for added detail for any model railroad, very useful for scrap, cargo, and elements that add interest on your layout, as well as for freight cars.


Without the cargo, you can see here traces of soot and grime from coal dust on the boards in the wagon. a lot of black pastel was scraped and smeared with a finger and a brush.


For this wagon, I painted it in a gray-black, Great Western color scheme, full of ballast dust from the harbor or the quarry. This is a double-ended, 7-plank open wagon.


It took a few coats of the black with different shades of gray to get the look I want, with weathering colors such as nutmeg for rust, with a few dabs of paint on the bolts, and mushroom for the ballast.


In the wagon here are some weathered Lego chains, and a pile of fishing nets, made from scrap onion plastic casing! Primer spray paint and a little pastel powder is all that is needed to weather them.

I recommend purchasing Bachmann and Hornby items of ehattons.com, in great prices and great service.

There are many freight cars and coaches planned for remakes, to fill the yards and make extra train consists!

Friday, April 12, 2013

Cattle Wagon #1: Weathering

This is Bachmann's cattle wagon painted and weathered using acrylics.
One of my favorite railways is the Great Western (I think it's because of Duck!), and I like to study their handsome engines and freight cars. Their dark gray cattle wagons became almost completely white because of the heavy exposure to the elements in main line running!

If there is one feature about cattle cars on the main lines, which have traveled vast distances, it is the dust and grime they pick up from the ballast on the tracks, plus the occasional spots and kinks of rust and dust! Even if you're painting wagons for a layout of a real railway, whimsically themed, even for Thomas, I believe it is so important to consider how the rolling stock appear based on being effected by their environment, times and seasons, and the era in which the layout is based.

I use FolkArt Acrylic Paints, which have been useful for me to paint rolling stock. I first repaint the car's underframe black, the body a dark brown, and the rook a medium grey. then I dry-brush my weathering colors. I work from dark to light, first a nutmeg color for dust, then terracotta for rust.


After giving the characteristic "dusting" with a light tan-shaded color, I added the rust color to the bars, metal plates and bolts. I do the same lightly with the underframe.


On each end, there is some rust on the metal pieces as well, and on the buffers. Even with the bulky couplers, I'd say the model looks pretty good eh? This is one out of four I have for the "Cows" episode that Edward pulls.


Here is Edward with his cars on the main line. I still need to get one more to weather, which is the one that is mostly brown with a darker roof that gets left behind! See another photograph of the finished scene I made posted on the bottom of my second post...

Anyway, studying from photographs and some reading can make a huge difference in how you paint, especially wagons.

Happy Modelling!