Sunday, May 14, 2017

Sudrian Narrow Gauge | Rolling Stock

A gallery of my select scratch-built models of characters and rolling stock from Thomas & Friends, with a list of links showcasing each model and the process of making each one:


LOCOMOTIVES:


Skarloey Railway №1 | 0-4-2ST | Fletcher, Jennings & Co. | 1865


Skarloey Railway №2 | | 0-4-0WT | Fletcher, Jennings & Co. | 1865

 Process Gallery »


Skarloey Railway №5 | Ruston & Hornsby | 1941

 Process Gallery »


Skarloey Railway №6 | 0-4-0WT | Andrew Barclay Sons & Co. | 1918

 Process Gallery »
 

Ex. Ulfstead Railway and Mining Co. №1 | 0-4-2ST | Falcon & Hughes Engine Works | ca. 1878


ROLLING STOCK:


Skarloey Railway Guards Van | Passenger & Goods


Skarloey Railway | Slate Cars | Type 1


Skarloey Railway | Open Wagons | Type 1

Process Gallery »


Skarloey Railway | Open Wagons | Type 2

Process Gallery » 


Skarloey Railway | Flatbeds | Type 1

Process Gallery »


THANK YOU

You can follow my work from this hobby on social media through these platforms:

Twitter | SodorRyModeler
Follow for live updates and process.

YouTube | SudrianRailwayModeler
 Watch and subscribe for model reels, effects, and remakes

Blogger | Sodor Model Railroading
Process blog

PayPal.me | Tip Jar 
Consider a donation of any amount to support ongoing projects

Scratch-Built Open Wagons | 16mm Scale | #2

For this blog post, I'll be sharing some of the first batches of wooden open wagons I made out of balsa, and are each equipped with moving parts.


These are loosely based on small wagons of Gn15 miniature gauge rolling stock found on railways like the Ravenglass & Eskdale Railway, specifically used to carry coal for the locomotives or either spare ballast and sand from the local quarries. This batch was fun to make, and can be seen on many industrial sites on any industrial narrow gauge site.


After painting and weathering in acrylics, these wagons having their final details fitted, including working craft wire couplings and chains, and here are being tested with coal made from fish tank ballast.


They also feature working brake handles, made from rolled strips of cardstock rolled for a snug fit and glued, and a balsa grip. The bolts are from peelable craft gems sprayed in primer and blended in with the paint while weathering.


Having being assembled for a strong bond with white glue, these cars can hold any load easily, and are ready for the next train on the diorama!

Scratch-Built Open Wagons | 16mm Scale | #1


After making the first batch of slate cars, I wanted to try out a rake of open wagons of the Skarloey Railway, made entirely from balsa wood. Here's how they turned out!


Making rolling stock out of real wood makes a difference in texture and quality, compared to paper or plastic styrene. It serves as the basis of my newest freight cars, but being able to make real planked open wagons is really fun and quite satisfying.


On the workbench are three wagons being glued and assembled together. After cutting the measured parts, I glued them together with white glue for a strong bond, and left to dry. Details include bolts made from peel able craft gems, axle bearings made from balsa and card, and a planked floor as well as the sides.

 
After giving the model a spray of primer, I began painting and weathering each wagon in select colors, starting with the base coat for select parts to be dry-brushed with elements of the cargo it carries, dust, coal etc. as well as some bits of rust.


At last they're ready for the layout! They all feature working couplings made from bent craft wire, drilled into the buffer beam and secured with glue, and equipped with chains for pulling. I carefully measure how they're mounted so they give enough space between the cars to work on tight curves.

Because of the strength from the gluing, these cars can hold any load easily, and when a longer train of these gets too heavy, there can be a double-heading or a banker to help the lead engine!

Scratch-Built Flatbeds | 16mm Scale

Making wooden wagons out of balsa creates unique cars with wood grain texture. Flatbeds with boarded tops display wood that's exposed to spills, dust, and stains from the cargo they carry. Here's progress I made on two I experimented making:


Often found in Welsh quarries to carry large boulders and rocks, and used to carry cargo in yards and on the waterfront, flat cars or skips are a common wagon and are quite easy to build in large quantities.


Just fresh from being painted and weathered, these cars sport bolts that hold the frame together, working couplings, and printed labels designed from Adobe illustrator as name plates for the railway they serve and their numbers.

All the wooden parts are glued together with White Glue, with Crazy Glue for the detail parts like the craft wire couplings drilled into the buffer beams.


I blended various natural colors of acrylics to create wood stains, sometimes using water to distribute darker pigments across specific boards, often using a paper towel handy to pick up excess water as it spreads.


I did the same thing for scrap pieces of balsa and driftwood in addition to pieces of cargo especially made for these cars to fit on for the diorama. They can carry rocks easily with their sturdy construction. A wound piece of rope to tie them down adds a finishing touch with the spare boards to cushion the load.


 These are fun and easy to make, and make a great way to display your cargo on any industrial set.


The Power of Visual Storytelling

As an artist, I'm constantly learning about the ways to make a lasting impression with stories, and even when it comes to something like a hobby to make videos with, I believe there's something to be said on focusing on having fun and making something you love, and how it can affect others.


For some projects, I've wanted to make a period piece to generate effects of an old camera of film taken "on location," like train-spotting these classic Thomas and Friends characters in a way that is nostalgic and timeless. It can be very easy to get carried away with the technology instead of tailoring that to focus on telling a story through the images. A question I often ask myself is:

"What good are all these effects if they don't do anything to make me or the audience feel connected to the story I'm telling?" 

This is something that inspires me in creating better content in a way that resonates with people. Including something as seemingly simple as a compilation of favorite footage showcasing locomotives at various locations, it takes a long time to make the working locomotives, the props, and sets to make these. Projects like this still have to show in the sequence of shots an intentional balance to give a captivating experience and have meaning to what you're making. As an artistic creator and a visual storyteller by profession, I find I produce work that's stronger when I think about these things, even when it comes to my hobby! :)

A perfect example is Skarloey traveling through the countryside in my newest video. In the middle, we get a chance to see what the railway looks like in different seasons, the good times and the bad times, and where the engine characters are going on their journies. Skarloey is first shown at the end of a warm summer with warm color grading in the footage, with a full train from the quarry. The next scene we cut to a wet, foggy day, when Skarloey puffs by the camera looking very sad and pulling a long empty train. It's obviously a very sad moment in his railway's history.

This is a moment where I believe color grading and the effect serve a strong purpose. First clip, it's bright and sunny, the atmosphere of the valley is very warm and happy. The next, there's heavy fog, with cold and dark colors, and it feels depressing, sad, and dreary. These are elements of storytelling that make us care for the character, allowing us a chance to empathize, getting us to feel the way the character feels. We want to root for him and that he succeeds somehow.


But then we cut to the next few clips to end the sequence, and as Skarloey reaches the top of a steep track, the sun fills the valley again, and he feels much better and happy again. Even when times get hard, there are moments that give you joy and peace to encourage you to carry on, and to move forward toward your goal. The point is, you show the viewer what you're working to communicate through the visuals, the sounds, and the music.

Speaking as a fan, Thomas and Friends have been a prime example that captures these values so well. It has inspired me in my professional art career to strive for excellence in the craft of making good stories, that make you feel, that move you, and maybe inspire.

This is a first for me writing down ideas as like a journal essay dissecting an element of filmmaking for a railway hobby or children's programming, but I really enjoyed writing it down! These are some of the many things I think about that's helped me with projects like this, and I hope it does for you too.


If you want to see these models in motion on these sets, you can watch my newest video compilation made especially for them on my YouTube Channel.


THANK YOU

You can follow my work from this hobby on social media through these platforms:

Twitter | SodorRyModeler
Follow for live updates and process.

YouTube | SudrianRailwayModeler
 Watch and subscribe for model reels, effects, and remakes

Blogger | Sodor Model Railroading
Process blog

Saturday, May 13, 2017

Designing Headboards | 16mm scale

On many railways, locomotives sport headboards for special events and occasions, and for today's blog post, here are some photos of new ones I wanted to try for my customs.


I always thought it'd be really nice for engines on the Island of Sodor to have headboard designs for special moments in their stories, and there are many possibles, like for their narrow gauge trains! For the Skarloey Railway, I came up with some ideas to practice making prototypical and freelance designs.

Each one is designed in Adobe Illustrator, and printed on premium matte paper. After cutting the excess with a model knife and scissors, I use a marker that matches the edge of the board, adding color to the white paper color, and then glue them to thick black card. I have an extra strip bent to fit the lamp iron and glue, which allows me to fix on the headboard snugly in place.


Duncan sure feels proud to wear this head board! It's based on many of his fellow Andrew Barclay well tanks and his Orenstein & Koppel cousins from Britain and around the world wear. It's a simple one with a black fill and yellow text, which compliments the number boards I added to the steam locomotives on this railway.


Some of these headboards have fanciful designs that I was inspired to come up with. This one displays a local mountain forestry further inland, with a dark green base color and text in yellow and orange.


This board displays the wharf at the bottom of the line, with a blue base, cream text, and orange boarders, some of my favorite colors.

Rheneas is at the quarry with Cora. His driver and fireman are getting him ready to go back to the waterfront with a loaded slate train to be loaded on a mainland trawler.


On their journeys, the engines can use these headboards to bring awareness to the public their railway, a local business or industry, or any event. Here Skarloey hauls a slate train through the open countryside, proudly sporting one of his railway's headboards.


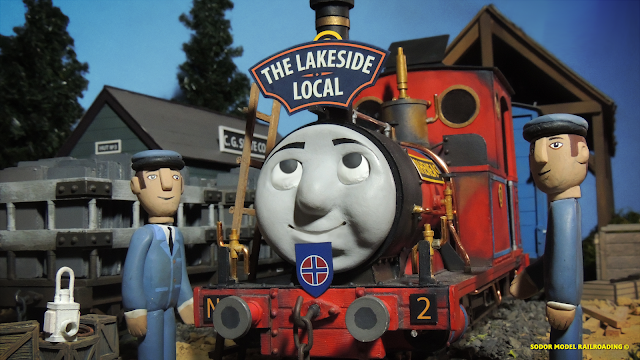
For this one, Rheneas is about to start his day with the morning passenger train, and this board displays one dedicated to the train of it's name. He also has the Skarloey Railway badge on a crest mounted above his buffers. He feels quite elaborate for the occasion, starting the summer season!

This was a fun project. I would like to try some more prototypical colors, and even make some in HO/OO scale.

Until next time!

Friday, May 12, 2017

Tool Sheds | 16mm scale

Recently I've been experimenting with paper to create new ways of making textured walls for wooden buildings. With some layering and painting, you can make some pleasing results.


I have slowly begun building a range of new highly detail structures to use in the foreground sets of my narrow gauge diorama sets. Tool sheds have been a good way to practice making smaller structures that take less time to make, but are useful to learn new ways of modeling textures for many types of structures. As a result of making these, they help divide areas in the layout to direct attention and build interest in different parts of a set to photograph or film.

This tool shed first appeared in the shots of an episode of Thomas and Fiends in season 5. I often collect frame stills to use as reference guides to help with construction.


This helps me to measure out the proportions of a building I plan to make. Then I draw them out on the base material to cut.


First, I start with the door. I decide what size it is to be made, based on the type of balsa wood I use to construct it, and what style looks right for the structure I'm making. I make the door handles so they can turn to make it look the way it does when open or closed, mounted on a piece of balsa for the handle bracket mount. Doors also can be opened with either strips of thick card glued in place for the door to bend, or make door hinges out of craft wire and strips of glued paper.


I use foam core to provide a thick base for the building's construction of the walls. For wooden buildings, I begin lightly drawing the boards I want to clap in place with glue, then I measure and cut the doorway to mount and glue the door in place. The same technique I apply to mount the hand-built windows.


Now begins the lengthy process of adding the wood planks. I love using Bazzil Basics textured cardstock, cut in length with a craft knife or scissors. It doesn't matter at this stage what color the paper is, as the surface will be painted and weathered later.

Right now it looks quite colorful with the materials ready for painting!


To begin, I usually start with a primer base coat, sprayed on to dry. Then I paint the interior a light tan color. When I want to light the interiors, I want the inside of appropriate structures bright, so the light can bounce the light and make it brighter from the inside.

Then I begin applying layers of the building's main color scheme, and after those layers dry, I paint the trim. the long tool shed one on the right has a dark red-brown color, and later I painted the smaller one on the right a darker variation of hunter green.


After the paint dries thoroughly, I begin adding details. I use glossy transparent plastic sheets cut so it fits snugly in place of the window frame in the back, with a piece of card added for a curtain.

Now I make the roof. to create the illusion of a corrugated metal, I use specially made chipboard manufactured like cardboard, which I cut into strips and glue in place to be painted later.


Now the fun part! I blend the base color in different shades to give some variety look faded or give it a worn appearance. Next, comes dry brushing earth-toned colors for weathering, in rust, dirt, grime or dust colors.

A final touch is a batch of signs that can be mounted on for the set! I design my own in Adobe Illustrator or use free downloadable signs from the internet. They are then mounted and glued on thick card. For some signs seen at stations and yards, I cut thin strips of balsa, which I paint to make the border.


Other signs include shed numbers, yard notices, no smoking signs, bulletins, and posters, all in many different colors. Signs reflect the era and the location of these structures and the sets they give life to.

Now they're ready for the layout!

Happy Modelling!